


About
An awesome ans simple technique to customize your threads, just cut out and iron on.
I picked up this fantastic black jacket at Jennyfers a couple of weeks back for 10 bucks, and it was just screaming “customize me”. So I found this great blue sparkely heat transfer vinyl fabric that you can cut out and iron onto any fabric, so I thought I would create a custom crest on the back of my new jacket with it. I picked it up at a local craft store, you can visit the website at www.ki-sign.com to find the same product, and you can also pick some up at an american etsy shop called ” TMTUSA” that carries the glitter transfer at the same price I paid for it and they ship at a good price.
It’s actually not such a difficult diy but it will require a bit of time to cut out your pattern. So I recommend that you sit yourself down in front of the tv and watch a couple shows while you work. I watched about 3 shows of Full throttle salon to get through all of the letters and the skull.
This is a fun project to make for yourself or maybe for a gift, but I would not recommend using this technique to make stuff for sale, the vinyl will need to be reironed again after a some wear. I have some sweat pants I made a month ago and the letters are peeling in the corners and need to be reironed, it’s just the nature of the vinyl. You would need a really industrial strength iron to permanatly set the vinyl to the fabric. This technique is best placed on parts of the clothes that is not going to be stretched to strongly. And just wash your clothes like you normally would, you don’t have to do anything special. But I hang my clothes to dry so I don’t know what effects the dryer has on the vinyl
Tags
-
 Victoria L. favorited Customized Jacket Diy
01 Jan 13:50
Victoria L. favorited Customized Jacket Diy
01 Jan 13:50
-
 Jillian H. favorited Customized Jacket Diy
11 Jul 01:15
Jillian H. favorited Customized Jacket Diy
11 Jul 01:15
-
 Stephanie N. favorited Customized Jacket Diy
31 Jan 11:48
Stephanie N. favorited Customized Jacket Diy
31 Jan 11:48
-
 Alisa B. favorited Customized Jacket Diy
21 Sep 17:50
Alisa B. favorited Customized Jacket Diy
21 Sep 17:50
-
Kat V. favorited Customized Jacket Diy
04 Jan 03:29
-
Kays K. favorited Customized Jacket Diy
17 Nov 23:51
-
 Valerie R. favorited Customized Jacket Diy
01 Jul 18:55
Valerie R. favorited Customized Jacket Diy
01 Jul 18:55
-
 Tawdry T. favorited Customized Jacket Diy
28 Jun 09:16
Tawdry T. favorited Customized Jacket Diy
28 Jun 09:16
-
gigglin' goddess favorited Customized Jacket Diy
28 May 20:44
-
Annika G. favorited Customized Jacket Diy
16 May 15:37
-
 Step 1
Choose your item you would like to customize. Here’s an image of what the back of my jacket looked like before I got started.
-
 Step 2
Assemble together all the materials you’ll be needing, a cutting board, tape, an exacto knife, extra blades ( you’ll need to keep your blades sharp to have a precise cut, you’ll have to change them at least once or twice), and scissors.
-
 Step 3
Purchase some vinyl heat transfer sheets, I used just one color in my design because I wanted a monotone design, but you can get creative and mix and match how you like. It took me approx 3 sheets to complete my jacket, one for the lettering and two for the skull. You can purchase a similar product online on etsy just type in "Vinyl glitter sheets" or search for the shop names "TMTUSA".
-
 Step 4
Measure out the proportions of your jacket and estimate the area for you to design in. I used a 45cm square to work in on my computer and made sure not to put any information in the top corners, my design was circular so it worked out fine. But if you want to fill in the entire back or create a custom shape make sure to make your work space exact on your computer.
For the font I used Old English and I create my template to scale in photoshop, if you don’t have photoshop you can download gimp, it’s a program that works the same as photoshop.
Leave a border around your work area, if you design doesn’t touch the edge this will give a more professional finish . -
 Step 5
Save your document as a .pdf file, and then open and print in Adobe Acrobat. Set your print to “Tile pages” and your document will print to scale.
-
 Step 6
Cut out your design approx. 3mm all around each letter. Keep all pieces together in groups, this is important, because you may have a few of the same letters, like 3 E’s, and they probably look a little different in each word.
-
 Step 7
If you have any letters that got printed in halfs, cut off the extra paper and tape together.
-
 Step 8
Make sure to keep all the letters for each word in seperate piles to not confuse them.
-
 Step 9
Place the letters of the vinyl glitter sheets, you may need to tape them down with clear tape to stop the paper from moving around. Now start cutting out each piece, taking your time to be precise and changing the blade when ever it gets dull.
-
 Step 10
Try to cut out your pieces in one piece, if you have any parts that are made up of more than one piece either, join it together and cut them out in one piece (like I did with the letters, you can see with this font the letters are made of 2-3 seperate parts, so I just joined them and cut it out as one piece) or set the extra little parts aside with the coordinating vinyl underneath. So that you can match up the shapes at the end and cut out each little piece one at a time and iron them on.
-
 Step 11
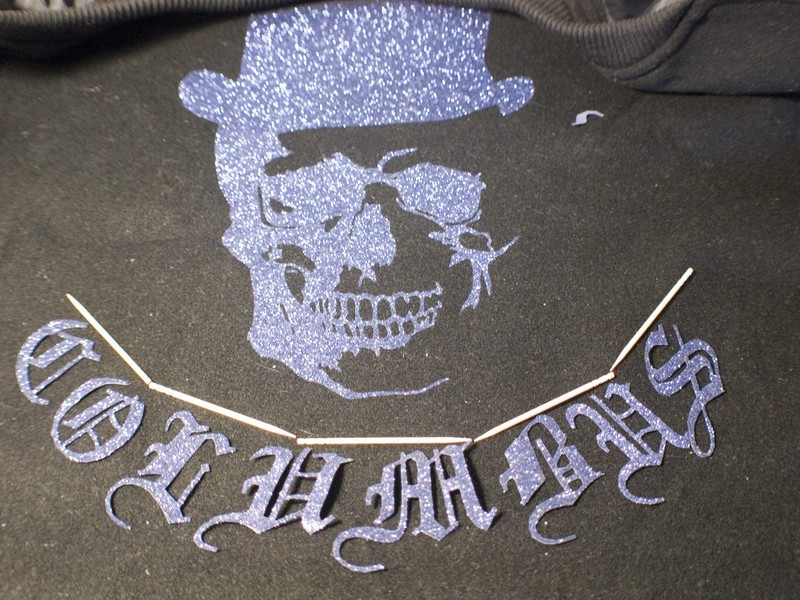
Carefully place all of you pieces onto the jacket in the correct places. Take the time to make sure things are straight and not leaning to the side. When you iron them on start from the center and work out, this will help keep them centered and proportionate. If you don’t want to use the plastic sheet that came with the package, you can also use baking paper ( parchment paper not waxed paper) or a clean piece of cotton fabric like I did.
I put all my peices down and figured out excactly how the skull should be placed then I removed the letters and ironed on the skull. Then I placed the bottom letters down again and ironed them on, and then I placed the top letters down and ironed them on. You can see I used toothpics to see if my arc was symetrical on both sides in relationship to the center image, if not my lettering would probably have drooped down on the right. -
 Step 12
Now cut out any of the random little shapes one at a time, not all at once or else you’ll mix them up, and place them onto your design in the right spot and iron them down.
Here you can see the final design but I haven’t gone in and added the extra little pieces yet. -
 Step 13
And here you go, your custom piece is all done and now you can put it on and wear it.


Comments


