


About
Your sniffles will be stylish with this cute and easy tissue pouch
Downloads
- RM_TissueHolderPattern.pdf 120 KB [ Download ]
-
 Diane M. favorited Curvy Tissue Holder
26 Apr 15:08
Diane M. favorited Curvy Tissue Holder
26 Apr 15:08
-
 Charlotte F. commented on Curvy Tissue Holder
13 Aug 02:11
Charlotte F. commented on Curvy Tissue Holder
13 Aug 02:11
-
Charlotte F. favorited Curvy Tissue Holder
13 Aug 02:07
-
Jenifer A. added Curvy Tissue Holder to Eco/reusable
27 Apr 01:54
-
Pauline M. added Curvy Tissue Holder to Beginner Sewing Projects
23 Feb 14:40
-
Deb E. favorited Curvy Tissue Holder
09 Feb 03:15
-
 Pamela D. added Curvy Tissue Holder to sewing
01 Feb 19:37
Pamela D. added Curvy Tissue Holder to sewing
01 Feb 19:37
-
 Detje C. commented on Curvy Tissue Holder
21 Jan 12:35
Detje C. commented on Curvy Tissue Holder
21 Jan 12:35
-
 Katherine B. favorited Curvy Tissue Holder
13 Jan 17:35
Katherine B. favorited Curvy Tissue Holder
13 Jan 17:35
-
 Andrew F. favorited Curvy Tissue Holder
03 Jun 12:56
Andrew F. favorited Curvy Tissue Holder
03 Jun 12:56
-
 Step 1
a. Fold your fabric in half, right sides together.
b. Place the pattern on the fabric, with the long straight edge along the fold (important!!) and trace around the pattern with a fabric pen.
c. Cut out the fabric along your drawn lines. Do not cut on the fold.
-
 Step 2
Cut out another identical piece with your lining fabric. Unfold the two pieces and press.
-
 Step 3
Place your outer and lining pieces right sides together and pin.
-
 Step 4
Sew around the outside edge of the pieces with a 1/4" seam allowance, leaving a 2" hole unsewn on one of the long sides, for turning. Backstitch at the beginning and end of your seam. I used red thread so it would be visible in the photos, but you'll want to use a neutral or matching thread so it won't show through on the other side.
-
 Step 5
Trim the seam allowances on the curves to about 1/8”, and also trim the fabric close to the corners.
-
 Step 6
a. Turn the holder right side out, and use a chopstick or point turner to carefully push out the corners, being careful not to stretch the fabric.
b. Tuck in the unsewn edges of your tissue holder to create a straight edge and press the holder with a hot iron. Take care to press the curves so that you don’t see the lining fabric from the outer side; this will help make your topstitched edge nice and neat.
-
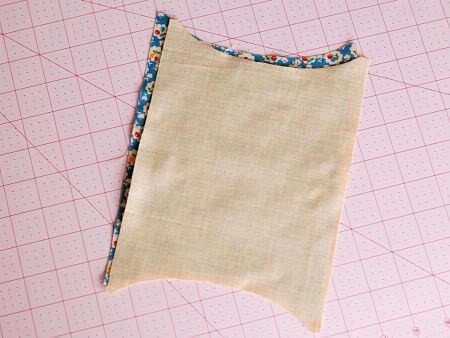
 Step 7
Topstitch, close to the edge, just around the curves.
-
 Step 8
..
-
 Step 9
Fold the holder into thirds, with the outer fabric on the inside, so the curved edges are centered and touch in the middle, and the edges overlap (one side goes on top of the other, the other side goes underneath) and pin.
-
 Step 10
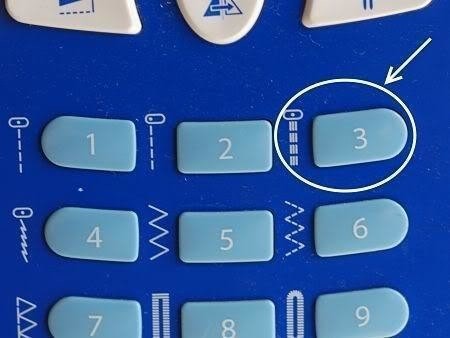
Sew all the way across the short straight edges of the holder with a slightly less than 1/4" seam allowance (to make sure that the turning hole gets sewn over), on both sides, using your triple stitch function. If you don't have a triple stitch, then you'll want to sew a single straight stitch, and then sew over that two more times for reinforcement.
-
 Step 11
Just in case you're not sure what the triple stitch symbol looks like, it is 3 parallel dashed lines--here's a photo of the symbol on my machine:
-
Step 12
Turn right side out, tuck in a pack of tissues, and you’re finished!


Can jou help me please
Thank you