

About
Cozy Up Your Curtains with a Crocheted Curtain Tieback
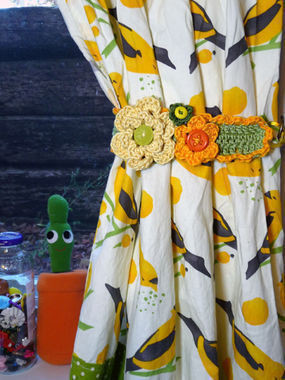
Spruce up your space with a simple accent: a flower-covered curtain tieback.
-
 Ashlee P. added Crocheted Curtain Tieback to Miss Marple
27 Apr 18:56
Ashlee P. added Crocheted Curtain Tieback to Miss Marple
27 Apr 18:56
-
 TheSewingMaven added Crocheted Curtain Tieback to Seventies Bedroom
03 May 23:27
TheSewingMaven added Crocheted Curtain Tieback to Seventies Bedroom
03 May 23:27
-
TheSewingMaven favorited Crocheted Curtain Tieback
03 May 23:27
-
 megan.taylor.37201901 favorited Crocheted Curtain Tieback
16 Jan 22:11
megan.taylor.37201901 favorited Crocheted Curtain Tieback
16 Jan 22:11
-
 satilanna added Crocheted Curtain Tieback to Crochet
15 May 23:20
satilanna added Crocheted Curtain Tieback to Crochet
15 May 23:20
-
 Serenity added Crocheted Curtain Tieback to crochet - ornamentish
28 Feb 23:11
Serenity added Crocheted Curtain Tieback to crochet - ornamentish
28 Feb 23:11
-
 Audrey P. favorited Crocheted Curtain Tieback
02 Feb 05:07
Audrey P. favorited Crocheted Curtain Tieback
02 Feb 05:07
-
 louesejackson favorited Crocheted Curtain Tieback
30 Aug 08:44
louesejackson favorited Crocheted Curtain Tieback
30 Aug 08:44
-
 Vandana J. favorited Crocheted Curtain Tieback
27 Jun 04:58
Vandana J. favorited Crocheted Curtain Tieback
27 Jun 04:58
You Will Need
-
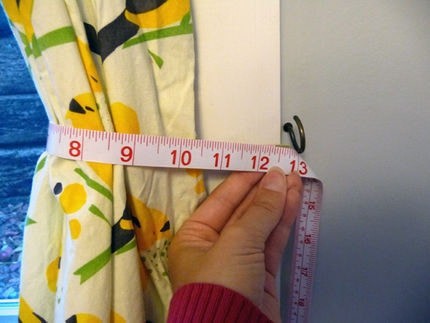
 Step 1
To get started, install the hook to the left or right of the window (depending which way you want to pull the curtain). I installed mine outside of the window frame so I can let as much light in as possible. Next, measure from the hook, around the curtain and back to the hook to determine the length of your tieback. A longer tieback will let the curtain hang without too much bunching, so play with the length to see what you like before you get started.
Measure around your curtain and to the hook to determine the length of your tieback. -
 Step 2
Make a foundation chain to match the measured length. Using a worsted-weight yarn and a size F-5 (3.75mm) hook, I made my foundation chain 55 stitches (13 inches) in length. Next, start building up the width of the pattern as follows:
Row 1 (RS): Chain 3 (counts as double crochet), double crochet in 4th ch from hook and in each chain across, turn.
Row 2: Chain 3, double crochet in next dc and each dc across.Repeat row 2 until you reach the desired width, keeping in mind that the edging will add about another 3/4 inch of width. Fasten off. I made mine 3 rows wide.
Double crochet across the length of the foundation chain for as many rows as desired to create the width of the tieback. -
 Step 3
Next, add an easy edging for a little contrast. With the right side of the work facing you, attach the yarn in the upper right-hand corner of the tieback. *2 double crochet in next stitch, slipstitch in each of next 2 stitches; repeat from * around the tieback, working into the sides of the stitches on the short ends. Join with a slipstitch in the first ch. Fasten off.
Add a crochet edging with contrasting yarn. -
 Step 4
Make a few crocheted flowers to accent your band.
Weave in the ends of the flowers, sew buttons to their centers (if desired) and then arrange them on the tieback. Fold the tieback in half first, with the short ends facing the side that your curtain will be pulled to. Arrange and sew on the flowers to the front half only of the tieback to be sure you'll see them all.
Arrange the crocheted flowers on the front half of the tieback. -
 Step 5
Next, you'll need to attach a ring to the inside of each short edge as shown below. With a length of yarn, make a few stitches around the ring to secure it, then weave in the yarn ends.
Sew a ring to the inside of each short end of the tieback.
-
 Step 6
Wrap the tieback around your curtain, and slide the rings over the hook in your wall—voila!
Cozy curtains!
I'd love to see finished photos of this project if you decide to make it.


i may try these (if i get good enough!) as my mum just bought me some crochet hooks for Easter!