


About
Crochet Dress Bag Pattern
I have seen dress pot holders and a dress purse made in crochet, I just loved the look of them and decided I wanted a dress bag. So I came up with this one.
<u>Special stitches</u>
Shell= (2dc, 1ch, 2dc) all in stitch indicated
Lge shell=(3dc, 1ch, 3dc) all in st indicated
fpdc = work dc around the front post of the st indicated
bpdc = work dc around the post of the st indicated
<u>Abbreviations</u>
Dc = yo over hook, insert hook into st, yo hook, pull through a loop, yo hook, pull through 2 loops, yo hook, pull through 2 loops again (AU trbl)
Tension not required.
-
 WerewolfCas favorited Crochet Dress Bag
29 Mar 09:10
WerewolfCas favorited Crochet Dress Bag
29 Mar 09:10
-
 Jessie D. added Crochet Dress Bag to To Do Yarn Crafts
19 Nov 05:19
Jessie D. added Crochet Dress Bag to To Do Yarn Crafts
19 Nov 05:19
-
Leslie D. added Crochet Dress Bag to CROCHET CUTIES
14 Sep 18:49
-
 Bizzywon favorited Crochet Dress Bag
31 Jul 14:16
Bizzywon favorited Crochet Dress Bag
31 Jul 14:16
-
 Kathleen S. favorited Crochet Dress Bag
02 Jun 11:28
Kathleen S. favorited Crochet Dress Bag
02 Jun 11:28
-
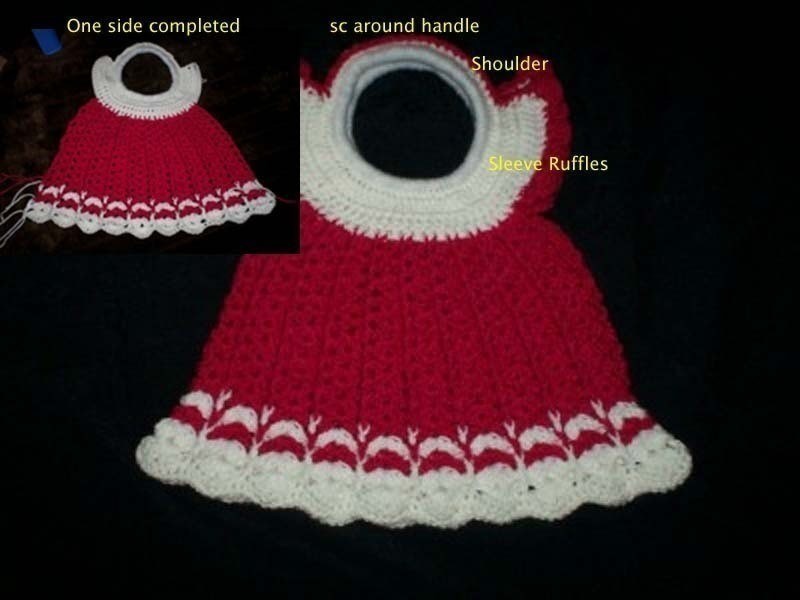
 Step 1
Handles - I made mine from a length of skipping rope, I cut two pieces about 13 inches long (33 cm) and sewed the ends together.
-
 Step 2
Make 2
Begin with the handles colour 1
Hdc all around the handles until the handles are completely covered, sl st to join
1. ch 3, work 1 dc in each of next 49 hdc, ch 3 turn (50dc)
2. dc in each dc to end, working 1 dc in ch 3, ch 3 turn (50dc)
3. repeat row 2, do not ch 3, break off yarn
-
 Step 3
Make 2
Dress Part colour 2
Working from opposite end that you just finished on, attach yarn to the 15th dc (includes ch 3)
1. ch 3, work shell st in next dc,* fpdc around next dc, shell in next dc,* repeat from * to * 8 more times, ending with fpdc around next dc, ch 3 turn
2. shell in ch 1 space of previous shell, skip next 2 dc of shell, bpdc around next dc, *shell in ch 1 space, skip next 2 dc of shell, bpdc around next dc, * repeat from * to * 8 more times, ending with bpdc around ch 3, ch 3 turn
3. *shell in ch 1 space, skip next 2 dc of shell, fpdc around next dc,* repeat 9 more times ending with dc in top of ch 3, ch 3 turn
4. repeat rows 2 and 3 5 more times (total of 10 more rows) and row 2, 1 more time (14 rows of pattern)
Alternate colours as per the picture
15. repeat row 2, using the large shell stitch, ch 3 turn
16. repeat row 3, using the large shell stitch, ch 1, turn
17. work 1 sc in each dc and ch 1 space to end, ch 1, turn
18. work 1 sc in each sc across. Fasten off.
Sew in all loose ends.
With wrong side facing, sew sides of bag together, beginning at the top of the first patterned row, sew down the side, along the bottom and up along the other side, using a back stitch sew all 3 sides firmly.
-
 Step 4
Sleeve Frills
With right side facing
(Please note you may have to wing it a bit here, making sure to keep your work as even as possible.)
Using colour 2, attach yarn to the shoulder part of the sleeve in the side of the dc, closest to the handle, sc across evenly across the shoulder, make a large shell in the corner of the shoulder and the sleeve (1 sc in next 2 dc, large shell in next dc) 1 sc in the next 2 dc, large shell in the next, work this way all around the sleeve, (1 sc in next 2 dc, large shell in next dc)
but when you come to the lower centre of the sleeves, work sc, across this part, continue pattern along the other side of the sleeve , work sc across the shoulder as before, then work 1 sc in every second sc around the handle to the opposite shoulder and repeat the directions from above.
Embellish with a nice flower, ribbon, belt, button or something else of your choice.
Line the bag for the perfect finish.


Comments

