


About
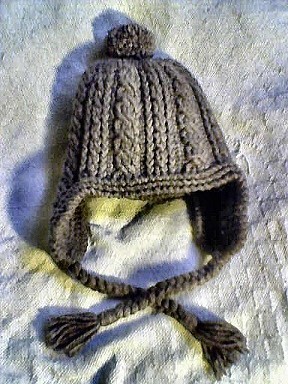
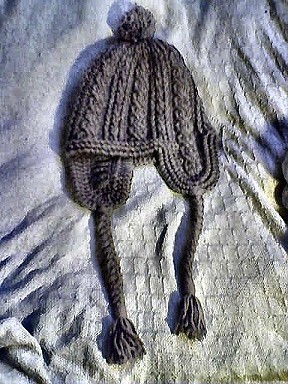
Tips on how to make your own incredibly warm crochet cable chullo.
If you're new to crocheting cables, a hat is a great choice, as the process is time-consuming and it's not as big a project to have to correct or struggle through as, say, an afghan. It's also incredibly warm, as the cables create a double layer of fabric over most of the hat. I didn't write a pattern, but if you know how to crochet cables, here's some basic tips on design.
---------------------------------------------------------------------------------------------------------------------------------------------------
CABLES and BODY: Work in rounds with an even number of stitches on the crown. The cables are four stitches wide (treble crochet). The cables alternate, one stripe of four treble crochet wide cable (two strands of two intertwining), and one stripe of one front post treble crochet on each side of a two treble crochet wide cable (two single strands intertwining).
---------------------------------------------------------------------------------------------------------------------------------------------------
FLAPS: On opposite sides of the hat, simply continue two of the double wide cables in rows instead of rounds, with an allowance of a few stitches on each side, until you reach the desired ear flap length. You'll have to cut and reattach the yarn for at least one of these. Round the corners by crocheting two or three together.
---------------------------------------------------------------------------------------------------------------------------------------------------
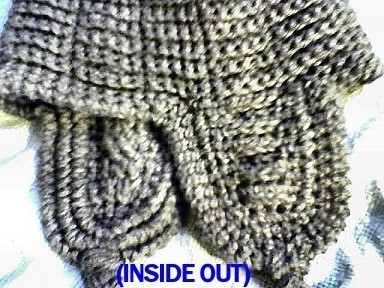
TRIM: Single crochet all the way around the hat, including the flaps. Crochet two together at the corners where the flaps meet the hat, and increase by two stitches at the corners of the flaps. When this row is finished, go back around, working in front loops only, with reverse single crochet (crab stitch). When this is completed, work another row of single crochet in the back loops of the last single crochet row, then reverse single crochet into the front loops only of the new row of single crochet. Add one last row of single crochet with reverse single crochet trim, but on the last row, at the top center of each flap, chain two instead of single crochet, and skip two single crochet. (Reverse single crochet into or over the chain two.)
---------------------------------------------------------------------------------------------------------------------------------------------------
TIES: Cut two small hanks (equal in size and length) of yarn a little more than twice the length you want your ties and neatly cut the ends. Double one over and pull it though the hole in a flap created with the chain two. Attach it firmly with a mounting knot so that the loop of the yarn is forward, and the tail is at the back of the flap. Braid the hank as far down as you like. Wrap the end with another piece of yarn until it's neat and stitch the closure into itself to hold it firmly. Repeat with the other ear flap.
---------------------------------------------------------------------------------------------------------------------------------------------------
POM-PON: Make a big pom-pon and sew it on top! Voila!
---------------------------------------------------------------------------------------------------------------------------------------------------
Here's how to crochet cables: http://www.woolcrafting.com/crochet-cables.html
---------------------------------------------------------------------------------------------------------------------------------------------------
Here's how to braid: http://www.wikihow.com/Braid
---------------------------------------------------------------------------------------------------------------------------------------------------
Here's how to tie a mounting knot:
http://jewelrymaking.about.com/od/macrameprojectsarticles/ss/mounting-knot.htm
---------------------------------------------------------------------------------------------------------------------------------------------------
Here's how to make a pom-pon: http://www.knitting-and.com/knitting/tips/pompom.htm
Tags
-
 Victoria L. favorited Crochet Cable Chullo (Andean Earflap Hat)
11 Nov 05:21
Victoria L. favorited Crochet Cable Chullo (Andean Earflap Hat)
11 Nov 05:21
-
 Belle favorited Crochet Cable Chullo (Andean Earflap Hat)
03 Nov 21:51
Belle favorited Crochet Cable Chullo (Andean Earflap Hat)
03 Nov 21:51
-
 Kim C. favorited Crochet Cable Chullo (Andean Earflap Hat)
25 Jul 08:02
Kim C. favorited Crochet Cable Chullo (Andean Earflap Hat)
25 Jul 08:02
You Will Need
Vermin Jerky posted this project as a creation without steps
Here are some similar tutorials to help you make this one!


