
About
This is one of the simplest projects for a practical item you can use at home or at work.
Many people purchase dry foods or toiletry products to store at home, and most of these products are packed in cardboard boxes of different shapes and sizes. Generally, after the product is removed, the box is discarded or placed in a recycling box.
Putting things into recycling facilities is a good step for the environment, but one can also use their creativity to revamp or reuse these items. A simple way to reuse these boxes is to use it as a storage box, a holder for small items, or even decorate as a unique gift box.
To begin, check around your home for any items that could be used as decoration. Remeber to use your imagination and creative eye, because many things that we throw away or recycle can actually be used for something new.
I will show you how to reuse two different boxes (one from dry foods and one from a facial product) and combine them with other materials from home. I will also use some of my leftover chiyogami or washi from previous projects. Most of the decorative paper I use are very small pieces, since I’m what most would call a “pack rat”, and have boxes filled with decorative paper from past gifts, calendars, posters, magazines and even flyers with nice colours or designs.
First step is find a piece of decorative paper large enough to wrap the entire box. If you only have small scraps, it’s simple to collage or create a mosaic design over a box. I’ll show both methods with two different boxes.
To put everything together, I also have scissors, double-sided tape (but you can use regular tape, glue or homemade adhesive), hole punch, a pencil and ruler.
-
 Peaches S. favorited Creative Gift Boxes And Holders
01 Nov 00:10
Peaches S. favorited Creative Gift Boxes And Holders
01 Nov 00:10
-
 Emma H. favorited Creative Gift Boxes And Holders
06 Oct 20:43
Emma H. favorited Creative Gift Boxes And Holders
06 Oct 20:43
-
 CarmelSmithxx added Creative Gift Boxes And Holders to summer progects
26 Jul 11:11
CarmelSmithxx added Creative Gift Boxes And Holders to summer progects
26 Jul 11:11
-
CarmelSmithxx favorited Creative Gift Boxes And Holders
26 Jul 11:10
-
Anastasia S. favorited Creative Gift Boxes And Holders
22 Apr 19:19
- Sayape added Creative Gift Boxes And Holders to Useful 12 Jan 11:59
-
 amanda.harris.16144 favorited Creative Gift Boxes And Holders
17 Sep 04:36
amanda.harris.16144 favorited Creative Gift Boxes And Holders
17 Sep 04:36
-
 Lowe . favorited Creative Gift Boxes And Holders
01 Jul 05:55
Lowe . favorited Creative Gift Boxes And Holders
01 Jul 05:55
You Will Need
-
 Step 1
Making a Paper Holder:
This is one of the simplest projects for a practical item you can use at home or at work.
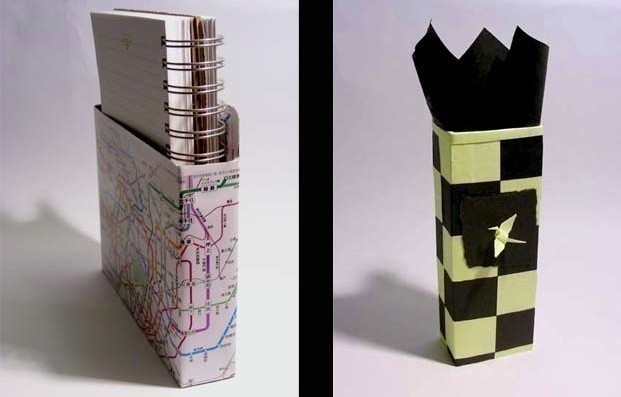
Take a cardboard box that’s long enough to hold letters, bills or any other small bits of paper in it.
-
Step 2
Cut all of the flaps from the open end. If you prefer, leave one of the longer flaps on and that will become the back of the box.
-
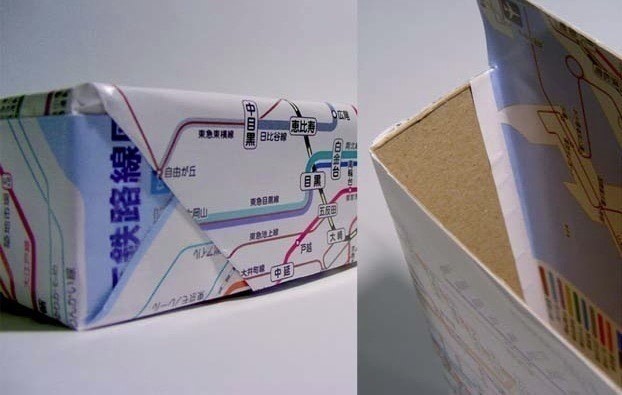
 Step 3
Here, you can either wrap the box as you would a gift, but just leave the open end free, or cover each face/panel separately. To hide the joint areas, use colourful/decorative tape or even stickers.
-
Step 4
At the top, tuck the excess paper into the open end of the box and secure with an adhesive. If you left the top flap, simply wrap the paper over it and secure with adhesive.
-
 Step 5
Now, if you would like to hang the box, punch a hole through the back flap or back area – either one hole in the middle or two holes spaced apart from the middle. Depending on the box length, separating the holes at least 5cm would be good.
-
Step 6
Finally, you can use any other materials to further decorate your box
-
Step 7
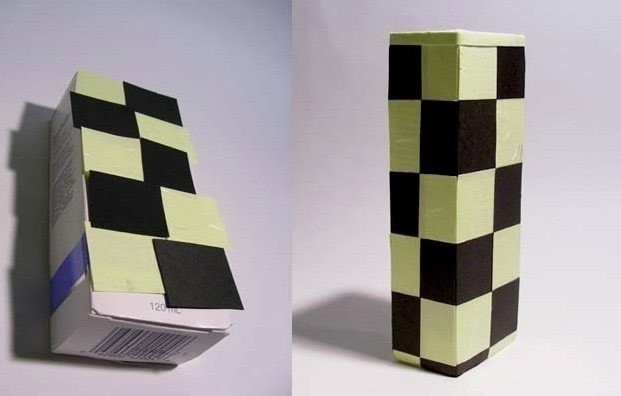
Making a Mosaic/Collage Pen Holder or Gift Box:
This project is also very easy, but will take a little more time.
Take any paper you would like to decorate your box with. For a nice effect, use one solid coloured paper and one patterned one or two different solid colours.
-
 Step 8
Next, cut out strips or squares from the paper -roughly judge how much paper will be needed to cover the entire box and add a few more.
-
Step 9
Then, arrange the pieces in a pattern that you like – either arrange them to create a picture of a flower, tile alternating colours or randomly chosen pieces are fun too.
-
 Step 10
Secure the pieces with an adhesive all around the box until it’s completely covered.
-
 Step 11
Once that is complete, you can add any other details or decorations that you like. Origami is a simple way to add a three dimensional embellishment.
-
Step 12
If you would like to seal the box, you can purchase them in craft stores. If you have white glue, add a little water and that should also work well.
Once it’s done, place anything you like inside, or, wrap a gift with tissue paper, place it inside with a bit sticking out of the opening, then tie with a ribbon.