
About
Create interest to your next skirt!
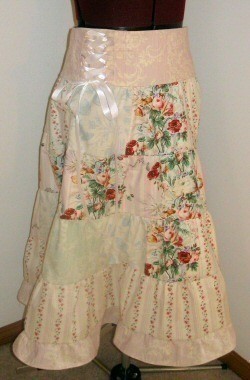
Need a new skirt that has a lot of interest? This frock not only has a faux corset style closure, tiered design as well. Since this skirt is tailored to your measurements and design specifications, there is quite a bit of math involved, but the results are well worth it!
Downloads
- 103988_2F2014-08-19-201144-undefined 217 KB [ Download ]
-
 Key West Witch added "Corset" Tiered Skirt to Sewing
29 Jun 15:03
Key West Witch added "Corset" Tiered Skirt to Sewing
29 Jun 15:03
-
Key West Witch favorited "Corset" Tiered Skirt
28 Sep 01:38
-
 ellie j. added "Corset" Tiered Skirt to recycling
08 Oct 07:15
ellie j. added "Corset" Tiered Skirt to recycling
08 Oct 07:15
-
 Melissa Beth added "Corset" Tiered Skirt to New Look
13 Sep 23:27
Melissa Beth added "Corset" Tiered Skirt to New Look
13 Sep 23:27
-
 Rachel B. favorited "Corset" Tiered Skirt
10 May 02:14
Rachel B. favorited "Corset" Tiered Skirt
10 May 02:14
-
Rachel B. added "Corset" Tiered Skirt to DIY and Crochet Clothes
05 May 04:54
-
 Carla B. favorited "Corset" Tiered Skirt
14 Mar 20:26
Carla B. favorited "Corset" Tiered Skirt
14 Mar 20:26
-
Melissa Beth favorited "Corset" Tiered Skirt
24 Nov 19:13
-
Susan F. favorited "Corset" Tiered Skirt
25 Jan 03:43
-
 Ирина Б. added "Corset" Tiered Skirt to ОДЕЖДА
16 Feb 09:48
Ирина Б. added "Corset" Tiered Skirt to ОДЕЖДА
16 Feb 09:48
-
Step 1
Measure yourself. It’s important to accurately measure your waist and hip size since these numbers will determine how you will cut your material.
Divide your hip measurement in half, then add your seam allowance, plus 5″ for the width of the material. This will be your back waistband – cut two from your material.
For example: For a 34″ waist; divide by 2 to get 17. Add 1/4 seam allowances on both sides to get 17 1/2 x 5″ rectangles.
-
Step 2
Determine how large of an opening you want to your corseted area to have (the skirt above has a 3″ 'opening'). I subtracted that number from the divided hip measurement (17), added seam allowances and 5″ for the width of the material. Cut two pieces with this measurement – these will be your front pieces.
For example: For a 34″ waist and a skirt with a 3″ opening you would subtract 17-3 to get 14. Add the seam allowances in to get 14 1/2″, with a 5″ width. Your rectangles would measure 14 1/2″ x 5″.
-
Step 3
Since the skirt isn’t really designed to be cinched and closed, you may want to add a panel that fits where the front and back are joined. I cut this approximately 2″ longer than the opening area and add 5″ to the width.Cut 2 pieces from your waistband material using this measurement and, with right sides together, sew along 3 edges, turn right side out, and press. Set aside.
For example: For a 3″ opening, you would add 2 inches to make a 5 x 5″ square.
-
Step 4
You’ll need to make loops for your skirt to hold the ribbon (I made 8). Cut a strip 1 1/2″ wide by 20″. Fold in half, right sides together and sew using a 1/4″ seam allowance. Turn right side out and press. Cut into 2″ segments and set aside.
-
Step 5
With right sides together sew one front and one back piece together along one short edge. Repeat for remaining, lining pieces and set aside.
-
Step 6
Along the short, free edges of the front waistband, mark the seam allowances on the top and bottom. Place 3-4 loops just under these markings and baste (this will keep the loops from getting caught while sewing the lining and skirt). Repeat for back of waistband.
-
 Step 7
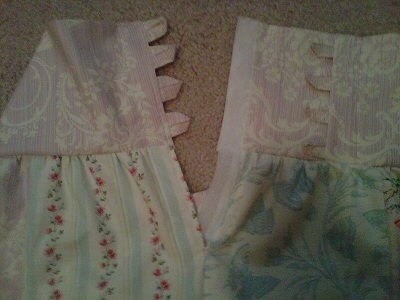
With right sides together, place lining on top of waistband matching raw edges and seams. Sew along the top and side edges, leaving bottom edge free. Clip corners, turn right side out and press.
At this point you should have something that looks like this:
-
Step 8
Add the panel to the front waistband. To do this overlap the the front side of the panel with the back of the waistband front by 3/4″. Stitch close to the panel’s finished edge. Do not sew the other side of the panel and the back waistband together (Velcro will later be sewn to this area so that the skirt can be opened up and slipped on over the hips).
-
 Step 9
Now you need to determine how long you want your skirt to be (the skirt above is 30") and subtract 4 1/2″ from your finished length (this is the size of the waistband).
For example: 30 – 4 1/2 = 25 1/2.You will also need to decide how many tiers you would like for your skirt to have (the skirt above has 4). Take the number from above and divide that by the number of layers you want your skirt to have.
For example: (25.5/4 = 6.375) and add your seam allowance. This would make your number 6.375 + .5 = 6.875 or 6 7/8. For cutting purposes I find it easier to round up and make these squares a full 7″. -
Step 10
Each tier is slightly gathered. The amount of fullness you want in your finished skirt is determined by how much gathering you use on each layer. To determine the length you need to sew for each tier, use the following formula:
For a slightly gathered look:
Tier one: Add 5 inches to your hip measurement width.
For example if you had 40″ hips, your first tier would be 45″ long (plus seam allowances)
Subsequent tiers: Multiply the previous number by 1.3
For example: My second tier you multiply 45 x 1.3 = 58 1/2″ (plus seam allowances), my third tier is 58 1/2 x 1.3 = 76″ (plus seam allowances), and my fourth tier is 78 x 1.3 = 99″ (plus seam allowances).For a very gathered, fuller skirt:
Tier one: Add 10 inches to your hip measurement width.
For example if you had 40″ hips, your first tier would be 50″ long (plus seam allowances)
Subsequent tiers: Multiply the previous number by 1.5
For example: My second tier you multiply 50 x 1.5 = 75″ (plus seam allowances), my third tier is 75 x 1.5 = 112.5″ (plus seam allowances), and my fourth tier is 112.5 x 1.5 = 168.75″ (plus seam allowances).Whew, now that we’ve tackled that, let’s get back to sewing.
-
Step 11
For the first tier, sew the short ends together 1/2 way – this area will eventually be closed with velcro after being attached to the waistband. Fold back the raw seam allowance on the back edge of the tier (the one that will be attached to the open end of the waistband).
-
Step 12
Use a long machine stitch and sew around the top edge of the tier. Gather by pulling up bobbin thread – distribute fullness evenly.
-
Step 13
With right sides together, place gathered tier to waistband, matching raw edges and sides. Sew in place.
-
Step 14
Cut Velcro the length of the opening (mine was approximately 7″). Stitch ‘fuzzy’ side of Velcro to the lining side of the back waistband and finished tier edge. Stitch ‘scratchy’ side of Velcro to the right side of panel and tier with the raw edge.
-
Step 15
Sew the short end of the tier together. Use a long machine stitch and sew around the top edge of the tier. Gather by pulling up bobbin thread – distribute fullness evenly. With right sides together, place gathered tier to previous tier and sew. Repeat until all layers are attached. For the last tier. Press up hem and sew in place.
Thread ribbon through the loops and work that skirt!