About
Place mat” and “creative” are words that don’t often appear in the same sentence.
Place mat” and “creative” are words that don’t often appear in the same sentence. But add a few scraps of blue jeans to your table settings and you might start to think differently. These delish place mats, a scrumptious dinner, and a group of good pals are the perfect ingredients for a real Cordon “Blue” dinner party.
JEANeology: Crafty Ways to Reinvent Your Old Blues. Copyright © 2011 by Zest Books. Used with permission of Zest Books, San Francisco. Learn more at www.zestbooks.net.
-
 catarina n. favorited Cordon “Blue” Place Mat
28 Jul 00:30
catarina n. favorited Cordon “Blue” Place Mat
28 Jul 00:30
-
 llJulie favorited Cordon “Blue” Place Mat
08 Jun 19:52
llJulie favorited Cordon “Blue” Place Mat
08 Jun 19:52
-
 Miss_Fit added Cordon “Blue” Place Mat to Atsetaera, Atsetaera, Atsetaera
29 May 02:02
Miss_Fit added Cordon “Blue” Place Mat to Atsetaera, Atsetaera, Atsetaera
29 May 02:02
-
 kelly.koopman added Cordon “Blue” Place Mat to To do
15 Apr 21:09
kelly.koopman added Cordon “Blue” Place Mat to To do
15 Apr 21:09
-
 Vanessa B. added Cordon “Blue” Place Mat to Home DIY
23 Mar 16:16
Vanessa B. added Cordon “Blue” Place Mat to Home DIY
23 Mar 16:16
-
 Romana S. favorited Cordon “Blue” Place Mat
23 Nov 12:17
Romana S. favorited Cordon “Blue” Place Mat
23 Nov 12:17
-
rachel d. favorited Cordon “Blue” Place Mat
20 Nov 04:31
-
 Step 1
Part 1: Making Strips and Stripes
You’ll sew strips of jean scraps together into a single striped piece that will serve as the top of the place mat.
Cut 17 strips of denim that measure 13" long and 2" wide.
-
Step 2
Place the strips on your table in a row. Put them in an order that is pleasing to the eye. If you are using denim from a few different pairs of jeans, this is a good time to get creative with making a pattern using the different shades.
-
Step 3
When you are satisfied with your arrangement of strips, mark each one with a number in the upper right hand corner, from 1 through 17.
-
Step 4
Place strip 1 on your work surface right side up.
-
Step 5
Place strip 2 on top of strip 1, right side down.
(Strip 1 and 2 should be right sides together.) -
Step 6
Pin them together along one of the long edges, and stitch using a 1?2" seam allowance.
-
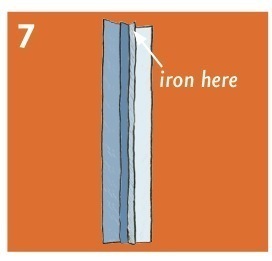
 Step 7
Open the strips out so that the wrong side is facing you and iron the seam you just sewed.
-
Step 8
Place this sewn-together strip right side up on your work surface. Place strip 3 on it right side down, matching up one of the long edges of strip 3 with the raw edge of strip 2.
-
 Step 9
Pin in place along this edge and sew using a 1?2" seam allowance.
-
Step 10
Open up this new three-strip piece wrong side up and iron the seam you just sewed.
-
Step 11
Continue in this fashion until you have no more strips to sew.
-
 Step 12
You will have a single piece of sewn strips that measures roughly 13"× 18 1?2".
-
Step 13
Part 2: Backing It up
You’ll use your alternate fabric to add a designer backing to the place mat.Cut a piece of your alternate fabric that measures 13"× 18 1?2".
-
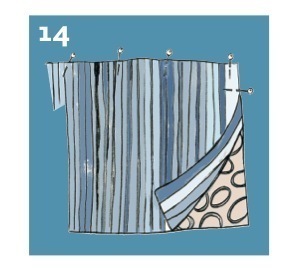
 Step 14
Pin the rectangle of jean strips on top of the alternate fabric rectangle, right sides together.
-
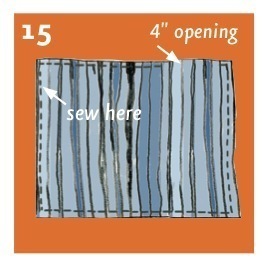
 Step 15
Leaving a 4" opening on one short edge (for turning the place mat right side out later on), sew all four sides together using a 1?2" seam allowance.
-
 Step 16
Clip the corners so that you get nice points when you turn it right side out.
-
Step 17
Turn your place mat right side out through the small hole in the side.
-
Step 18
Tuck the raw edges of the hole inside the place mat 1?2" and pin shut.
-
Step 19
Starting with the pinned edge, sew all the way around the place mat using a 1?2" seam allowance. Use a contrasting color thread so that this second seam sewn on the top of the place mat both closes the turning hole and provides a decorative border.
-
 Step 20
Make more! Once you’ve learned this technique, you can use different sized strips in different arrangements, and even mix and match denim with other fabrics to create an ultra-modern, funky-looking dinner table.