


About
Personalize your handmade clothing with custom clothing labels.
I'm in the middle of rebranding and labeling my shop with my name, so that means I need new clothing labels.
-
 Sarah Sylvia S. favorited Clothing Label How To
19 Jul 06:10
Sarah Sylvia S. favorited Clothing Label How To
19 Jul 06:10
-
 Michelle L. favorited Clothing Label How To
05 Sep 08:31
Michelle L. favorited Clothing Label How To
05 Sep 08:31
-
 Kelly J. favorited Clothing Label How To
03 Sep 04:57
Kelly J. favorited Clothing Label How To
03 Sep 04:57
-
 su l. favorited Clothing Label How To
05 Mar 12:36
su l. favorited Clothing Label How To
05 Mar 12:36
-
 Lee Rose added Clothing Label How To to DIY!!!
28 Jun 15:37
Lee Rose added Clothing Label How To to DIY!!!
28 Jun 15:37
-
 BelleandStuff favorited Clothing Label How To
05 May 20:59
BelleandStuff favorited Clothing Label How To
05 May 20:59
-
 Christine R. B. added Clothing Label How To to Textile Printing
10 Apr 09:52
Christine R. B. added Clothing Label How To to Textile Printing
10 Apr 09:52
-
 Liliane R. added Clothing Label How To to craft (atelie organização)
08 Feb 23:45
Liliane R. added Clothing Label How To to craft (atelie organização)
08 Feb 23:45
-
Missi M. added Clothing Label How To to Tips
17 Dec 16:38
-
 Chudames favorited Clothing Label How To
29 Sep 00:37
Chudames favorited Clothing Label How To
29 Sep 00:37
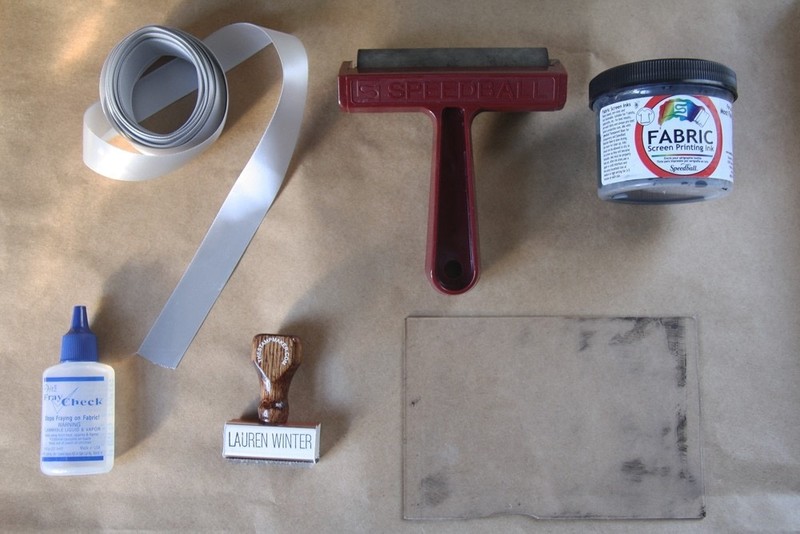
You Will Need
-
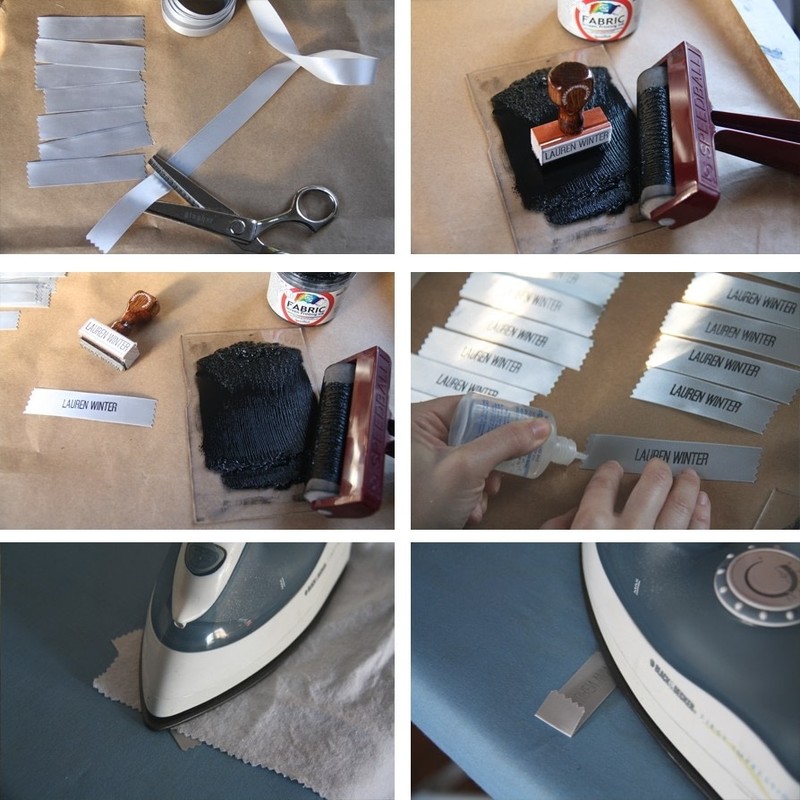
 Step 1
What you need.. customized rubber stamp (I recommend The Stamp Maker, it's inexpensive and they ship really fast - my 2x1/2 inch stamp cost only ten dollars), fabric paint such as screen printing ink, a roller or brayer, a smooth and nonporous surface to roll your ink out on (I used an old acrylic surface), Fray Check, an iron, and single face satin ribbon (smoother and better than grosgrain, in my opinion).
-
 Step 2
First step - cut your ribbon. My stamp is about 2 inches wide, and I cut ribbon pieces between 3 1/2 inches and 4 inches wide. I used pinking shears as an added protection from fraying.
Step two - take your flat surface and just a teaspoon of fabric paint. Roll it out flat using your roller. Once you have a very thin, even layer of paint, press your stamp into the paint.
Step three - stamp firmly and evenly! If you find the ink is too thick and dark and slightly smudged, press lighter. Keep dipping your stamp in the ink between labels.
Step four - allow your fabric labels to dry. Once dry, spread fray check along the outer edges (be careful to add only a small amount as it can spread).
Step five - allow to dry again. Once the fray check is dry, heat set your labels using an iron set on low heat (no steam) for about twenty seconds. Place a piece of cotton fabric between the label and the iron.
Step six - press the ends of the label inside. You can fold the edges in twice to make it look a little nicer.
-
 Step 3
When ready to attach labels to your clothing, simply sew the outer left and right edges in place. Now you have wash-fast, custom clothing tags.

Comments


