


About
Show your earbuds some love ♥
I've always wanted to make these, I just wasn't ever able to settle on a design. :(
After a recent trip to the butterfly house, though, my mind seemed to have been made for me. I knew that I wouldn't always want to stand out too much when I'm listening to music, so I decided to make them removable. And now I can make new ones to coordinate with my mood or outfit >:)
Tags
-
 Kinhime Dragon added Clip On Earphone Accessories to things to make
21 Jun 18:44
Kinhime Dragon added Clip On Earphone Accessories to things to make
21 Jun 18:44
-
Kinhime Dragon favorited Clip On Earphone Accessories
24 Dec 19:37
-
 Conner W. added Clip On Earphone Accessories to Things to try and make/ideas
13 Feb 20:38
Conner W. added Clip On Earphone Accessories to Things to try and make/ideas
13 Feb 20:38
-
 Laouen favorited Clip On Earphone Accessories
10 Dec 20:45
Laouen favorited Clip On Earphone Accessories
10 Dec 20:45
-
 Packye favorited Clip On Earphone Accessories
28 Nov 21:12
Packye favorited Clip On Earphone Accessories
28 Nov 21:12
-
Conner W. added Clip On Earphone Accessories to gadgets stuff
07 Sep 18:25
-
 harley r. favorited Clip On Earphone Accessories
16 Jul 13:39
harley r. favorited Clip On Earphone Accessories
16 Jul 13:39
-
 isobel.l favorited Clip On Earphone Accessories
13 Mar 21:12
isobel.l favorited Clip On Earphone Accessories
13 Mar 21:12
- Paris N. favorited Clip On Earphone Accessories 07 Dec 02:36
-
 Isa B. favorited Clip On Earphone Accessories
02 Dec 12:16
Isa B. favorited Clip On Earphone Accessories
02 Dec 12:16
You Will Need
-
 Step 1
Gather up everything. You will need: Polymer clay, a clay knife, a clay roller, a pair of earphones, some acrylic paint or nail polish, a hot glue gun, and either clay glaze or clear nail polish.
-
 Step 2
Roll out your clay fairly thin, about 1/8 of an inch or so, and cut so that it is as wide as your earphone is long.
-
 Step 3
Cut off a piece of the clay long enough to fit around most of the earphone's base, leaving a gap large enough to fit the cord through easily.
-
 Step 4
Cut out at least one more piece this size. You can make as many as you want though :)
-
 Step 5
Wrap the pieces of clay around the the earphone to give it a sort of "U" shape. I'll be referring to this piece as the base from now on.
-
 Step 6
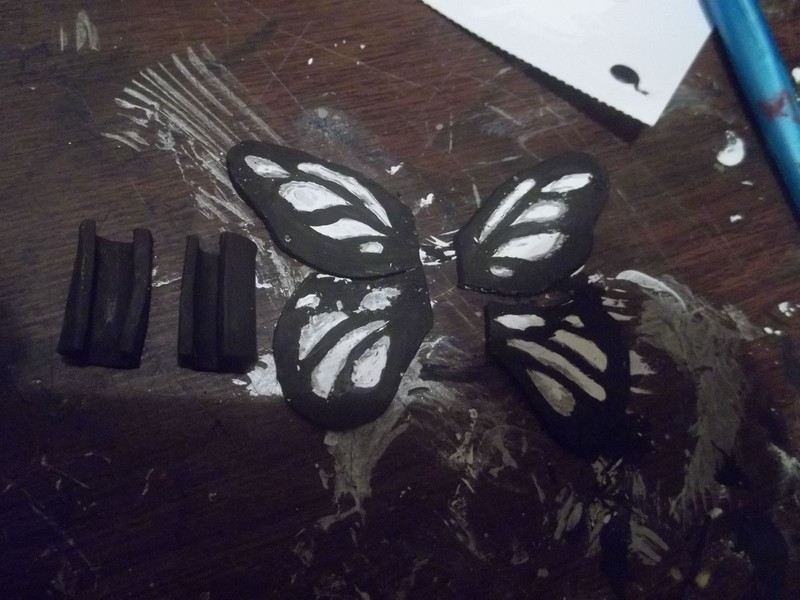
Roll out your remaining clay, or grab some more if you need to, and start scratching out a design. Make sure that you'll be able to duplicate it...
(I was torn between making the butterfly wings, a knife going through my head, or a banana.) -
 Step 7
Cut out your design and bake. (I used Sculpey III, so I baked it for about 20 min. at 275 degrees Farenheit.)
-
 Step 8
Let your clay cool and paint it. I started with a white base coat so that everything would show up well.
-
 Step 9
Finish adding any extra painting details then glaze. Let the clay dry completely, then glue it to the base across from the cord opening.
-
 Step 10
Wrap the earphone a couple of times with some electrical tape to hold the base on more securely.
-
 Step 11
Now sit back, relax, and enjoy the music! :)


thanks for sharing your great how-to