

Chocolate Orange Roulade
Extract from Fine Cooking Chocolate • By Editors of Fine Cooking • Published by GMC Publications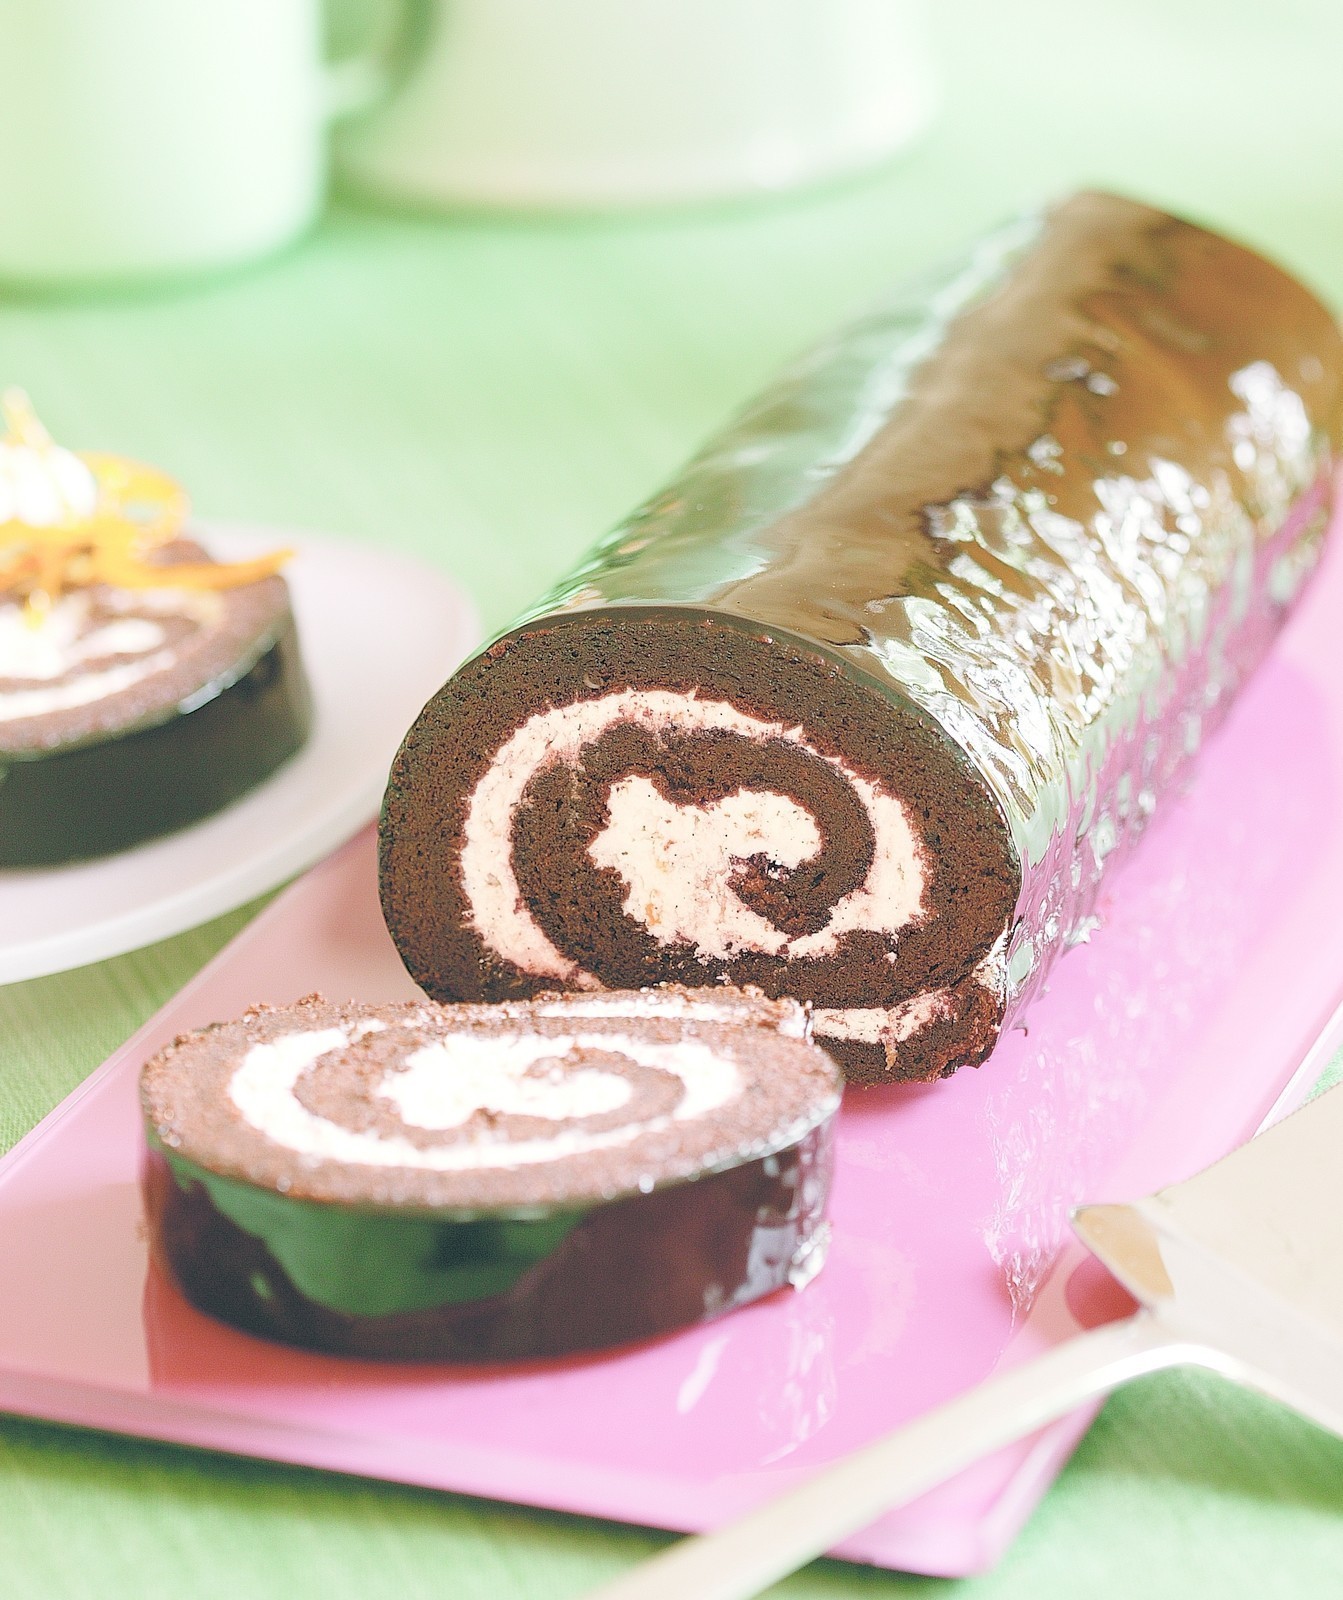

About
Fine Cooking Chocolate by the Editors of Fine Cooking —Emily Luchetti
An easy-to-handle chocolate sponge cake and a step-by-step guide guarantees impressive—and delicious—results.
Serves 12
For the chocolate sponge cake
3 oz. bittersweet chocolate, chopped
For the orange filling
2 large egg whites
For the chocolate glaze
3 Tbs. heavy cream
3/4 cup granulated sugar
1 1/2 oz. (1/2 cup)
1 1/2 tsp.
Tags
© 2024 Fine Cooking / GMC Publications · Reproduced with permission. · Recipe from Fine Cooking Chocolate by The Editors of Fine Cooking, published by The Taunton Press in 2013. Photography by Scott Phillips.
-
 Leeni S. favorited Chocolate Orange Roulade
25 Jan 06:57
Leeni S. favorited Chocolate Orange Roulade
25 Jan 06:57
-
 Shantelle t. added Chocolate Orange Roulade to food!!
08 Dec 13:29
Shantelle t. added Chocolate Orange Roulade to food!!
08 Dec 13:29
-
 rouge s. added Chocolate Orange Roulade to Food
30 Nov 21:23
rouge s. added Chocolate Orange Roulade to Food
30 Nov 21:23
-
 rock3r1 favorited Chocolate Orange Roulade
14 Jul 15:28
rock3r1 favorited Chocolate Orange Roulade
14 Jul 15:28
-
 Miss Monstro favorited Chocolate Orange Roulade
13 Jul 00:00
Miss Monstro favorited Chocolate Orange Roulade
13 Jul 00:00
-
Kaiulani W. favorited Chocolate Orange Roulade
10 Jul 00:50
-
 jade.owen.338 added Chocolate Orange Roulade to Cakes
27 Jun 18:48
jade.owen.338 added Chocolate Orange Roulade to Cakes
27 Jun 18:48
-
Suzi T. favorited Chocolate Orange Roulade
23 Jun 09:48
-
 ale_corason favorited Chocolate Orange Roulade
17 Jun 04:53
ale_corason favorited Chocolate Orange Roulade
17 Jun 04:53
-
Angel C. favorited Chocolate Orange Roulade
16 Jun 23:39
You Will Need
-
Step 1
Make the sponge cake
Position a rack in the center of the oven, and heat the oven to 350°F. In a double boiler, melt the chocolate with 2 Tbs. warm water. Let cool to room temperature.
-
Step 2
Grease the bottom of an 18x13-inch rimmed baking sheet (a standard half sheet pan) with the softened butter. Line the pan with parchment; butter and then flour the parchment.
-
Step 3
With an electric mixer, whip the egg yolks in a large bowl on medium-high speed until light in color and beginning to thicken, 2 to 3 minutes in a stand mixer or 3 to 5 minutes with a hand mixer. Add 1/2 cup of the sugar, and whip until very thick and pale yellow, about 2 minutes. Reduce the speed to low and mix in the melted chocolate. With a rubber spatula, stir in the cocoa powder and salt until blended.
-
Step 4
In a clean, dry bowl with clean, dry beaters (any grease will keep the whites from whipping), whip the egg whites with an electric mixer at medium speed until they’re frothy and begin to increase in volume, about 30 seconds. In a steady stream, add the remaining 1/2 cup sugar. Increase the speed to medium high, and whip until soft peaks form,
2 to 3 minutes in a stand mixer or 4 to 6 minutes with a hand mixer. -
Step 5
With a rubber spatula, fold the whites into the chocolate mixture in two equal additions. You can fold in the first half vigorously to lighten the yolks, but fold in the second half gently, mixing just until the batter is evenly colored with no streaks of white. Don’t overmix. Scrape the batter into the baking pan, gently spreading and smoothing it to make sure it’s level. Bake until the top springs back lightly when touched, 22 to 25 minutes.
-
Step 6
Meanwhile, spread a clean dishtowel (at least as big as the cake pan) on the counter. Using a sieve, dust the towel with cocoa powder, completely covering it (this will keep the cake from sticking to the towel as it cools).
-
Step 7
Immediately after taking the cake from the oven, run a small knife around the inside edge to loosen it from the pan. Invert the cake pan onto the towel in one quick motion. Remove the pan. Carefully peel off the parchment. Using both hands and starting from one of the short ends, roll up the cake and the towel together. Let cool to room
-
Step 8
Make the filling
Fill a wide pot or straight-sided skillet with 1 to 2 inches of very hot water. In the bowl of an electric mixer, whisk the egg whites, sugar, and salt until blended. Set the bowl in the pot of hot water; make sure the water comes up to at least the level of the mixture in the bowl. Whisk until the mixture is almost hot (about 120°F), about 90 seconds. Take the bowl out of the water. With an electric mixer on medium-high speed, whip the whites until cool and thick, 2 to 3 minutes. Reduce to medium speed, add the butter, a tablespoon at a time, and mix until the butter is completely incorporated. The filling should be soft and loose; it will firm up as the cake chills. (If it seems very runny, refrigerate it for up to 20 minutes.) With the mixer on low speed, blend in the vanilla bean, vanilla extract, and orange zest. -
Step 9
Fill and roll the roulade
Carefully unroll the cooled, towel-wrapped cake. Spread the filling over the cake, covering it evenly to within 2 inches of the edges. Reroll the cake, without the towel this time. The filling may squish out of the ends a bit; this is fine. Line a rimmed baking sheet with foil and set a wire rack on the foil. Slide two large metal spatulas (or a spatula and your hand) under the roulade and transfer it to the rack. (Or, if working ahead, transfer it to a large sheet of plastic, wrap it snugly, and refrigerate for up to a day; transfer to the rack before glazing.) -
Step 10
Glaze the roulade
In a large saucepan, combine the cream, sugar, 1/2 cup of water, and the cocoa powder. Bring the mixture to a boil and then reduce the heat to a simmer, whisking often, until very thick, like hot fudge sauce, 8 to 10 minutes from when the mixture began simmering. Pay close attention: This mixture boils over easily. Remove the pan from the heat. While the mixture is cooling, bloom the gelatin in 11/2 Tbs. of water (see the sidebar on p. 87). Melt the bloomed gelatin over very hot water or in the microwave. Whisk the gelatin into the chocolate mixture and strain the glaze through a medium sieve into a metal bowl. Let the glaze cool at room temperature until thick but still
pourable, 5 to 10 minutes; the glaze should be about 110°F to 120°F. (If you’ve made the cake ahead, unwrap it and put it on a rack set over a foil-lined baking sheet.) -
Step 11
Pour the glaze over the roulade, using an offset spatula to help the glaze cover the top and sides evenly. Don’t worry about covering the ends; they’ll be trimmed later. Refrigerate uncovered for at least
30 minutes or up to 4 hours. -
Step 12
Garnish and serve
Prepare the Whipped Cream as directed below.
Whipped Cream
Makes enough to
garnish 12 slices3/4 cup heavy cream
2 tsp. granulated sugar
1/2 tsp. pure vanilla extractWith a whisk or hand mixer, whip together the cream, sugar, and vanilla extract until soft peaks form.
The glaze will have “glued” the roulade to the rack, so slide a metal spatula between it and the rack to release it. Transfer the roulade to a serving platter, using two large offset spatulas to get underneath and pressing the spatulas against the rack as you go. Trim the ends of the roulade. Fill a tall container with hot water and have a dishtowel handy so that you can clean and dry the knife after cutting each slice. Using a long, sharp knife, cut 3/4-inch-thick straight slices, or cut pieces on an angle, rinsing and drying the knife after each slice. Put a dollop of the Whipped Cream next to each slice. Garnish with the candied orange zest and serve.
-
Step 13
Blooming Gelatin
Although gelatin isn’t an everyday ingredient, learning to work with it can give you spectacular-looking desserts. Gelatin is a stabilizer derived from animal collagen, and working with it isn’t difficult. However, before adding it to a recipe, it must be softened and then melted. For powdered gelatin, the softening process is also known as “blooming.”To bloom gelatin, sprinkle powdered gelatin evenly over its softening liquid to keep lumps from forming. Then set the gelatin aside for a few minutes until it swells or “blooms” as it absorbs the liquid. Finally, melt the gelatin either in a hot water bath or in a microwave for about 10 seconds on high until it becomes translucent. Use your fingers to check that all the granules have totally dissolved.
