

About
Great do-together art project doubles as great holiday gift for family!
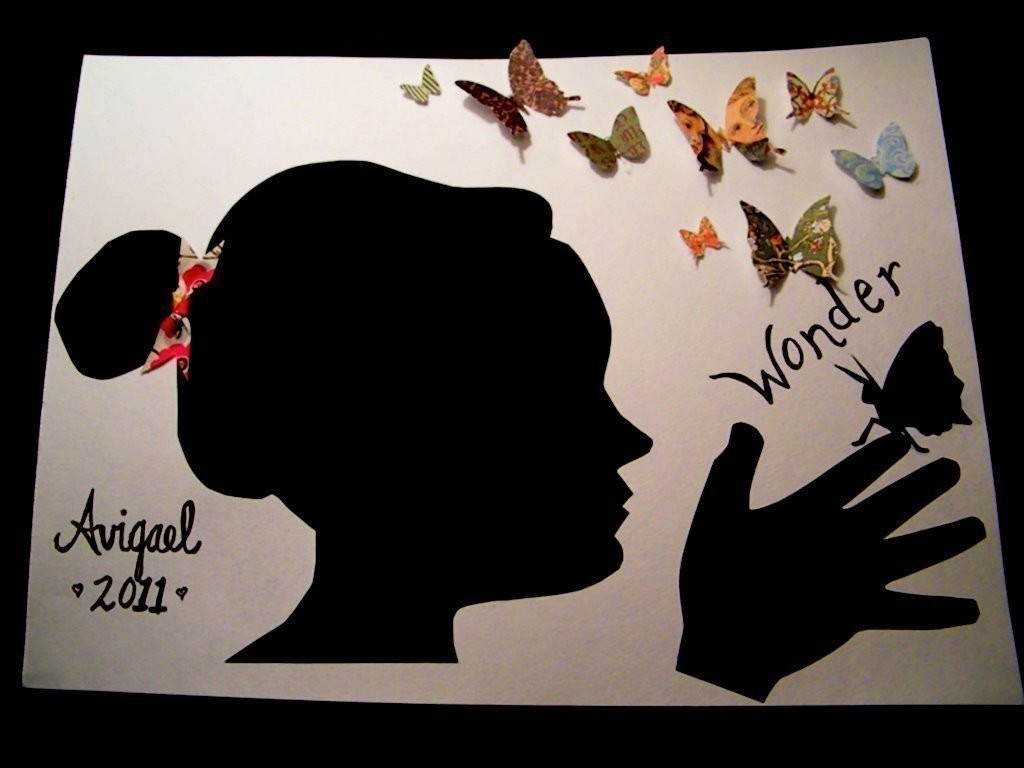
I saw the vintage-style portrait silhouette project posted here and thought I'd share an art project that came to mind while playing with my 3 yr old, Avi. She asked me to trace her hand over and over again, and after the 10th or so time of doing this, jokingly I said "how about I trace your face!?" To this she replied, "yeah! yeah!" and so we did. Remarkably she held still, as she thought the end result of seeing her face was "awesome!"
This ended up making a cute keepsake, since it's a permanent image of her head and hand at this age, and embellished it to be shadow-box worthy. You could develop any concept (instead of the butterflies) to match your child's interests and have it be more relevant for him/her. I've already had requests from grandparents, and I think it would be a fun, do-it-together holiday gift too!
Some details on the construction:
I traced a particularly good attempt on black Artgrain paper (you could use card stock in any dark color, or reverse the dark-on-light concept)
Trace a portrait by having your child kneel down and put her head down on the paper on a low-sitting table, like a coffee table. Gently trace her face and head shape. Trace her hand as well.
Position & glue the shapes on very sturdy paper (e.g. paper canvas, watercolour paper, etc.). Note- I used a glue stick that was supposed to go on colored & dry clear, which is usually the case, but on the grain of the watercolor paper I used, it dyed the fibers blue in some spots on the first attempt. I would shy away from these!
I thought the "floating hand" was awkward, so I wanted to fill the negative space. I decided to add a silhouette butterfly to her finger (so it appeared she was looking at it) because of her love of exploring nature.
Looking at a photo of a butterfly, I sketched it on the black Artgrain in the reverse of the direction I wanted it facing, then cut out the outline and flipped the paper to the solid black side.
Since there was still a lot of open white space, I developed the motif further by cutting little butterflies of varying sizes and colors out of vintage-themed scrapbook paper.
I folded these in half at the "body" of the butterfly, and hot glued them on the apex so the wings were free to stand up off the page. Less is more with the got-glue!
I cut a small piece of ribbon, tied a simple knot, cut the ends to size and a "V" shape, and glued this over the 'bun' part of her hair.
I added her name and the year.
Tags
-
 Faye W. added Child Keepsake Silhouette Portrait With Dimensional Elements to Fav
23 Jun 01:40
Faye W. added Child Keepsake Silhouette Portrait With Dimensional Elements to Fav
23 Jun 01:40
-
 Anni favorited Child Keepsake Silhouette Portrait With Dimensional Elements
01 Aug 08:52
Anni favorited Child Keepsake Silhouette Portrait With Dimensional Elements
01 Aug 08:52
You Will Need
Casey W. posted this project as a creation without steps
Here are some similar tutorials to help you make this one!


