


About
a no-seams, no-piecing, no-measuring, low-OC method of doing crazy patchwork
This is a favorite method of mine for putting together quick fabric patchwork pieces that I then use to cover my handbound books with.
It’s “low brow” because the fabric scraps are laid down with raw edges: I don’t turn the edges of the pieces over, or stitch one piece to the next with a neat ¼-inch seam. I don’t measure or use templates to cut the pieces out…I don’t even use fabric* as the foundation!
It is a great method to use if you plan to mount the patchwork to something hard and stable afterwards, as a purely decorative skin. Use the resulting fabric to cover a box, or medium density fibreboard (MDF) craft shapes…to cover book boards, or glue onto greeting cards. I’ve made postcards and artist’s trading cards (ATCs) with it, stitching or gluing the fabric to heavy paper.
This would not be a good method to use on a serious quilt, or any other free-moving sewing project. The patchwork won’t take washing, and probably wouldn’t hold together if the pieces were constantly moving and flexing. Certainly not suitable for upholstery, bags or anything that gets wear-and-tear…even if you backed it with fabric later, and quilted it all over for strength, the raw edges could slowly work themselves into rough, frilly edges.
-
 Cassiefairy added Cheater's Crazy Patchwork to Penny's Bedroom
11 Jun 20:41
Cassiefairy added Cheater's Crazy Patchwork to Penny's Bedroom
11 Jun 20:41
-
 Sarah Sylvia S. favorited Cheater's Crazy Patchwork
23 Jul 08:39
Sarah Sylvia S. favorited Cheater's Crazy Patchwork
23 Jul 08:39
-
 Sharon S. favorited Cheater's Crazy Patchwork
15 Aug 19:27
Sharon S. favorited Cheater's Crazy Patchwork
15 Aug 19:27
-
 Stefunny128 favorited Cheater's Crazy Patchwork
10 Jul 05:49
Stefunny128 favorited Cheater's Crazy Patchwork
10 Jul 05:49
-
Jenifer E. favorited Cheater's Crazy Patchwork
25 Feb 13:59
-
 silentband favorited Cheater's Crazy Patchwork
21 Jul 03:06
silentband favorited Cheater's Crazy Patchwork
21 Jul 03:06
-
 Charlene J. favorited Cheater's Crazy Patchwork
04 Jul 01:23
Charlene J. favorited Cheater's Crazy Patchwork
04 Jul 01:23
-
 Step 1
Cut the fusible interfacing to the finished size you’d like your patchwork to be.
Here, I have a small stack, all cut to the size I will need (I'm going to use the finished patchwork to cover handmade journals)
-
 Step 2
Get out your fabric scraps. Iron them smooth, and cut them into different shapes and sizes. Don't make them too small...my minimum is about 2-inches square.
I don't stress on making lines straight or anything, I just use a sharp pair of scissors and 'eye' it. -
 Step 3
Lay your interfacing with the GLUE SIDE UP (the glue side has shiny little crystals all over it)
Start arranging your scrap pieces on the interfacing, overlapping each succeeding piece by about 1/4-inch (5 mm)to hide the white interfacing. Get an arrangement you like. -
 Step 4
Almost done...for funny-shaped gaps, use your scissors to trim scraps into pieces that fit better.
-
 Step 5
Use a smooth, flat, firm surface for ironing. Tape a big piece of baking parchment to the surface (don't iron an good furniture!), lay your interfacing + scraps arrangement on the parchment.
Cover with another sheet of baking parchment. Set the iron to cotton or linen, and iron your patchwork.
Move slowly, and press down firmly to force the fabric and the interfacing to touch each other. Don't ignore the edges.
Stay away from the tape that is holding the parchment to the table!
-
 Step 6
When things seem to have bonded together well, flip the patchwork over, cover with the parchment, and iron some more, just to make sure.
-
 Step 7
Done. Let it cool before you pick it up.
There will be little flappy bits, where the fabric scraps overlapped and some parts didn't come in contact with the interfacing glue.
Next step is to stitch these raw and flippy-flappy bits down.
-
 Step 8
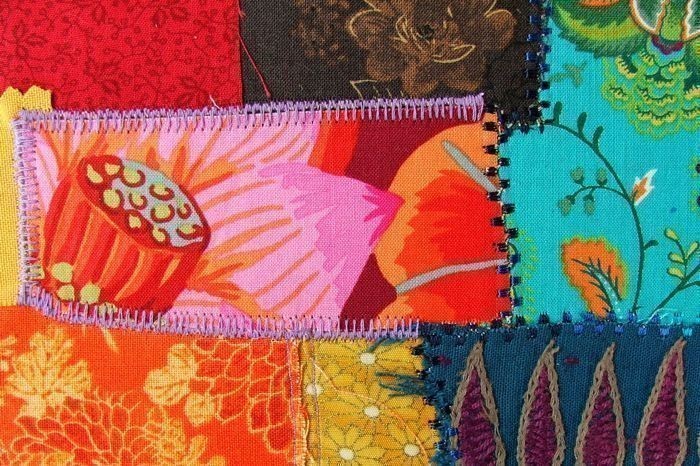
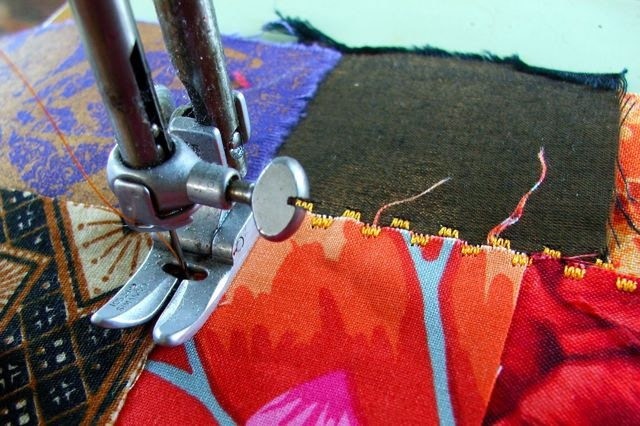
Put the patchwork into your sewing machine, load some brightly colored thread into it, and pick wide, DECORATIVE stitch patterns to stitch the raw ends of the pieces down. Try to stitch down the middle of two pieces, so you get both pieces with one pass.
Just zoom along the lines, making quarter-turns as needed, or cutting the threads and starting somewhere else.Change thread color and stitch pattern as often as you like. It's not called "Crazy Patchwork" for nuthin'!
-
 Step 9
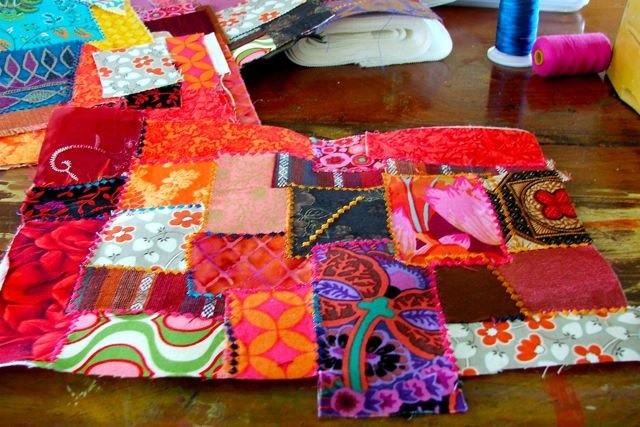
Here's a finished piece.
-
 Step 10
And here's what it looks like on the back of the interfacing.
Enjoy!


Lucia, Happy that you like it!
Even if I love the original way doing a crazy quilt.