About
Stampmaking is fun and is a great intro to a whole world of printmaking!
Stampmaking is a great introduction to the world of printmaking. You learn the basics of the technique and you can do it right in your own home without the use of heavy printing presses! Just don't forget: What ever you carve will be backwards when you stamp it!!! Also, when carving a stamp, think in black and white, no matter what color you stamp in. Whatever you carve away will be the white of the paper, and what ever you leave raised will be black / ink color.
-
 Mick C. favorited Carve Your Own Stamp! (And Stamp It Too!)
07 Oct 00:59
Mick C. favorited Carve Your Own Stamp! (And Stamp It Too!)
07 Oct 00:59
-
 Bek S. favorited Carve Your Own Stamp! (And Stamp It Too!)
02 Aug 10:54
Bek S. favorited Carve Your Own Stamp! (And Stamp It Too!)
02 Aug 10:54
-
kera c. added Carve Your Own Stamp! (And Stamp It Too!) to Hmm..Projects of Interest...?
08 Jul 13:41
-
 MischievousRaven added Carve Your Own Stamp! (And Stamp It Too!) to Computer / Office stuff
04 Sep 10:17
MischievousRaven added Carve Your Own Stamp! (And Stamp It Too!) to Computer / Office stuff
04 Sep 10:17
-
 Gente de Massinha favorited Carve Your Own Stamp! (And Stamp It Too!)
22 Apr 18:41
Gente de Massinha favorited Carve Your Own Stamp! (And Stamp It Too!)
22 Apr 18:41
-
 Crafterella featured Carve Your Own Stamp! (And Stamp It Too!)
16 Apr 23:00
Crafterella featured Carve Your Own Stamp! (And Stamp It Too!)
16 Apr 23:00
-
 Sveta favorited Carve Your Own Stamp! (And Stamp It Too!)
16 Apr 06:38
Sveta favorited Carve Your Own Stamp! (And Stamp It Too!)
16 Apr 06:38
-
 Emma H. favorited Carve Your Own Stamp! (And Stamp It Too!)
13 Apr 17:40
Emma H. favorited Carve Your Own Stamp! (And Stamp It Too!)
13 Apr 17:40
-
 LoupLou added Carve Your Own Stamp! (And Stamp It Too!) to Gifts
12 Apr 08:19
LoupLou added Carve Your Own Stamp! (And Stamp It Too!) to Gifts
12 Apr 08:19
-
 Heather M. favorited Carve Your Own Stamp! (And Stamp It Too!)
10 Apr 22:52
Heather M. favorited Carve Your Own Stamp! (And Stamp It Too!)
10 Apr 22:52
-
 Step 1
Here's a photo of what the tools you will need look like, in case it's hard to find them out in the wild, just by description. (The brayer and tube of relief ink on the left hand side and top of photo are optional to the process.) Otherwise you will need (clockwise): ink pad, Speedball Linocut Tool (blades come with it), X-Acto knife, ballpoint pen, rubber carving block, your drawing, and graphite transfer paper.
-
 Step 2
Tape your drawing down to the rubber stamp material on one edge, like a hinge. (Make sure you do this step, otherwise the paper may move when you are tracing your drawing with the graphite paper).
-
 Step 3
Place the graphite transfer paper (dark side down) between your drawing and the rubber carving block.
-
 Step 4
Trace your drawing with your ballpoint pen, applying a medium amount of pressure (and by medium we just mean, don't press so hard you poke through your drawing and graphite paper).
Trace ALL the details of your drawing, you can edit what you don't want to carve once this part is done. It's better to have too much info in your tracing than not enough once you unstick your drawing from the block, before carving. Periodically peek under the graphite paper to make sure you are transferring your image.
-
 Step 5
Once you have traced your drawing, remove the drawing and tape from your rubber carving block to reveal what looks like a pencil drawing.
-
 Step 6
If any details didn't transfer or are blurry, use a pencil to draw them back in, directly on the surface of your block.
-
 Step 7
Now you can start carving your image.
NOTE: ALWAYS CARVE AWAY FROM YOUR FINGERS.
The blades are different sizes: a small blade for detail, two V-gouges for thick and thin line work, and a wide U-gouge for clearing away large areas of stamp material. -
 Step 8
For ease, shading (in pencil) the areas you don't want to carve away is an easy way to keep from carving away too much and makes your carving a less stressful experience.
-
 Step 9
Using your X-Acto knife, carefully carve 1/4 inch around your entire drawing/carving. The excess stamp material can be discarded. Using the largest blade in your linocut tool, carve a bevel or lip between the stamp image and the edge of the material (this is the 1/4 inch of space you left when you cut around the design with the X-Acto.)
-
 Step 10
Here's another view of that step and the edge it leaves behind. Lightly carve that 1/4 inch of space to bevel. This allows you to pick up and place the stamp by the edges without getting your fingers all inky.
-
 Step 11
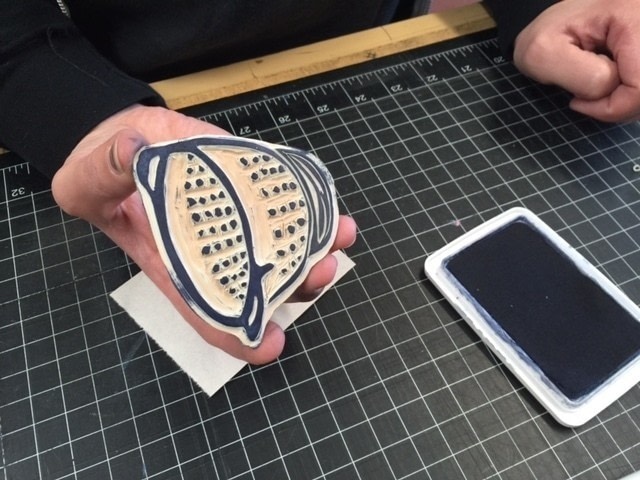
Press the carved stamp down on the stamp pad so that the whole stamp surface gets inked.
-
 Step 12
Like so...
-
 Step 13
Place stamp face down on paper and press firmly with palm of hand. Don't go crazy with pressure, just press firmly. If you press too hard, the stamp material will squish out and look blurry.
-
 Step 14
Pick up stamp at the edges with one hand, while holding the paper down with the other and you've done it! Now go stamp everything!