

About
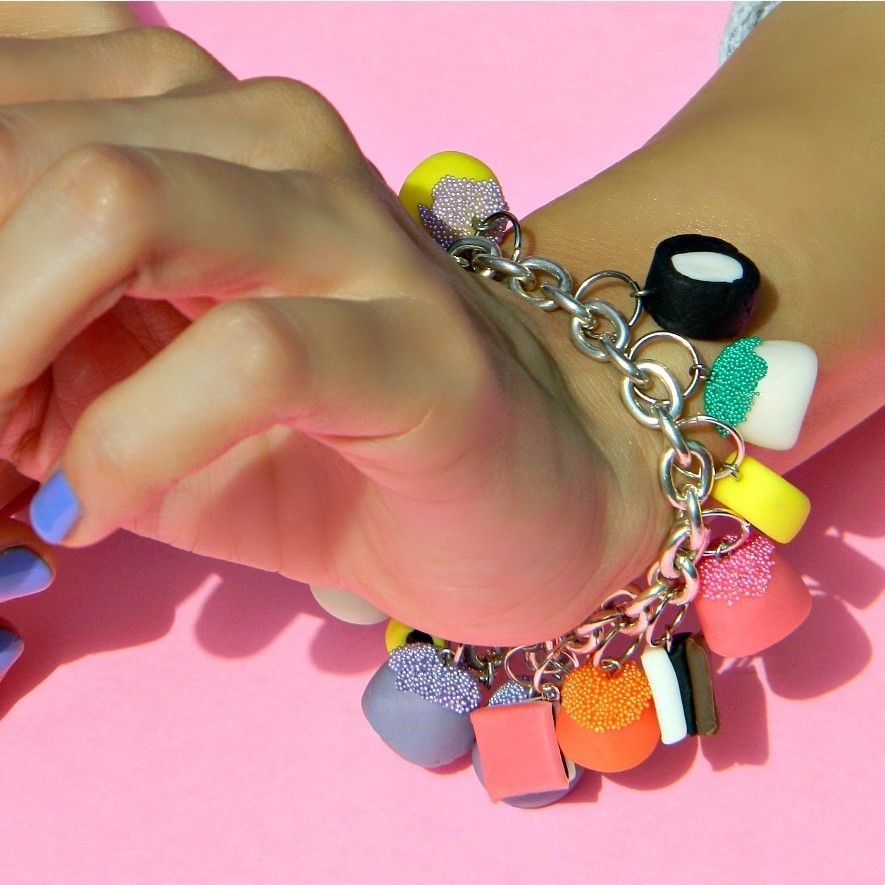
Candy Jewelry that looks good enough to eat!
Make this candy jewelry with air-dry clay and micro glass beads.....So fun! See the video tutorial here: https://www.youtube.com/watch?v=KvTfiEGSFMc
-
 Key West Witch favorited Candy Jewelry Diy
26 Jun 09:10
Key West Witch favorited Candy Jewelry Diy
26 Jun 09:10
-
 mmotse03 favorited Candy Jewelry Diy
07 Mar 19:51
mmotse03 favorited Candy Jewelry Diy
07 Mar 19:51
-
 Summer O. favorited Candy Jewelry Diy
22 May 05:32
Summer O. favorited Candy Jewelry Diy
22 May 05:32
-
 gypsie_jay added Candy Jewelry Diy to DIY Accessories
23 Nov 02:46
gypsie_jay added Candy Jewelry Diy to DIY Accessories
23 Nov 02:46
-
gypsie_jay favorited Candy Jewelry Diy
23 Nov 02:46
-
 Elizabeth s. favorited Candy Jewelry Diy
04 Apr 17:33
Elizabeth s. favorited Candy Jewelry Diy
04 Apr 17:33
-
 Sabrina Dee Berry favorited Candy Jewelry Diy
04 Dec 00:18
Sabrina Dee Berry favorited Candy Jewelry Diy
04 Dec 00:18
-
 bluebirdy17 favorited Candy Jewelry Diy
06 Nov 11:54
bluebirdy17 favorited Candy Jewelry Diy
06 Nov 11:54
-
 Sophie K. favorited Candy Jewelry Diy
03 Nov 21:40
Sophie K. favorited Candy Jewelry Diy
03 Nov 21:40
-
Verlaine R. favorited Candy Jewelry Diy
12 Oct 01:34
-
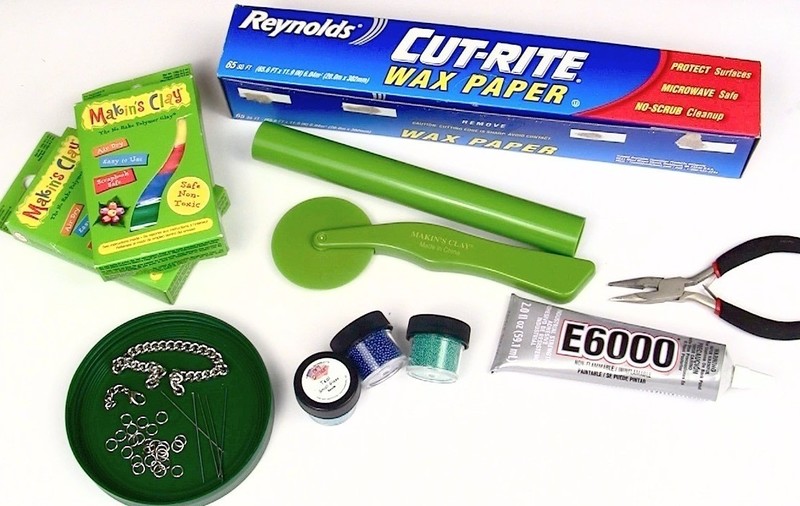
 Step 1
You'll Need
E-6000 Glue
Wax paper
Makin's Clay
Clay tools (rolling pin and pizza cutter)
Art Glitter Micro Glass Beads
Jewelry findings
Needle nose pliers -
 Step 2
1. Pick your colors. I used white and red to make pink.
2. Mix them together and roll it out with a rolling pin.
3. Cut 3/4" squares.
4. Do this with black and white clay, too.
5. Gently squeeze them together to create a candy. -
 Step 3
6. Create an eye pin and insert it into the candy.
7. Take a small bit of clay and roll it into a ball.
8. Flatten one side to create a gumdrop.
9. Insert an eye pin. -
 Step 4
10. Let everything dry overnight.
11. Frost the tops of the gumdrops with E-6000 glue.
12. Sprinkle the micro glass beads on the glue and let dry for 1 hour. -
 Step 5
13. Attach your candy to a chain bracelet.
14. Attach gumdrops to earring wires to create earrings.
You're done!