


About
Carry your kitty in style with a retro campervan cat carrier!
This awesome retro fabric from Premier Prints Inc had the perfect look for a campervan so I decided to treat Bobbin to a new cat carrier so she could travel in style.
-
 Cathy P. favorited Campervan Cat Carrier
13 Jan 08:05
Cathy P. favorited Campervan Cat Carrier
13 Jan 08:05
-
 Meghan E. favorited Campervan Cat Carrier
08 Feb 04:39
Meghan E. favorited Campervan Cat Carrier
08 Feb 04:39
-
 Cassiefairy favorited Campervan Cat Carrier
12 Jun 10:52
Cassiefairy favorited Campervan Cat Carrier
12 Jun 10:52
-
 mmotse03 favorited Campervan Cat Carrier
21 May 07:22
mmotse03 favorited Campervan Cat Carrier
21 May 07:22
-
 amyistheparty favorited Campervan Cat Carrier
18 Apr 20:48
amyistheparty favorited Campervan Cat Carrier
18 Apr 20:48
-
 Cat Morley published her project Campervan Cat Carrier
18 Apr 09:00
Cat Morley published her project Campervan Cat Carrier
18 Apr 09:00
-
 Step 1
For this project, you'll need a cheap lightweight carrier to start with.
-
 Step 2
Trace the front of your carrier onto paper to make a template.
-
 Step 3
Pin your template to the white fabric.
-
 Step 4
Cut around the template leaving 1/2" around the edges. Cut two of these.
-
 Step 5
Measure your carrier with a measuring tape and cut to the correct width and depth. Leaving an inch excess on all sides.
-
 Step 6
Fold the bottom edge of the fabric up by 1/2", then up by another 1/2" then pin.
-
 Step 7
Drape the fabric over the carrier and fold the front and back edges under by 1/2", then another 1/2" and then pin.
-
 Step 8
Cut a v-shaped bottom for the front of the campervan from your red fabric.
-
 Step 9
Sew in place using a zig-zag stitch.
-
 Step 10
Repeat with the top edge of the fabric and then sew.
-
 Step 11
Cut large circles for the headlights from black felt and then slightly smaller circles from the silver fabric.
-
 Step 12
Place a black circle at either side for the headlights and place a silver circle on top of each.
-
 Step 13
Stitch in place using a zig-zag stitch.
-
 Step 14
Mark the top of your fabric where the carrier's handle sits underneath.
-
 Step 15
Slit the line with your scissors and slip the handle through the hole.
-
 Step 16
Fold the rough edges under and pin.
-
 Step 17
Sew the edges down.
-
 Step 18
Cut two strips of red fabric about half the height of your carrier and as long as the sides. Stitch in place at the bottom of either side of the fabric.
-
 Step 19
Stitch a slightly smaller version in the middle of the two headlights for the campervan's badge.
-
 Step 20
Cut a template to the size you'd like the front window.
-
 Step 21
With the wrong sides facing out, pin the front of your campervan to the sides.
-
 Step 22
Trace around the template onto the front of your campervan using an air erasable pen.
-
 Step 23
Unpin the front of your campervan.
-
 Step 24
Cut the middle from the window leaving 1/2" around the edges and then pin them back.
-
 Step 25
Sew around the sides of the window.
-
 Step 26
Make a new template for the side windows and trace around it three times onto either side of the carrier.
-
 Step 27
Use the same template to cut 12 squares of retro print fabric for the curtains.
-
 Step 28
Fold the rectangles with a fan fold and pin to either side of the windows to look like curtains.
-
 Step 29
Cut a strip of ribbon for the top of the windows and pin in place.
-
 Step 30
Sew the curtains in place.
-
 Step 31
Cut four large circles from black felt for the wheels and hand-stitch in place on the sides of the campervan, stitching a large white button in the middle.
-
 Step 32
Hand stitch one large button and 3 small buttons in the shape of a paw on the badge of the campervan.
-
 Step 33
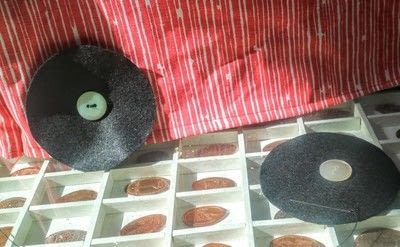
Wrong sides facing out, pin the front and back to the side of your carrier cover and stitch in place. Fold inside out again, place over your carrier and you're done!


