About
the more cephalopods, the better!
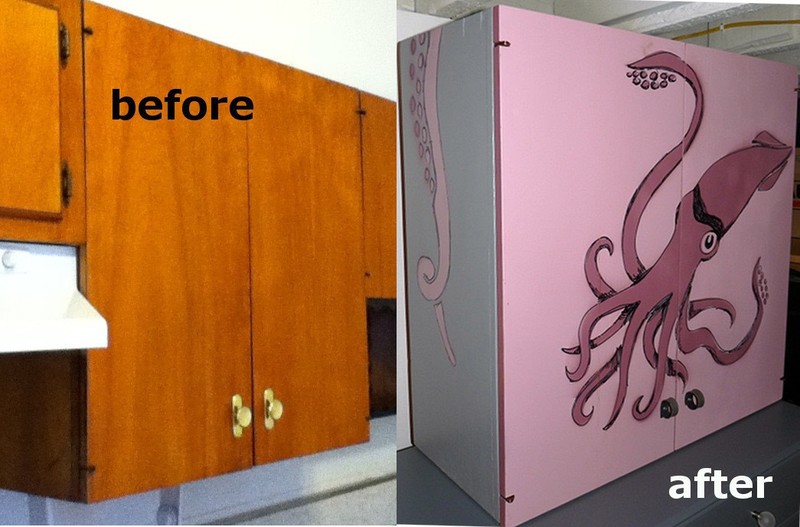
after tearing out our old kitchen, we had these solid but ugly cabinets cluttering up the basement. i can't stand to get rid of anything functional, so i rehab'd 'em just to see how they'd look. i'm super happy with how they turned out, so i thought i'd share!
i use lots of spray paint, because my brush painting technique is awful, and i get wicked bad repetitive stress inflammation when i hand paint. i have found home depot's rustoleum 2x spray to be my favorite easily available paint- it really does go on quick and thick, and wears really well. they also have some fun colors. for more color choices, i used montana black (that's what i used here- see can in step #4). montana is a high end 'street art' spray paint (ie, kinda pricey, made for graffiti artists), but it comes in a bazillion colors, and sprays and wears better than anything else. it is hard to find in person, but easy to buy online. be warned, the paint colors don't match the chart very well- if you can find it in person, the can colors are a very good match.
-
 Kayleigh W. favorited Cabinet Rehab Make The Most Of What You've Got!
21 Feb 04:09
Kayleigh W. favorited Cabinet Rehab Make The Most Of What You've Got!
21 Feb 04:09
-
 Tasha-Elizabeth added Cabinet Rehab Make The Most Of What You've Got! to Home
04 Oct 19:33
Tasha-Elizabeth added Cabinet Rehab Make The Most Of What You've Got! to Home
04 Oct 19:33
-
Tasha-Elizabeth favorited Cabinet Rehab Make The Most Of What You've Got!
04 Oct 19:33
-
 Emma H. favorited Cabinet Rehab Make The Most Of What You've Got!
17 Jul 16:53
Emma H. favorited Cabinet Rehab Make The Most Of What You've Got!
17 Jul 16:53
-
 Len favorited Cabinet Rehab Make The Most Of What You've Got!
12 Feb 20:16
Len favorited Cabinet Rehab Make The Most Of What You've Got!
12 Feb 20:16
- JaydeyLikesMac&Cheese favorited Cabinet Rehab Make The Most Of What You've Got! 17 Jun 03:25
-
christina c. favorited Cabinet Rehab Make The Most Of What You've Got!
19 May 02:43
-
 Roughwaters44 favorited Cabinet Rehab Make The Most Of What You've Got!
24 Feb 04:40
Roughwaters44 favorited Cabinet Rehab Make The Most Of What You've Got!
24 Feb 04:40
-
Jennifer C. added Cabinet Rehab Make The Most Of What You've Got! to hair
01 Oct 03:18
-
ashley l. favorited Cabinet Rehab Make The Most Of What You've Got!
18 Aug 02:01
-
 Step 1
i don't have pics of the deconstruction, but you can see from the pick at the left- hideous orange stained wood, basic box construction. they are old enough that they are actually made of wood & plywood- no particle board!
i don't bother with particle board or cheap veneer furniture- i like real wood (even cheap pine), i like to strip it, i like to sand it, i like the feel of it. this technique would work just as well on particle board, but why?
i sanded the wood lightly, then spray painted them in a nice even base coat. then it was stencil time!
-
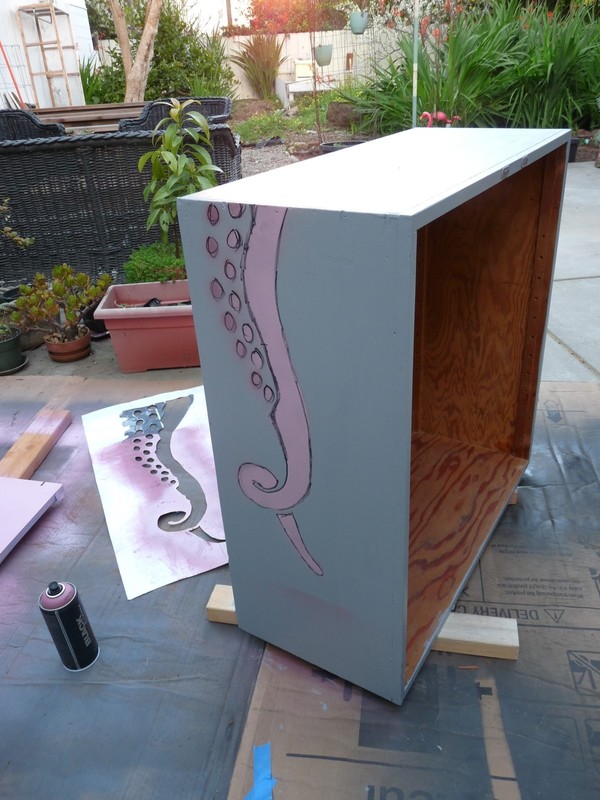
 Step 2
i made a quick hand drawn/ cut stencil from paper, then spray painted the darker color onto lighter. since i was going to add sharpie outlines, i didn't worry about my edges being fuzzy. i forgot to cut out the middle leg, so had to go back and cut a separate stencil to fill that in. a huge pain.
-
 Step 3
Use a sharpie to highlight details or shadows, cover mistakes, or just have fun with it!
-
 Step 4
since the cabs are no longer mounted together, i painted the outside and used an old stencil to add interest.
(i often make stencil from paper covered in packing tape. they are a pain to cut out, but they wear well. i've used this one for several projects and it is still going strong.)
-
 Step 5
in any furniture rehab, updated knobs/pulls are very important- i added something different with these loops of old belt. the are sturdy, flexible, functional, and unexpected. leather works great for this, and wears really well. (these are faux snake skin- it's what i had on hand. i don't expect them to wear that well, but they were easy to make, and free. plus, i really like the color and texture)
to make them, i just cut 2 loops of belt to length, punched holes in them, and used short screws thru the belt into the wood. i've also seen them with the strip folded flat against the cab face, with the screw thru the top- this seemed more functional to me.
-
 Step 6
And there you have it- functional, and much more fun to look at. this is basement storage for us, but would look great anywhere!