
About
Button, button, who's got the button?
-
 Pimke added Button Monogram Art to Deko
11 Feb 21:32
Pimke added Button Monogram Art to Deko
11 Feb 21:32
-
 Dee D. added Button Monogram Art to art
05 Feb 17:37
Dee D. added Button Monogram Art to art
05 Feb 17:37
-
 Shannon G. entered her project Button Monogram Art to Allstarco Contest
08 Mar 05:34
Shannon G. entered her project Button Monogram Art to Allstarco Contest
08 Mar 05:34
-
 Djamilah W. favorited Button Monogram Art
18 Jul 17:23
Djamilah W. favorited Button Monogram Art
18 Jul 17:23
-
 Phenomenise favorited Button Monogram Art
12 Jul 15:20
Phenomenise favorited Button Monogram Art
12 Jul 15:20
-
 tiffany.robinson.900 favorited Button Monogram Art
20 Jun 03:59
tiffany.robinson.900 favorited Button Monogram Art
20 Jun 03:59
-
Shannon G. entered her project Button Monogram Art to Image3D
18 Jun 23:43
-
 KelliDroze added Button Monogram Art to Decorations
18 Jun 06:04
KelliDroze added Button Monogram Art to Decorations
18 Jun 06:04
-
Step 1
1. First figure out what size frame or canvas you are trying to cover. Add an inch all around to allow for overlap and attaching at the end.
-
 Step 2
2. Once you have your size figured out, sketch up the initial you want to recreate. You can freehand a template or print out a font on the computer.
-
 Step 3
3. To actually start working, take your piece of fabric and stretch it out over an embroidery hoop.
-
Step 4
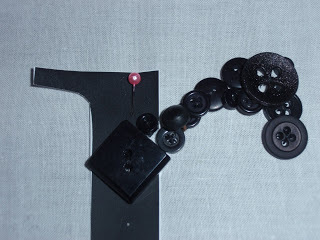
4. Pin your monogram onto the center of your stretched fabric.
-
Step 5
5. Now, bust out your button collection! There was two ways to go about laying out your buttons to the monogram. Way one: take out your button collection and lay out all of your buttons over a second paper copy of the initial template to see where and how to affix your embellishments. I did this with my first uppercase letter. It worked out well—I took a digital photo of the layout before moving any buttons so as to preserve my hard work. Way two: wing it! That is the approach that I took for the lowercase letter.
-
 Step 6
6. Starting with larger sized buttons, take a needle and thread and attach buttons thru the initial template. Don’t worry; you can cut the paper away later.
-
Step 7
7. Once you have your main, base buttons attached, cut away the paper. If you wait to do this later on after the small buttons are sewn are, it is much harder to remove the paper cleanly. (You can wait, though if you want. I did for the first monogram!)
-
 Step 8
8. If you did decide to keep the paper on thru to the small size buttons, take small scissors and start clipping away the paper that you are able to reach. To make it easier, remove the fabric from the hoop. Please be CAREFUL not to cut any threads you have in and around the paper.
-
Step 9
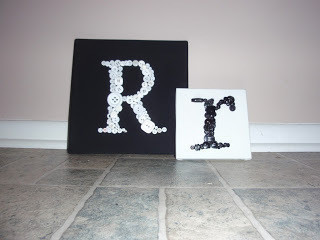
9. Remove your fabric from the hoop (if you haven’t already). Lay the piece face down on a counter. If you used buttons with back loop shanks, you may want to lay the piece down on a slightly padded surface. Lay your canvas or frame over top your fabric, centered. Take your fabric at the top and fold it over the back of the frame. Place one staple in the top center. Fold the bottom of the fabric over the back. Pull taught and place a staple in the bottom center of the fabric. Repeat steps for the left and right side of the canvas. Starting at the top again, pull your fabric taught along the edge, placing a few staples along the way.
-
Step 10
10. If there is any extra bulk fabric on the back, trim around the staples so the back of the artwork can lay flat against the wall.
-
Step 11
11. Hang up—and done!