


About
Spend $3 instead of buying this for $59!!!!!!
I've been lusting after this fringe tank top from Boston Proper that retails for $59 but is now on sale for $29.99. But I think that is a ridiculous price so I've been mentally working on creating my own version and here it is and it only cost approx. $3! I've made some adjustments due to my own preferences (i.e. dark olive color instead of a cream, the fringe is only on the front and does not wrap around the entire garment because I didn't want the side and back pieces to get caught up in chairs, purse straps and other things...lol!) I also made the braid a bit more wide to add more strength because my fringe is more full than that of the original garment. I just felt the original garment was "bare"...Hope you enjoy and feel free to ask any questions. Hopefully this tutorial (my first ever) is easy to follow! Best of luck!
PS. I apologize for the color not showing up properly...I will work on this for the future! :)
Tags
-
 Key West Witch favorited Braided Fringe Tank (Version Of Boston Proper's Garment)
12 Sep 12:50
Key West Witch favorited Braided Fringe Tank (Version Of Boston Proper's Garment)
12 Sep 12:50
-
 Jobie K. added Braided Fringe Tank (Version Of Boston Proper's Garment) to Diy CutOut Tshirt
16 Dec 15:42
Jobie K. added Braided Fringe Tank (Version Of Boston Proper's Garment) to Diy CutOut Tshirt
16 Dec 15:42
-
 Julie A. added Braided Fringe Tank (Version Of Boston Proper's Garment) to to make
18 Jul 00:30
Julie A. added Braided Fringe Tank (Version Of Boston Proper's Garment) to to make
18 Jul 00:30
-
 shelly.anderson.547 added Braided Fringe Tank (Version Of Boston Proper's Garment) to Tee Shirt
11 Jun 21:07
shelly.anderson.547 added Braided Fringe Tank (Version Of Boston Proper's Garment) to Tee Shirt
11 Jun 21:07
-
shelly.anderson.547 favorited Braided Fringe Tank (Version Of Boston Proper's Garment)
11 Jun 21:07
-
Franky F. favorited Braided Fringe Tank (Version Of Boston Proper's Garment)
19 Jan 07:21
-
 RareJewel favorited Braided Fringe Tank (Version Of Boston Proper's Garment)
30 Nov 05:54
RareJewel favorited Braided Fringe Tank (Version Of Boston Proper's Garment)
30 Nov 05:54
-
 srslyjc favorited Braided Fringe Tank (Version Of Boston Proper's Garment)
20 Sep 18:48
srslyjc favorited Braided Fringe Tank (Version Of Boston Proper's Garment)
20 Sep 18:48
-
 Aby M. added Braided Fringe Tank (Version Of Boston Proper's Garment) to Lady Loki
10 Aug 14:19
Aby M. added Braided Fringe Tank (Version Of Boston Proper's Garment) to Lady Loki
10 Aug 14:19
-
 Dark Rose favorited Braided Fringe Tank (Version Of Boston Proper's Garment)
11 Jul 10:15
Dark Rose favorited Braided Fringe Tank (Version Of Boston Proper's Garment)
11 Jul 10:15
-
Step 1
Measure:
First determine the length of the fringe (which ends up being the width of your rectangle in the next step).Mine was roughly 6 inches so I needed a total of 12 inches for the length of one fringe piece.
-
 Step 2
Cutting your Fringe Strips:
Determine the direction of the stretch of your fabric. Mine was selvage to selvage. I cut a rectangle from the fabric that was 12 inches across the stretchy side by approx 13-14 inches in length. Remember that you want your fringe pieces to stretch a little so double check before you start cutting. Notice that you are making your fringe longer than really needed. You will trim at during the last step. (Better to be safe than sorry!)Start Cutting:
Cut thin strips (as thick or thin as you prefer)and put aside. FYI: fold the fabric together and cut your fringe. Trust me, you can cut your strips faster this way! -
 Step 3
Make the Braid:
Cut 3 strips (any width you prefer but keep it in balance with the width of your fringe strips) and braid the entire length. I safety-pinned both ends to keep them from unraveling. Note: the extra braid lengths become your straps so DO NOT cut them off!!!!Fold the braid together and pinpoint the middle. Place a safety pin there as a marker. This middle point will be the match up to the middle point of the front of your tank top.
-
 Step 4
Fringing the Braid:
Start fringing your braid starting from the middle point and continue outwards on one side. You will have to determine how far you want to fringe depending on your individual measurements. Once you've completed one side, go back to the middle point and work in the opposite direction. Make sure both sides are equal. (you can adjust this later on if you need to. I had to remove some of the fringe when I actually tried on the garment.)To Loop the Fringe:
I used a small crochet needle to fringe. Sorry I don't have a picture but I used a simple "latch hook rug loop" for those of you that remember making those...lol. I put my crochet needle up through a bottom braid link, wrapped two fringe strips around the needle, pulled the needle through the braid link to create a loop, and then pulled the fringe strip through the loop. -
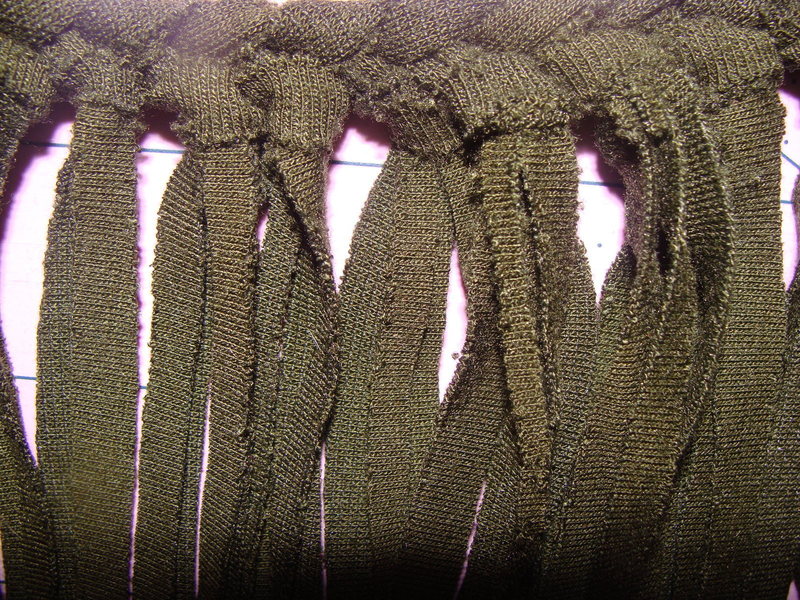
 Step 5
Closer look at the loops
-
 Step 6
Cut Body of Tank Top:
Lay out your fabric selvage sides together with the right sides of the fabric faced together. Lay your favorite fitting tank top flat and cut out. If you do it this way, you will have two identical pieces for the front and back. Give yourself enough seam allowance as well. -
 Step 7
Construction:
I used a serger to sew up the sides and used a 4-thread safety stitch. -
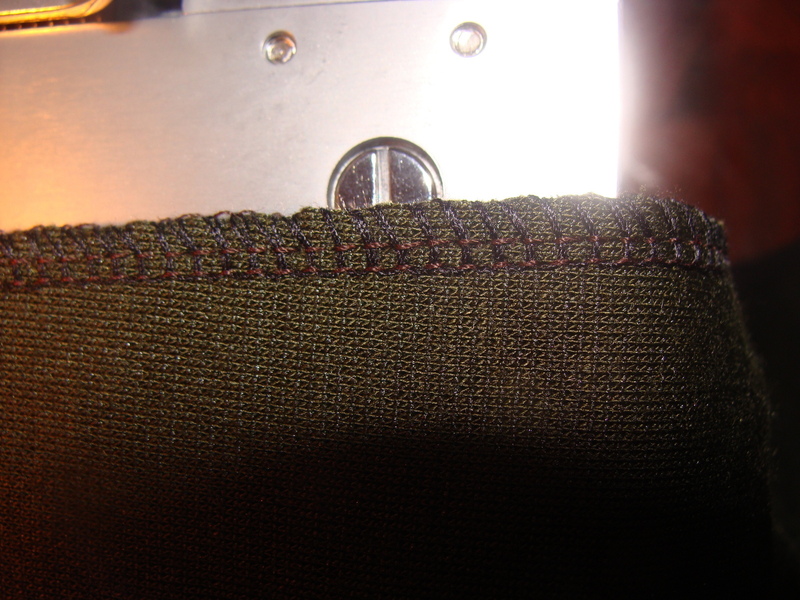
 Step 8
Next I hemmed the under arm seams and bottom seam using a narrow cover stitch on the serger. You can always use a stretch stitch or zig zag on a conventional sewing machine.
-
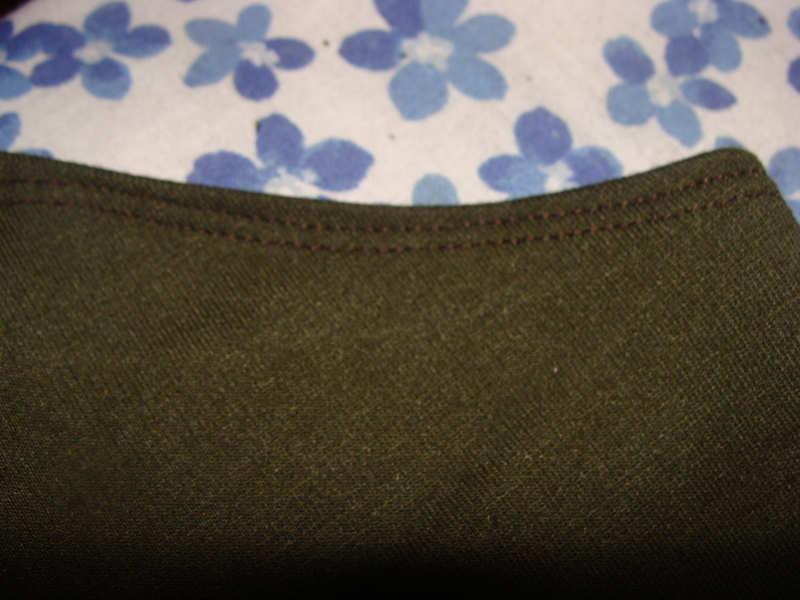
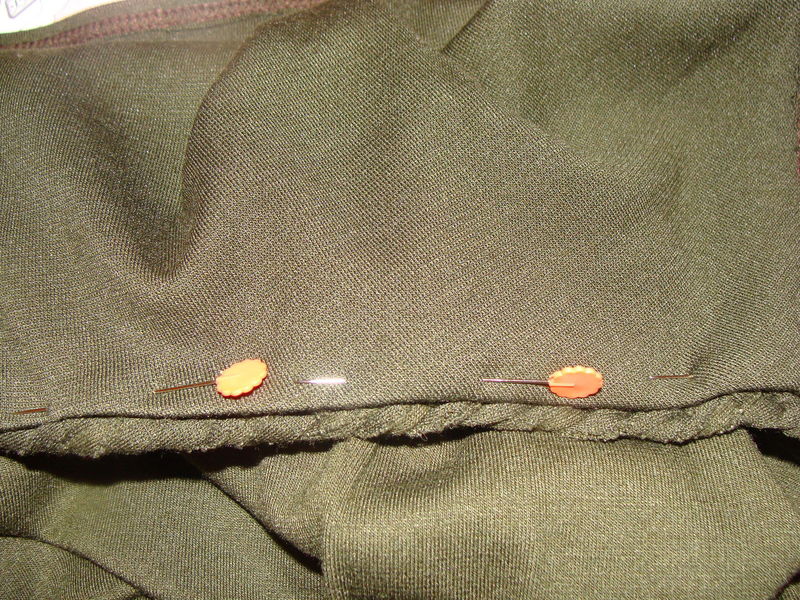
 Step 9
Picture of the bottom hem
-
Step 10
(Sorry no picture!)
Next I looked at the back of the tank top. The top is exactly like the front and I didn't want that so I folded it over, ironed, and narrow cover stitched. I didnt use elastic because I wanted it to be more comfy.Once all hems are done, I trimmed any excess material to give it a clean look.
-
 Step 11
Neck Hem and attaching the braid:
I turned the tank top right side out and folded a 1/4 inch seam outwards and then ironed. This sounds odd and opposite of what you normally do but it will provide for a clean look on the final product.
Find the middle point of the front of your tank. Match this point to the middle point (safety pin) of your braided fringe and pin. I pinned mine so that the edge of the hem was close to the middle point of the braid. I didn't want the neckline hem to show at the top of the braid edge.
Pin the braid from the middle moving outwards to ensure no pulling or gaps. I then hand-stitched the neckline hem to the braid making sure the stitches didn't show in the front.
-
 Step 12
Find the middle point of the front of your tank. Match this point to the middle point (safety pin) of your braided fringe and pin. I pinned mine so that the edge of the hem was close to the middle point of the braid. I didn't want the neckline hem to show at the top of the braid edge.
Pin the braid from the middle moving outwards to ensure no pulling or gaps.
-
 Step 13
I then hand-stitched the neckline hem to the braid making sure the stitches didn't show in the front.
-
 Step 14
Last steps!
I tried this one and thought that I may want to sometimes wear this as a halter so I opted NOT to sew the straps to the back. Instead I placed buttons on the inside back. Here is how to use buttons to make this "convertible".
Try on your tank top. Mark where you would want your straps "attached" if this were a normal tank top with pins. Sew a button on the inside of the back of the tank top on both sides. I then measured how long I wanted my shoulder straps to be with pins making sure the lengths were equal.
Take the tank top off, match the pins to the appropriate button hole and put the button through the braid. This should be pretty secure so no additional stitching should be required.
Just a thought: you could put the buttons on the OUTSIDE of the garment and let the braids hang loose for a fun look. Your decision.
I didn't cut the remaining length of the braids from the straps so that I could tie the halter straps together but I did unravel them a bit to let them flow a bit loose and knotted two of the braid strips together to secure the actual braid. Hope this makes sense! You could always stitch the braid to secure as well.
Final step:
Try on, make sure the fringe covers properly and then add/remove fringe pieces as necessary. Trim the fringe if you'd like.You can trim it to look like a sharp V or keep it soft. Go crazy and have fun with this but keep in mind to cut with caution. If you make a mistake you will have to cut more fringe and re-fringe! Add any beading or etc to give this a boho look if you'd like! ENjoy!
-
Step 15
Please give any feedback, constructive criticism on my tutorial. This is my first one and I'd like to perfect this process! Thanks!


Thank you very much for creating it.
I think I will give it a shot in the holidays
I've only been sewing for about a year so my skills are pretty basic. Even so, this is a very simple top to make...find a knit fabric that doesn't unravel and change it up a bit. tie the sides together if you dont have a sewing machine and leave the bottom hem plain... cutting the fringe and making the braid doesn't require sewing either! so give it a try! You have NOTHING to lose!