About
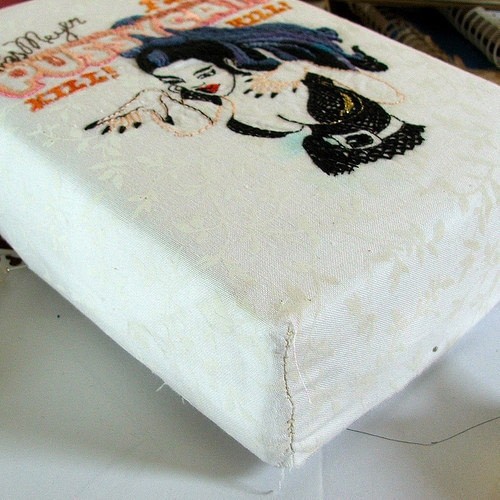
A really impressive, chunky-looking way to display your embroidery, yet weighs almost nothing and recycles, too!
I joined an embroidery swap on The Phat Quarter (the theme was Movies! and I did an old exploitation film from the 60s).
My finished piece was going from Australia to my swap partner in the UK. I wanted to present the piece nicely, properly framed, ready to hang—none of those cheap, flimsy embroidery hoops, or sticking my precious work into a 2 dollar photo frame! Que horror!—but without spending a fortune on postage.
So I got the idea to use a sturdy cardboard box...the sort that digital gadgets and so forth come in. Not only did it give a beautiful, boxy finish to my piece...it was stuffed with polystyrene peanuts (to prevent crushing) and the whole thing weighed very little, making overseas postage manageable.
Please note! Time does not include embroidery! 2 Hours is arbitrary, when stitched by hand, with lots of coffee breaks and daydreaming in between.
Cost does not include embroidery!
Downloads
- Missing file
-
 Kepi favorited Box Mounting An Embroidery For Display
10 Feb 04:54
Kepi favorited Box Mounting An Embroidery For Display
10 Feb 04:54
-
 Biblionic added Box Mounting An Embroidery For Display to Embroidery
03 Aug 01:32
Biblionic added Box Mounting An Embroidery For Display to Embroidery
03 Aug 01:32
-
Biblionic favorited Box Mounting An Embroidery For Display
03 Aug 01:31
-
 Sveta favorited Box Mounting An Embroidery For Display
19 Oct 05:26
Sveta favorited Box Mounting An Embroidery For Display
19 Oct 05:26
-
 Chudames favorited Box Mounting An Embroidery For Display
27 Jul 08:45
Chudames favorited Box Mounting An Embroidery For Display
27 Jul 08:45
-
 Katrina P. favorited Box Mounting An Embroidery For Display
05 Jul 03:52
Katrina P. favorited Box Mounting An Embroidery For Display
05 Jul 03:52
-
 PixieFey favorited Box Mounting An Embroidery For Display
09 Jun 09:01
PixieFey favorited Box Mounting An Embroidery For Display
09 Jun 09:01
-
 Lauren C. added Box Mounting An Embroidery For Display to Textiles
25 Apr 19:23
Lauren C. added Box Mounting An Embroidery For Display to Textiles
25 Apr 19:23
-
 Birgit favorited Box Mounting An Embroidery For Display
06 Jan 09:57
Birgit favorited Box Mounting An Embroidery For Display
06 Jan 09:57
-
 swestrope favorited Box Mounting An Embroidery For Display
03 Jul 17:21
swestrope favorited Box Mounting An Embroidery For Display
03 Jul 17:21
-
 Step 1
Take a sturdy cardboard box, with a 'front' side that your embroidery or fabric design will fit nicely on, plus some overhang around the four sides. Stuff it with polystyrene peanuts or with softly crumpled balls of paper (RECYCLE! Use magazine pages, junk mail, or newspaper)
-
 Step 2
Wrap the box with a single sheet of cartridge paper...white or whatever color is right for your fabric...like a present, with tape.
-
 Step 3
Position your embroidery—RIGHT SIDE DOWN—onto the front of the box.
When you are happy with its position (i.e. centered nicely, top to bottom and left to right) use dressmaker's pins to pin the embroidery to the box. Just push the pins into the box as though it were a pincushion. Pull A LITTLE BIT from one pin to the pin directly across from it, to sort of 'stretch' the work a bit, so no wrinkles or big floppy bubbles form in the fabric. -
 Step 4
When the design is well pinned down, using as many pins as you think you need to do this, go to one corner and gather the excess fabric up with your thumb and forefinger. Gently pinch and pull this triangle of fabric slightly to again take up any slack in the fabric. Don't pull too roughly, though, or you will move the embroidery out of position.
When you are happy with the way the triangle is gathered up, pin through the fabric as close to the corner of the box as you can, to hold it in place.
Repeat on the other three corners. -
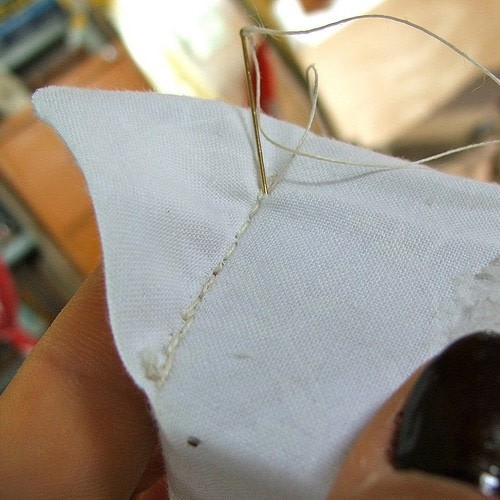
 Step 5
Sew a line of backstitch along the base line of each triangle of fabric, where you placed the pin in the last step...this runs along the corner of the box.
Do this for the other three corners. You now have little ears or flaps at the corners of your box. -
 Step 6
Remove the corner pins and trim the ears a centimeter or so from the stitched line.
Remove the pins on the front of the box, too...every last one of them. Go slowly and gently, so as not to leave pinholes in your fabric on the front.
Slide the embroidery OFF the cardboard box.
-
Step 7
Didn't take a pic of this step...
cut a piece of quilt batting or felt so that it fits the FACE of the cardboard box perfectly. Just a rectangle that covers that front plane of the box.Use a bit of spray adhesive to stick this felt or batting down to the front plane of the box.
This is to give a bit of soft padding behind your embroidery, and that little bit of bulk to stretch your embroidery some more and pull any persistent wrinkles or bubbles out of your fabric.
-
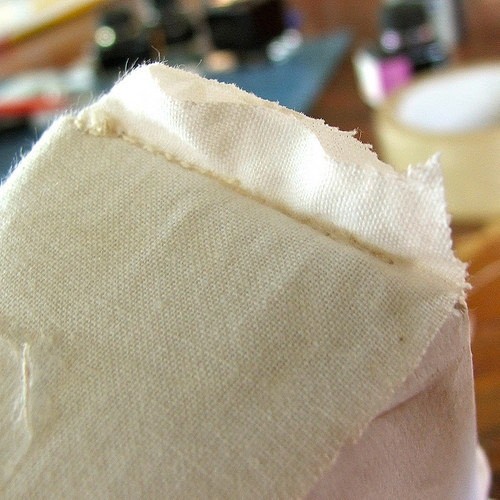
 Step 8
Turn your embroidery right side out, and gently slip the embroidery back down onto the box, with its quilt batting or felt pad. This is a bit like putting a fitted sheet over a bed mattress. Work gently and slowly, with clan hands to keep your embroidery clean.
Right down till the embroidery is SNUG and the surface is smooth. -
 Step 9
Again, I skipped the details for this step, but you should be able to figure it out (if you've come this far already!) I made a felt strip, same height as the box, slightly more than the box's perimeter. I wrapped it around the box's sides and joined it into a belt.
Then I used embroidery floss and blanket stitch to go around the top of the belt, joining it to the embroidery.
I cut a piece of pink felt to exactly fit the back plane of the box, and stitched around this to connect it to the belt, as well, thereby enclosing the box completely so it can't be seen. I stitched a loop for hanging to the felt on the back.
An that's it.