

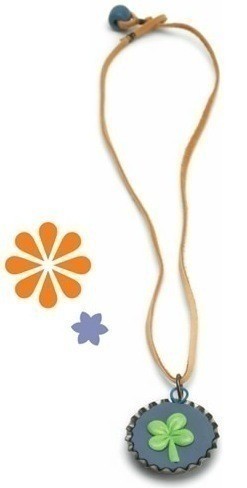
Bottlecap Necklaces
Extract from Clay So Cute!: 21 Polymer Clay Projects for Cool Charms, Itty-Bitty Animals, and Tiny Treasures • By Sherri Haab • Published by Potter Craft


About
With their vintage vibe, these bottlecap pendants make a statement one a a time or hanging in bunches.
Make lots of bottlecap charms to show off everything you love. I've made mine with a music note, a shamrock, a heart... but how about a bird, a rainbow, an eye, or a peace sign? Let your bottlecap flag fly!
-
 smila e. favorited Bottlecap Necklaces
07 Nov 16:15
smila e. favorited Bottlecap Necklaces
07 Nov 16:15
-
 Ichigo M. favorited Bottlecap Necklaces
05 Aug 01:41
Ichigo M. favorited Bottlecap Necklaces
05 Aug 01:41
You Will Need
-
 Step 1
Form a loop in the center of the piece of plastic-coated wire. Twist the ends together. Clip off extra wire.
-
 Step 2
Press the twisted wire into the bottle cap; bend the loop to fit over the edge of the cap.
-
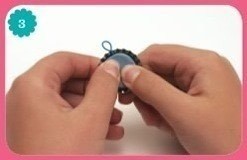
 Step 3
Press a ball of clay into the cap and flatten it, covering the twisted part of the wire but leaving the loop free. Push the clay right up to the inner edge of the bottle cap all the way around.
-
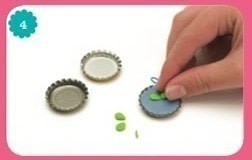
 Step 4
Decorate the clay in the cap with small bits of clay. To make a shamrock, for example, form four small teardrop shapes and a stem with green clay. For any other images, plan the design in your mind - for example, a heart could be a triangle, pinched and sculpted into a heart shape. Stack layers of clay, pressing them together for a three-dimensional effect. Firmly press the shapes onto the clay base in the cap.
-
 Step 5
Use a toothpick to form the shamrock leaves or to define other shapes. Bake the caps filled with clay in the oven on a baking dish at 275'F (130'C) for 20 minutes. Let the caps cool after baking. (If you want to add shine to the clay design, brush on polymer gloss glaze. Let the glaze dry before working with the caps more.) Then put a large jump ring on each cap's wire loop, using pliers to attach the rings. Loop cord through the jump ring to complete the necklace. Tie off the cord. If you prefer, you can buy an inexpensive necklace and use the chain for your pendant.


Comments


