


About
my beloved new storage out of ribbon and wood
I -really- needed a storage for my jewellery, so I invented this ribbon-and-wood creation hanging from my closet. I was asked for a How To, so here it comes...
-
 VillainousNinja added Bling Bling Storage to Organizers
07 Mar 02:16
VillainousNinja added Bling Bling Storage to Organizers
07 Mar 02:16
-
VillainousNinja added Bling Bling Storage to Make this
07 Sep 00:21
-
 Joanna C. added Bling Bling Storage to Organization
16 Mar 04:37
Joanna C. added Bling Bling Storage to Organization
16 Mar 04:37
-
tam b. favorited Bling Bling Storage
22 Feb 18:00
-
 Jessica A. favorited Bling Bling Storage
09 Oct 23:41
Jessica A. favorited Bling Bling Storage
09 Oct 23:41
-
 zoegirl221 favorited Bling Bling Storage
18 Sep 01:48
zoegirl221 favorited Bling Bling Storage
18 Sep 01:48
-
 WaterAngel added Bling Bling Storage to Organize!
03 May 17:04
WaterAngel added Bling Bling Storage to Organize!
03 May 17:04
-
 Suki Chan favorited Bling Bling Storage
23 Oct 01:55
Suki Chan favorited Bling Bling Storage
23 Oct 01:55
You Will Need
-
Step 1
-
Step 2
As this is really easy, there will be no pictures of the crafting itself. If you have any questions, ask me.
First, you need to grab your stuff. Get about 2 meter of 0,3mm thick, round wood. You can get it in your garden, or your local DIY store. Cut them to the lenght you need and sand the ends down.
-
Step 3
Second, you need some beautiful but cheap ribbon. You can also take fabric or other fancy things that are capable of holding some weight.
The important thing is to do the "shelves" step by step as you work your way downwards. First, cut two equal pieces of ribbon and hotglue one end to a loop. This will be the upper holding ribbon. I hammered the upper double layer onto my wardrobe with two nails. LATER! ^^
Then you have to hotglue the other side to a loop to put one of your sticks through. VERY IMPORTANT: The outcome HAS to have the SAME lenght. Otherwise you can throw everything out the window and start again. And that's the only tricky part of this whole project.
So, now you have the first "shelf".
-
Step 4
Work downwards: For every step, you need the two equal ribbon-pieces with a loop on each side. Cut different lenghts for necklaces, earrings and all your different-sized jewellery.
Depending on how long the storage shall be, you can also make 2 and hang them side by side ^^Once your ribbons are finished, put the sticks through, connecting your new ribbons with those of the upper "shelf".
-
 Step 5
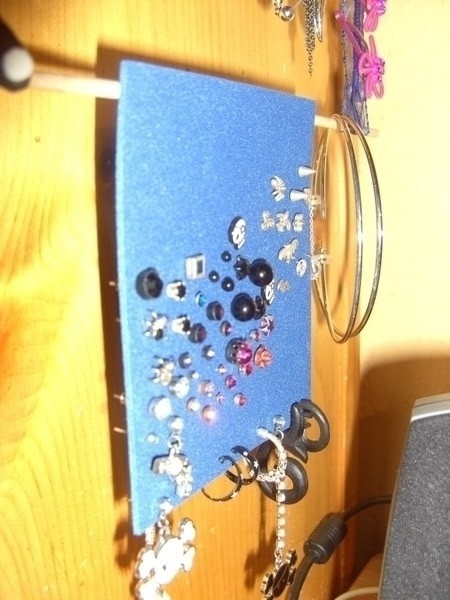
Now to the storage for ear studs: EASY! Take one of your sticks and hotglue it on top of a piece of foamy stuff. Finished.
-
 Step 6
Another usefull add-on is the ring-bearer ( haha xD ). This was rather tricky, making this thing itself and also attatching it to the rest of the storage... Well, or perhaps I was too stupid to figure out an easier way xD
I cut a rectangle out of my foamy stuff, formed it into a half tube and glued rectangle pieces to the sides AND a piece of ribbon in the middle to make it hold its tuby shape.
Uhm, well, and then I tried to put it up to the rest of the storage... Lots of messing, lots of cursing, lots of not being satisfied with the outcome. So please do better than me xD -
 Step 7
Hang your finished storage to whereever, see if you have to change something, padd your own shoulder and... No, wait, we're not finished!!!
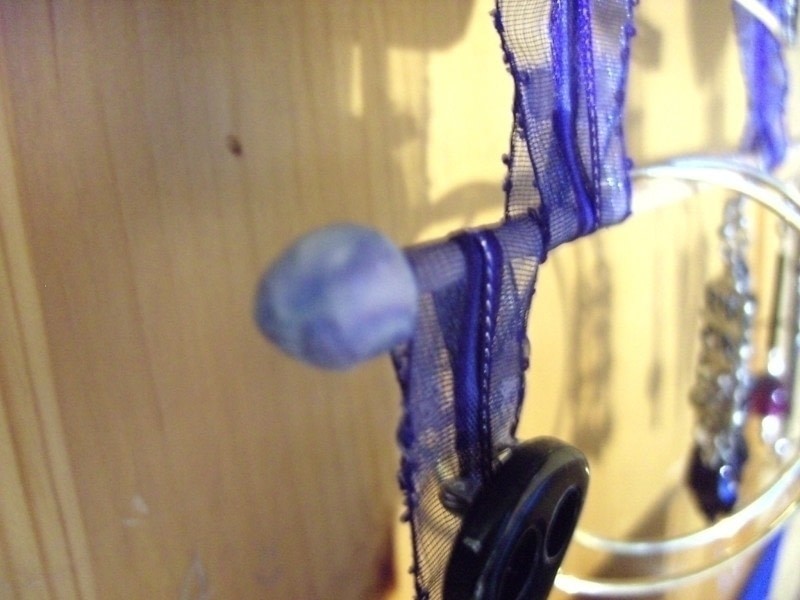
Depending on where the ribbon meets the stick, you might wanna secure the ends of the sticks so nothing can accidently slipp off and create a mess! So what I made: I took some modelling clay, made little beads and made holes in them in the stick-size... Let dry, polish or whatever, and either just stick it on the ends* or glue it on.
*: If you put items on that can't be opened, such as bracelets, don't glue! :P Cause you'll need to take the stick out to get them!
-
Step 8
Last and most satisfying and fun step: PUT STUFF ON! Hang your jewellery on the storage, clip hair clips on the ribbon, have fun with that!


Looks Great!