


About
Save pennies by binding your own sketchbooks.
Life costs too much already without all the creative supplies we need to keep going. Binding your own sketchbooks could help save you some pennies.
Tags
-
 Angel C. favorited Binding Books
25 Sep 01:08
Angel C. favorited Binding Books
25 Sep 01:08
-
 Yuzu K. favorited Binding Books
16 Sep 07:06
Yuzu K. favorited Binding Books
16 Sep 07:06
-
 Miss_Fit favorited Binding Books
12 Nov 20:16
Miss_Fit favorited Binding Books
12 Nov 20:16
-
 Coyote added Binding Books to Coyote Do A Art
13 Jun 04:53
Coyote added Binding Books to Coyote Do A Art
13 Jun 04:53
-
Marie R. added Binding Books to DIY's to do
12 Feb 14:14
-
 Tierra T. favorited Binding Books
26 Oct 19:41
Tierra T. favorited Binding Books
26 Oct 19:41
-
 Craft_manic 2016 favorited Binding Books
21 Aug 21:47
Craft_manic 2016 favorited Binding Books
21 Aug 21:47
-
Rebecca B. favorited Binding Books
30 Jul 18:02
-
 jenna y. favorited Binding Books
09 Apr 16:37
jenna y. favorited Binding Books
09 Apr 16:37
-
 RegiAndBryan favorited Binding Books
11 Mar 01:54
RegiAndBryan favorited Binding Books
11 Mar 01:54
-
 Step 1
Seperate your paper in to equal piles. Make 3 or more piles consiting of 5 or more sheets. You can use any kind of paper you like. Fold each of the piles in half. These are called signatures. Make 3 or more signatures depending upon how much paper you have and how big you want your sketchbook to be.
-
 Step 2
You will need a sheet of card for your cover. This should be atleast 2cm longer than your sheets or paper and about 1cm wider.
-
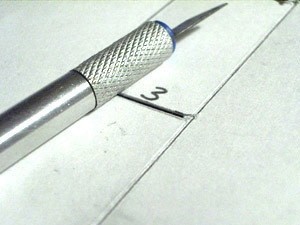
 Step 3
Draw out the spine in the center of the card. The spine should measure �cm for each signature. So if you are using 4 signatures the spine should measure 2cm etc. Score along the lines of your spine and fold in to the shape of the cover.
-
 Step 4
Mark out 4 lines in on the inside spine of your cover. The lines nearest the edges so be atleast 2cm away from the edge and the rest should be spaced equally. Mark these 1, 2, 3 + 4 working down.
-
 Step 5
Cut slits along each of the lines.
-
 Step 6
Take the signatures and mark the equivelent 1, 2, 3 and 4 points. Make holes at these points using a pin.
-
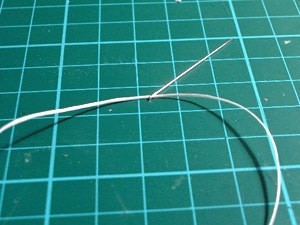
 Step 7
Thread up a needle with some dental floss. You will need 2x the height of the spine for each signature that you are using.
-
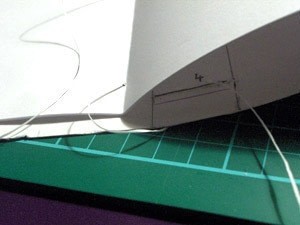
 Step 8
Thread through point 3, leave a long tail. Go around the outside of the signature and enter through point 4.
-
 Step 9
Loop around the bottom of the cover and thread through the back of point 4 on the cover.
-
 Step 10
Thread back through point 4 on the signature.
-
 Step 11
Thread down through point 3 of the signature and the cover.
-
 Step 12
Thread on the outside through point 2 of the cover and the signature.
-
 Step 13
Turn the book over and tie the tail and the thread together.
-
 Step 14
Thread through point 1 of the signature and the cover.
-
 Step 15
Thread up over the top and back through point 1, down through point 2, around the outside of the cover of the signature but not the cover.
-
 Step 16
Thread back through point 3 on the cover, but nor the signature. You are at the point where you started. Take another signature and repeat the threading process.
-
 Step 17
When you have added all of your signatures. Tie the end of the thread around one of the bound pieces of thread and in to a knot. All you have to do now is cover your book. You can use wrapping paper, posters, fabric or even ribbons.


i personlly think its cool!
ruairi donovan
gosh!
Amy