


About
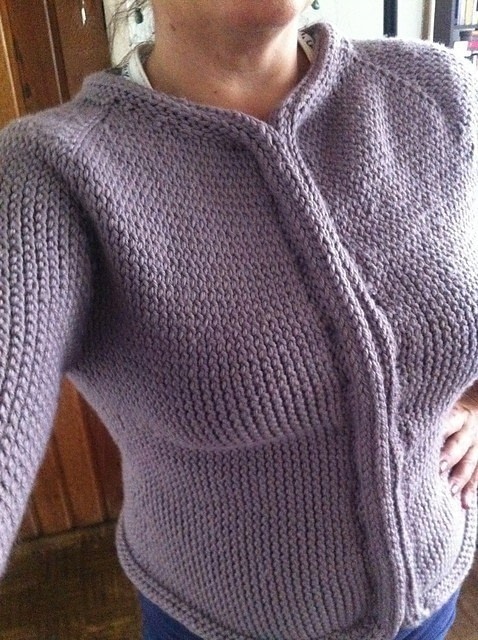
Bettina Cardigan
Bettina Cardigan is an easy going piece with a fit that flatters the body. The stitch motif creates a cute texture that highlights the body curves enhanced by sutil bust darts.
You can wear the little cardi with a sheer top for a feminine look but it also looks great with your favorite jeans and t-shirt!
Downloads
- 111718_2F2015-10-27-124741-Bettina_Cardigan.pdf 428 KB [ Download ]
-
 js-m crafts favorited Bettina Cardigan
07 May 19:00
js-m crafts favorited Bettina Cardigan
07 May 19:00
-
 Paula PKL published her project Bettina Cardigan
10 Dec 09:00
Paula PKL published her project Bettina Cardigan
10 Dec 09:00
You Will Need
-
Step 1
Yoke:
With the bigger needles and using any long tail method, cast-on 52 (54, 58, 66, 66, 68) stitches.
Purl one row. Do not join work in the round. The cardigan is knitted back and forth in rows.
Change for smaller needles.
Set up row: p1 (1, 1, 2, 2, 2), pm, p1, pm, p8 (8, 9, 11, 11, 11), pm, p1, pm, p30 (32, 34, 36, 36,
38), pm, p1, pm, p8 (8, 9, 11, 11, 11), pm, p1, pm, p1 (1, 1, 2, 2, 2)
Shaping collar and Increasing raglan:
Row 1 (RS): co 1, * k until next marker, M1R, slm, k1, slm, M1L, * repeat 3 more times (4 times
total), k to the end.
Row 2 (WS): co 1, purl until the end.
Repeat rows 1 and 2 one more time.
Row 5: co 2, * k until next marker, M1R, k1, M1L, * repeat 3 more times (4 times total), k to
the end.
Row 6: co 2, purl until the end.
Row 7: co 8 (9, 10, 10, 10, 11), * k until next marker, M1R, k1, M1L, * repeat 3 more times (4
times total), k to the end.
Row 8: co 8 (9, 10, 10, 10, 11), purl to the end.
You will have 108(112, 118, 126, 126, 130) stitches on the needle.
Continuing the yoke – Increasing raglan
Row 9 (increase row): * k until next maker, M1R, k1, M1L, * repeat 3 more times (4 times
total), k to the end.
Row 10: purl all sts.
Repeat the rows 9 (increase row) and 10 more 3 (4, 6, 7, 9, 11) times.
You will have 140 (152, 174, 190, 206, 226) stitches on the needle.
Final raglan increases section
Work 2 even rows (one row: knit all stitches; next row: purl all stitches), one increase row (as
row 9) and one even purl row. Repeat this section more 6 (6, 6, 6, 7, 7) times.
When finished this section, you will have 196 (208, 230, 246, 270, 290) stitches on the needle.
Setting up for body and sleeves
Obs.: (the previous work stitch markers must be removed at this row and repositioned as
follows).
Set up row: k 28 (30, 33, 35, 38, 41), *place next 40 (42, 47, 51, 57, 61) sleeve sts on scrap yarn,
co 2(2, 2, 4, 4, 4) sts, place a marker (this marker will indicate the side “seam” of the cardigan),
co 2(2, 2, 4, 4, 4) sts**, k 60 (64, 70, 74, 80, 86) sts, repeat from * to ** k 28 (30, 33, 35, 38,
41),
Next row: p30 (32, 35, 39, 42, 45), slip marker, p64 (68, 74, 82, 88, 94), slip marker, p30 (32,
35, 39, 42, 45). You have 124 (132, 144, 160, 172, 184) sts on the needle.
Body
Work 13 even rows in Twisted Stockinette stitch, finishing with a RS row.
Shaping Bust (bust darts)
Right front side
x Sizes XS, S, M
Row 1: p 14 (16, 19) W&T
Row 2: k 14 (16, 19)
Row 3: p 16 (18, 21) W&T
Row 4: k 16 (18, 21)
Row 5: p 18 (20, 23) W&T
Row 6: k 18 (20, 23)
Row 7: p 21 (23, 26) W&T
Row 8: k 21 (23, 26)
Row 9: p 24 (26, 29) W&T
Row 10: k 24 (26, 29)
Row 11: p 27 (29, 32) W&T
Row 12: k 27 (29, 32)
Row 13: p 30 (32, 35), slm, p 64 (68, 74), slm, p 30 (32, 35)
x Sizes L, XL, XXL
Row 1: p 23 (26, 29) W&T
Row 2: k 23 (26, 29)
Row 3: p 25 (28, 31) W&T
Row 4: k 25 (28, 31)
Row 5: p 27 (30, 33) W&T
Row 6: k 27 (30, 33)
Row 7: p 29 (32, 35) W&T
Row 8: k 29 (32, 35)
Row 9: p 31 (34, 37) W&T
Row 10: k 31 (34, 37)
Row 11: p 33 (36, 39) W&T
Row 12: k 33 (36, 39)
Row 13: p 35 (38, 41) W&T
Row 14: k 35 (38, 41)
Row 15: p 37 (40, 43) W&T
Row 16: k 37 (40, 43)
Row 17: p 39 (42, 45), slm, p 82 (88, 94), slm, p 39 (42, 45)
Left front side
x Sizes XS, S, M
Row 1: k 14 (16, 19) W&T
Row 2: p 14 (16, 19)
Row 3: k 16 (18, 21) W&T
Row 4: p 16 (18, 21)
Row 5: k 18 (20, 23) W&T
Row 6: p 18 (20, 23)
Row 7: k 21 (23, 26) W&T
Row 8: p 21 (23, 26)
Row 9: k 24 (26, 29) W&T
Row 10: p 24 (26, 29)
Row 11: k 27 (29, 32) W&T
Row 12: p 27 (29, 32)
Row 13: k 30 (32, 35), slm, p 64 (68, 74), slm, p 30 (32, 35)
x Sizes L, XL, XXL
Row 1: k 23 (26, 29) W&T
Row 2: p 23 (26, 29)
Row 3: k 25 (28, 31) W&T
Row 4: p 25 (28, 31)
Row 5: k 27 (30, 33) W&T
Row 6: p 27 (30, 33)
Row 7: k 29 (32, 35) W&T
Row 8: p 29 (32, 35)
Row 9: k 31 (34, 37) W&T
Row 10: p 31 (34, 37)
Row 11: k 33 (36, 39) W&T
Row 12: p 33 (36, 39)
Row 13: k 35 (38, 41) W&T
Row 14: p 35 (38, 41)
Row 15: k 37 (40, 43) W&T
Row 16: p 37 (40, 43)
Row 17: k 39 (42, 45), slm, k 82 (88, 94), slm, k 39 (42, 45)
Work 3 even rows in Twisted Stockinette stitch, finishing with a WS row. -
Step 2
Shaping Waist
Decrease row (RS): * k until 3 sts before side marker, SSK, k1, slm, k1 k2tog, ** repeat from *
to ** one more time and k to end (4 sts decreased)
Repeat the Decrease row every 6th row for 3 more times (total of 16 sts decreased)
When finished this section, you will have 108 (116, 128, 144, 156, 168) sts.
Starting and finishing with a WS row, work 7 even rows in Twisted Stockinette stitch.
Increase row (RS): * k until 1 sts before side marker, M1R, k1, slm, k1, M1L,** repeat from * to
** one more time and k to end (4 sts increased)
Repeat the Increase row every 6th row for 3 more times (total os 16 sts increased)
Purl next row.
Work 10 rows in Twisted Stockinette Stitch.
When finished this section, you will have 124 (132, 144, 160, 172, 184) sts. -
Step 3
Setting up for Garter Stitch rows
Starting at the left front hem, passing around the collar and going down towards the right
front hem, pick up stitches as follows:
Left front: 86 (88, 90, 94, 100, 104) stitches
Collar: 80 (84, 88, 94, 94, 98) stitches
Right front: 86 (88, 90, 94, 100, 104) stitches
You will have 376 (392, 412, 442, 466, 490) stitches on the needle.
Place a marker and join the round. Facing the right side work 3 rounds in garter stitch, starting
with a purl round. -
Step 4
Double I-cord Finishing (worked one at a time)
Setting up for the first I-cord
Change for the bigger size needles.
I cord: Cast on 3 stitches at the left needle using the Backward Loop Method.
*Knit 2 stitches, SSK, slip 3 stitches from right needle to left needle and repeat
from* until the last stitch before a corner.
I cord corners: After slip the 3 stitches from the right needle to left needle,
K2 and slip them to left needle
K2, SSK, slip 3 stitches from right needle to left needle
K2 and slip them to left needle. Continue to work the I-cord Finishing.
Stop before the marker. You will have 3 stitches on right needle. Slip them to the left needle
and Slip 1, K2tog and pass the slipped stitch over. Place the remaining stitch on hold. -
Step 5
Setting up for the second I-cord Finishing
Pick up stitches as follows:
Left front: 86 (88, 90, 94, 100, 104) stitches
Collar: 80 (84, 88, 94, 94, 98) stitches
Right front: 86 (88, 90, 94, 100, 104) stitches
Back: 124 (132, 144, 160, 172, 184)
You will have 376 (392, 412, 442, 466, 490) stitches on the needle.
Place the stitch on hold at the left needle. Cast on 2 at the left needle using the Backward Loop
Method.
I-cord: *Knit 2 stitches, ssk, slip 3 stitches from right needle to left needle and repeat
from* until the last stitch before a corner.
I cord corners: After slip the 3 stitches from the right needle to left needle,
K2 and slip them to left needle
K2, SSK, slip 3 stitches from right needle to left needle
K2 and slip them to left needle. Continue to work the I-cord Finishing.
Stop before the marker. You will have 3 stitches on right needle. Slip them to the left needle
and Slip 1, K2tog and pass the slipped stitch over. Break the yarn and draw tail through
remaining loop. ***before break the yarn, be sure to leave enough yarn to weave. -
Step 6
Sleeves
With DP gauge needles, place held 40 (42, 47, 51, 57, 61) sleeve stitches onto needles.
Beginning at the center of the underarm, pick up and knit 2 (2, 2, 4, 4, 4) underarm sleeve
stitches, knit 40 (42, 47, 51, 57, 61) sleeve stitches and pick up and knit 2 (2, 2, 4, 4, 4)
underarm sleeve stitches.
You will have 44 (46, 51, 59, 65, 69) stitches on the needles. Place a marker and join for work.
Keep working in Twisted Stockinette stitch (at every other round the knit stitches are worked
on the back loop) for 11 rounds.
Decrease round:
K1, K2tog, K until last 3 stitches before the marker, SSK, K1.
Repeat the decrease round every 10 (10, 8, 7, 7, 6) round for 4 (4, 5, 6, 6, 7) times.
You will have 34 (36, 39, 45, 51, 53) stitches on the needles.
Work in Twisted Stockinette stitch until the sleeve measures 11 ” from underarm.
Setting up for Garter Stitch rows
Work 3 rounds in Garter Stitch, starting with a Purl round.
Double I-cord Finishing
Setting up for the first I-cord
Change for the bigger DP needles.
I-cord: Cast on 3 stitches at the left needle using the Backward Loop Method.
*Knit 2 stitches, SSK, slip 3 stitches from right needle to left needle and repeat
from* until the marker.You will have 3 stitches on right needle. Slip them to the left needle and Slip 1, K2tog and pass
the slipped stitch over. Place the remaining stitch on hold. -
Step 7
Setting up for the second I-cord Finishing
Pick up 32 (34, 37, 43, 49, 51) stitches. Place the stitch on hold at the left needle. Cast on 2 at
the left needle using the Backward Loop Method.
I-cord: *Knit 2 stitches, SSK, slip 3 stitches from right needle to left needle and repeat
from* until the marker.
You will have 3 stitches on right needle. Slip them to the left needle and Slip 1, K2tog and pass
the slipped stitch over. Break the yarn and draw tail through remaining loop. ***before break
the yarn, be sure to leave enough yarn to weave.
Finishing
Weave in all ends (Double I-cord Finishing at cuffs and around the cardigan) and close any
holes (like at underarms).
Wet-block the garment to measurements and to align both I-cord finishing’s.
Hook & eye for closing: place 10 hook & eye evenly spaced. For a better closing, they must to
be internally seamed at the line between the end of the cardigan and the beginning of the first
I-cord Finishing.


