
About
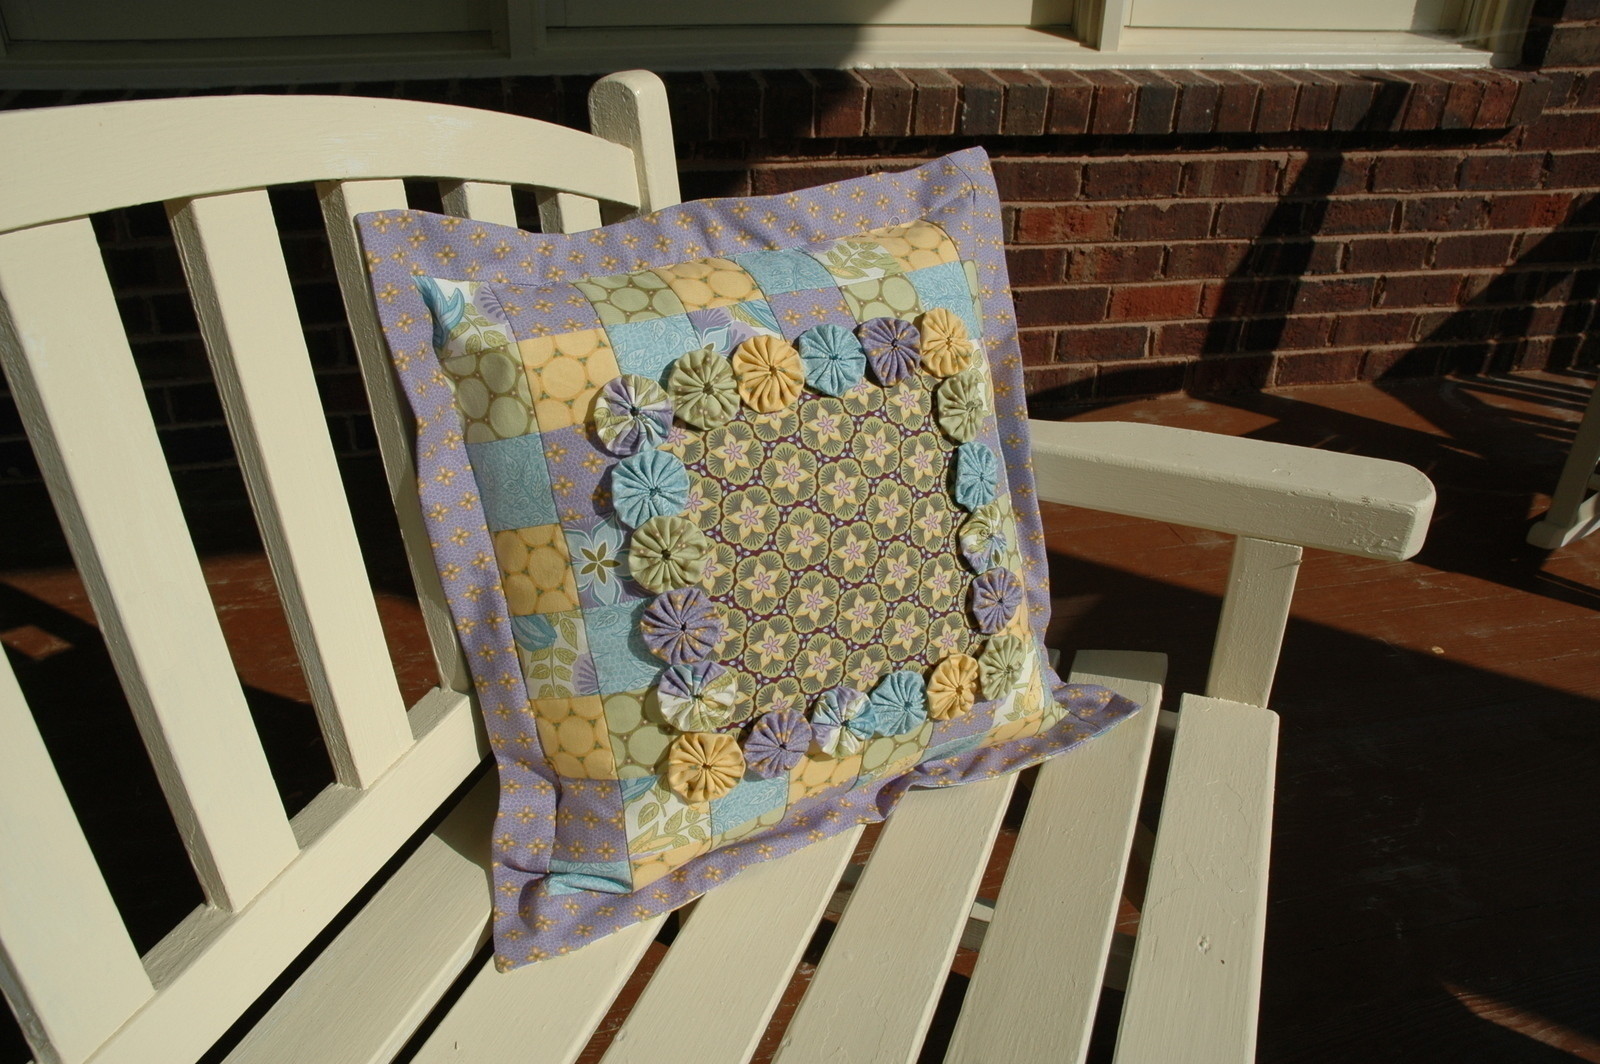
Make this fun yo-yo pillow with scraps from your stash.
The perfect project for those lovely bits of fabric that we all have in our stash...
Materials
Miscellaneous
• 16inchpillowform
• largegoldCloverTMYo-YoMaker(optional)
• 3decorativebuttons
• 3"x20"stripoflightweightfusible interfacing
• handquiltingthread(orotherstrong thread)
Fabric - Pillow Front:
• 1yardtotaloffabricscraps-atleastsix different colors or patterns, that can be cut into 2-1⁄2" and 5" squares
• 8-1/2"x8-1/2"featureprintforcenter square
• 9"x20"scrapfortheflange
Fabric - Pillow Back
• 1fatquarterforyourmainbackingfabric
• 7-1⁄2"x20"pieceofacontrastingprintfor the center panel
• 4-1⁄2"x20"accentprintforthebuttonhole panel
Downloads
- Ambrosia_YoYo_Pillow.pdf 500 KB [ Download ]
-
 Caron K. added Ambrosia Yo Yo Pillow to Quilted Pillows
23 Dec 07:59
Caron K. added Ambrosia Yo Yo Pillow to Quilted Pillows
23 Dec 07:59
-
 Pimke added Ambrosia Yo Yo Pillow to Nähmuster
03 Mar 12:12
Pimke added Ambrosia Yo Yo Pillow to Nähmuster
03 Mar 12:12
-
 pandanomz favorited Ambrosia Yo Yo Pillow
08 Sep 14:47
pandanomz favorited Ambrosia Yo Yo Pillow
08 Sep 14:47
You Will Need
-
 Step 1
Instructions
* All seams 1⁄4"
Front of Pillow
1. To make 20 yo-yos, gather your 20 approxi- mately 5" x 5" assorted fabric squares. Use the CloverTM Yo-Yo Maker to make perfectly shaped yo-yos every time or, if you don’t have a yo-yo maker, cut 20 4-1⁄2" circles. To make each yo-yo, use hand quilting thread
(or another strong thread) and make running stitches about 1⁄4" long around the entire circle, while turning under the seam 1⁄4". Pull up the gathering thread to form a yo-yo and knot. Run the threads through the inside of the yo- yo before cutting off. Set aside.
2. Cut 48 2-1⁄2" squares for your patchwork.
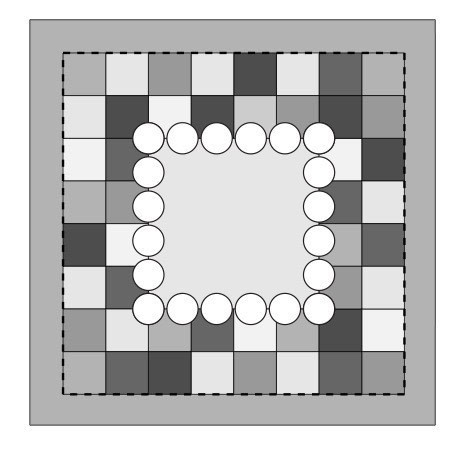
3. Arrange the small squares around the central square in a pleasing pattern as shown in the diagram to the left, so that color and pattern are nicely varied. Now you are ready to piece. (I find it easiest to label each piece with a bit of masking tape at this point, but for those with better memories, that may not be necessary.)
4. JoinA1toA2,A3toA4,A5toA6,andA7to A8. Join C1 to C2 and C7 to C8. Join rows
E and G in a similar fashion. Press seams to the RIGHT. Continue sewing and pressing rows A and G together until you have strips of 8 squares.
5. JoinB1toB2,B3toB4,B5toB6,B7toB8. JoinD1toD2andD7toD8. Dothesame for rows F and H. Press seams to the LEFT. Continue sewing and pressing rows B and H together until you have a strip of 8 squares.
6. Now sew rows A and B together. Sew rows H and G together. Press. -
 Step 2
8. At this point, you should have units that look like the diagram on the left. Now join the C, D, E, and F panels on the left. Join the same panels on the right. Sew these units to both sides of your central square.
9. Piece the AB unit and the CD unit to the central panel.
10. Now you just need to add the material for the flange. Cut two 2" x 16-1⁄2" strips. Sew them to the sides of your central unit. Cut two 2" x 19-1⁄2" strips. Sew them to the top and bottom.
11. Following the pattern photo, tack on the yo-yos to the seam that runs along the outer edges of the main panel. Try to stitch through the seam allowances to increase the stability of the attachment. There are six yo-yos on each side (including corners). You are done with the front of the pillow! -
 Step 3
Back of Pillow
1. Take the fat quarter of the main fabric for the back of the pillow and cut two pieces that are 7-1⁄2" x 20". Set aside.
2. Cut the interfacing into a 1-1⁄4" strip and a 1-3⁄4" strip.
3. Take the contrasting piece of fabric that is 7-1⁄2" x 20" and press one of the long edges under 1⁄4". Slip the 1-1⁄4" wide piece of interfacing under the fold and iron onto the wrong side of the fabric. Fold over again, with the crease on the edge of the interfacing. (This will stabilize the area where you sew the buttons.) Turn the fabric WRONG side up and stitch 1/8" away from your original fold, encasing your interfacing strip.
4. Join one of the main fabric panels to the other raw edge of this contrasting center panel. Press seam toward center panel.
5. Now take the 4-1⁄2" x 20" piece of accent fabric and join it to the other main panel along the long edge. Press seam toward accent fabric. Press the other long edge of the accent fabric under 1⁄4". Slip the 1-3⁄4" piece of interfacing under the fold and iron onto the wrong side of the fabric. Fold over again, so that the folded
edge meets the seam on the wrong side of the fabric. Press. Turn the fabric right side up and stitch 1/8" away from the seam, en- casing both the folded edge and the seam allowances. -
 Step 4
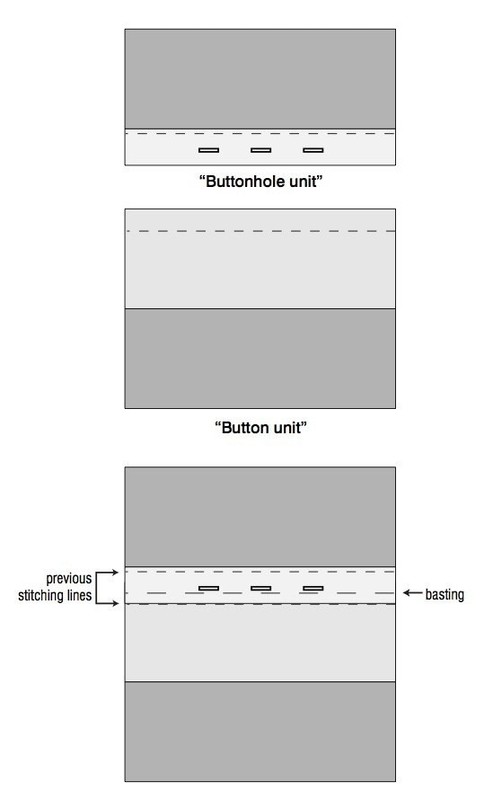
6. Turn the accent piece right side up again with the finished edge closest to you. Make a mark in the center of the fabric, 1" from the finished edge. Make another mark 4" to the right and another 4" to the left, also 1" from the finished edge. These will be the centers of your buttonholes. Stitch the buttonholes so that they run parallel to the finished edge.
“Buttonhole unit”
7. Position this “Buttonhole unit” on top of
the “Button unit”. The finished edge of the Buttonhole unit should sit right on top of the stitched line of the Button unit, as shown on the right. Set your stitch length as long as it will go and baste the two units together.
8. Open up the buttonholes a bit and make
a tiny mark on the contrasting fabric right through the center of each buttonhole. You can use these marks to attach your buttons accurately later.
9. Square up this main panel so that it mea- sures 19-1⁄2" x 19-1⁄2". You are done with the back panel! -
 Step 5
Finishing
1. Pin the front and the back of the pillow wrong sides together. Stitch around all 4 sides.
2. Remove basting stitches and turn the pillow right side out. Press.
3. Pin the pillow along the edges so that it lies square. With front side up, stitch “in the ditch” around the entire pillow, where the flange meets the patchwork.
4. Sew on buttons and enjoy your “yo-yo pillow”!