About
The Jewelry School
This is a simply stunning cuff of white glass pearls and faceted crystals. I have named it After Eight because it would embellish any ‘little black dress’, but with its simple black and white theme, it could be worn at any time of day, with any colour scheme.
What you learn
. How to make a basic loop on an eye pin or headpin
. How to create cuffs using memory wire
-
 Luna D. favorited After Eight Cuff
25 Apr 06:52
Luna D. favorited After Eight Cuff
25 Apr 06:52
-
 Kaiulani W. favorited After Eight Cuff
19 Nov 01:58
Kaiulani W. favorited After Eight Cuff
19 Nov 01:58
-
 Kathy C. favorited After Eight Cuff
10 Apr 11:38
Kathy C. favorited After Eight Cuff
10 Apr 11:38
-
 crochetmommie added After Eight Cuff to Jewelry Tutorials
10 Oct 23:29
crochetmommie added After Eight Cuff to Jewelry Tutorials
10 Oct 23:29
-
tracy m. favorited After Eight Cuff
22 Jun 18:23
-
 Holly M. favorited After Eight Cuff
10 Jun 03:29
Holly M. favorited After Eight Cuff
10 Jun 03:29
-
 Kara S. added After Eight Cuff to Coco Chanel
19 Mar 23:54
Kara S. added After Eight Cuff to Coco Chanel
19 Mar 23:54
-
 julietierney14 added After Eight Cuff to Jewelry Making
06 Feb 23:51
julietierney14 added After Eight Cuff to Jewelry Making
06 Feb 23:51
-
 RareJewel favorited After Eight Cuff
11 Jan 09:46
RareJewel favorited After Eight Cuff
11 Jan 09:46
-
Shari S. favorited After Eight Cuff
17 Dec 15:10
-
 Step 1
Making a basic loop
Thread bead/s onto the headpin or eye pin.
-
 Step 2
With chain-nosed pliers, bend the wire extending above the bead/s at right angles, as close to the bead as possible.
-
 Step 3
Cut off excess wire, leaving a small arm of about 1cm (3/8in).
-
 Step 4
With round-nosed pliers, grab the very end of the pin about 6mm (¼in) from the tip of the pliers. Twist the wire back towards where the wire comes out of the bead, wrapping it tightly around a barrel of the pliers to make a loop.
-
 Step 5
The finished loop should be positioned centrally over the holes of the beads.
-
 Step 6
Cut two coils of memory wire with a 5–10cm (2–4in) overlap. With memory wire finishing pliers (or round-nosed pliers) make a P-shaped loop at one end of the wire. Next prepare twenty-one silver-plated eye pins by threading a silver seed bead, a faceted jet crystal rondelle and a second silver seed bead onto each. Proceed to make a basic loop on each eye pin as shown right.
-
 Step 7
Pick up the two pieces of memory wire and hold together in your non-dominant hand while threading a 4mm white glass pearl onto each.
-
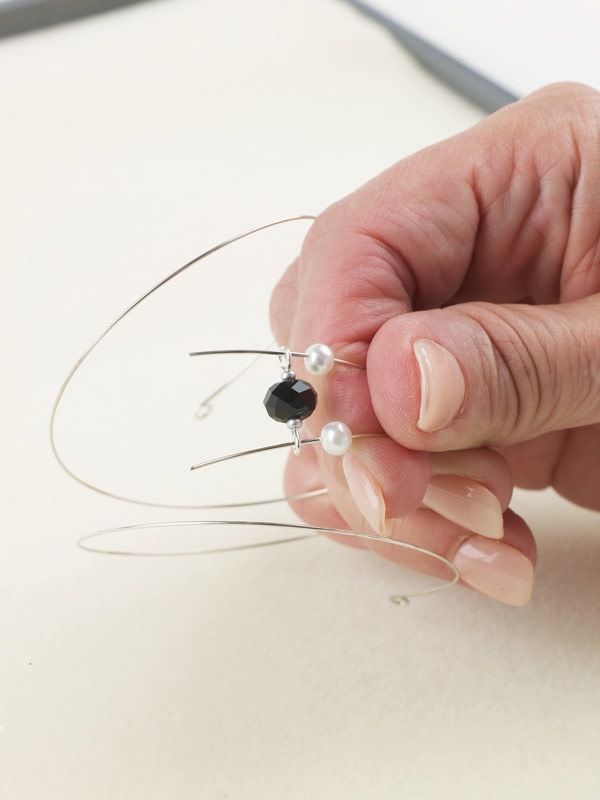
 Step 8
Pass the end of one piece of memory wire through the loop of one of the faceted jet crystal rondelle bead units made in step 1. Pass the end of the other piece of memory wire through the loop at the other end of the same unit.
-
 Step 9
Thread two small pearls onto each piece of memory wire followed by another faceted jet crystal rondelle bead unit.
-
 Step 10
Repeat step 4 until all twenty-one crystal rondelle bead units have been strung onto the two pieces of memory wire with two pearls between. Finish with a single pearl.
-
 Step 11
Working with one piece of memory wire at a time, use memory wire shears to cut the excess wire, leaving approximately 8mm (¾in) or whatever length is needed to form a P-shaped loop to hold all the beads tightly in place.
-
 Step 12
To finish the ends, thread a small pearl on to a headpin. Pass the headpin through one P-shaped loop at the end of the bracelet. Add three small pearls to the same headpin then pass it through the second P-shaped loop. Make a wrapped loop as shown right.
Tip
• Use bead stoppers to hold beads onto the piece of memory wire you are not working with.
• If you find the wire slippery when holding with your fingers, use chain-nosed pliers to pull and hold the beads tight. -
 Step 13
How to make a wrapped loop
1 Using round-nosed pliers, hold the bead on a headpin so that it is tight against the head.
2 Bend the wire at right angles with your finger. The round-nosed pliers should be horizontal as shown.
3 Shift the barrels of the round-nosed pliers so they are vertical.
4 Use your fingers to pull the wire tight around the top barrel of the pliers, then down. Pull so that the wire is tight around the barrel and down as far as it can go.
5 Shift the barrels again to make them horizontal. Use your fingers to pull the wire around the barrel of the pliers to form a complete loop.
Note
If you are attaching this unit to another component such as P-shaped loop, be sure to attach it now, BEFORE step 6.
6 Change to bent-nosed pliers and hold the loop. Twist the wire two to three times, or as many as required, around the gap between the bead and the loop.
7 Use flush cutters to trim the end of the wire.Tip
• Use bead stoppers to hold beads onto the piece of memory wire you are not working with.
• If you find the wire slippery when holding with your fingers, use chain-nosed pliers to pull and hold the beads tight.