About
Tutorial: Adding A Waist-Stay To A Garment by Laura Mae from Lilacs & Lace
Hello everyone, it’s Laura Mae from Lilacs & Lace. Today I would like to share my new frock made from this delicious cotton batiste as well as a great way to take your garment sewing to the next level with a grosgrain waist stay!
A waist stay relieves tension on a garment at its tightest point and helps to support the weight of the fabric. It also keeps seams and zippers from being strained during wear. As an added bonus, it can serve as an extra pair of hands to help keep the opening closed when trying to zip yourself into the garment!
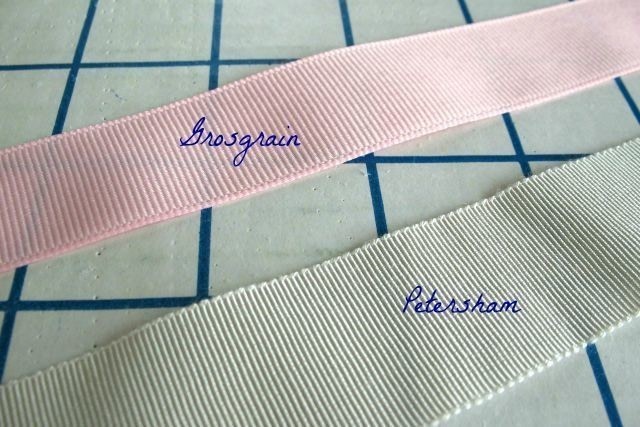
There are two types of grosgrain ribbon that make an excellent waist stay. Grosgrain commonly found in craft stores is made from polyester and has a bound edge that has absolutely no give. That kind of strength is excellent for a waist stay, but those edges can start to feel uncomfortable after many hours of continuous wear depending on your tolerance of tight clothing.
-
 Tahleena S. added Adding A Waist Stay To A Garment to crafting tips
13 Apr 02:24
Tahleena S. added Adding A Waist Stay To A Garment to crafting tips
13 Apr 02:24
-
 Ashley W. favorited Adding A Waist Stay To A Garment
05 Apr 05:55
Ashley W. favorited Adding A Waist Stay To A Garment
05 Apr 05:55
-
 Crafterella featured Adding A Waist Stay To A Garment
01 Apr 23:00
Crafterella featured Adding A Waist Stay To A Garment
01 Apr 23:00
-
 Chudames favorited Adding A Waist Stay To A Garment
31 Mar 18:59
Chudames favorited Adding A Waist Stay To A Garment
31 Mar 18:59
-
 Nancy C. favorited Adding A Waist Stay To A Garment
28 Mar 18:45
Nancy C. favorited Adding A Waist Stay To A Garment
28 Mar 18:45
-
 Alissa B. favorited Adding A Waist Stay To A Garment
26 Mar 22:01
Alissa B. favorited Adding A Waist Stay To A Garment
26 Mar 22:01
-
 Shop Showcase published her project Adding A Waist Stay To A Garment
25 Mar 09:00
Shop Showcase published her project Adding A Waist Stay To A Garment
25 Mar 09:00
-
 Step 1
There are two types of grosgrain ribbon that make an excellent waist stay. Grosgrain commonly found in craft stores is made from polyester and has a bound edge that has absolutely no give. That kind of strength is excellent for a waist stay, but those edges can start to feel uncomfortable after many hours of continuous wear depending on your tolerance of tight clothing.
Petersham ribbon is sometimes called “true grosgrain” and is made of rayon and/or cotton. It is often used in millinery applications and has a scalloped edge. In my experience, petersham makes for a much more comfortable waist stay. (If you are planning on laundering your garment, make sure to pre-shrink your petersham!)
I recommend using ribbon that is 1” or 1.5” wide. If a 2” wide ribbon is used at the waistline, small darts may be used to shape the stay.
-
 Step 2
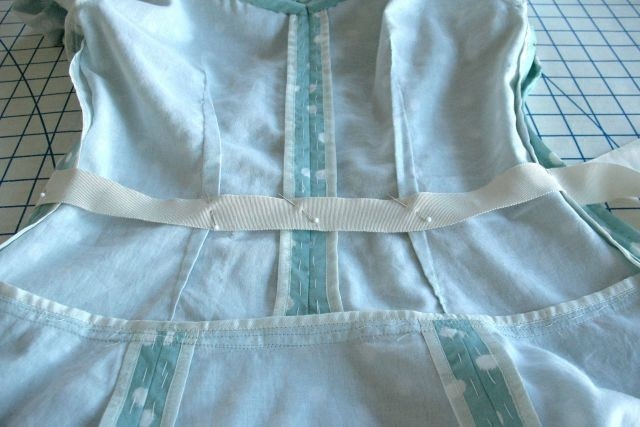
Starting at one opening edge, leave two or three inches of grosgrain as a tail and pin in place. Lay the grosgrain flat against the garment until you come to the first stitching point. Pull the stay slightly past that point so that the grosgrain is shorter in length than the garment fabric and pin into place.
-
 Step 3
This will cause a bit of puckering when laid flat, but this is what you want. Continue this process until you reach the opposite opening edge, securing the ribbon at each seamline and dart it crosses.
-
 Step 4
The stay should measure slightly smaller in circumference than the waistline it stabilizes. Think of two concentric circles – the inside circle circumference must be smaller than the outer one in order to fit inside.
-
 Step 5
You may carefully measure your stay and divide up the ease between each attachment point (generally darts, tucks, or a seam allowance), but I usually just wing it.
-
 Step 6
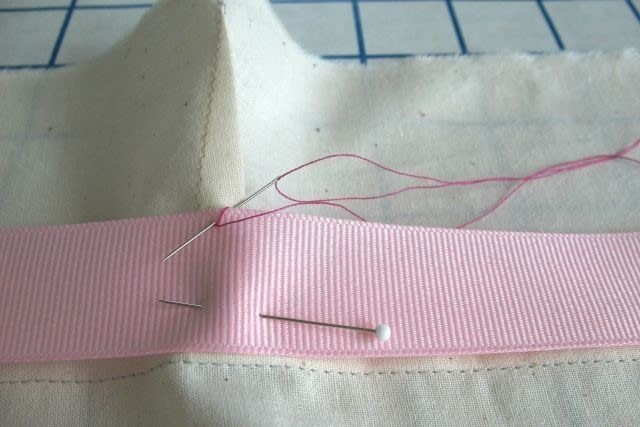
Using a reinforced cross-stitch, attach the stay to the garment at each pin, making sure to only catch the seam allowance or dart so that none of the stitches will show from the right side of the garment.
-
 Step 7
Cross-stitches may be stitched through the middle of the stay, or at both edges. I often use a combination of both options, depending on how my garment is constructed, how many intersecting seamlines and darts/tucks are available to secure the ribbon, and the width of the grosgrain ribbon.
-
 Step 8
This particular dress has a dropped-waist, but the technique is the same for a garment without an appropriately placed seamline such as a princess seamed dress. For such a garment, make sure to mark your waistline on the wrong side to ensure proper placement.
-
 Step 9
A stay may also be inserted just under the bustline. The idea is that the stay is carrying some of the weight of the garment so that it no longer hangs from the shoulders and is secured on the torso. This will also help to keep the garment from rotating on the body during wear.
-
 Step 10
The easiest way to close the stay is with a hook & bar closure. Make sure to stitch the hook so it faces away from your body with the ribbon creating a barrier between your skin and the metal.
-
 Step 11
Using smaller hook & eyes is a bit more time consuming, but look so pretty! The ends of the ribbon may be used to cover most of the metal bits.
-
 Step 12
I like to off-set the opening of the waist stay slightly from the zipper so the zipper teeth and metal hooks are not layered one on top of the other.
-
 Step 13
Technically, a waist stay must be somewhat independent from the garment and not stitched continuously to a seam allowance. However, every garment may not require a true waist stay, and there are more basic options that will help to stabilize a horizontal seamline.
-
 Step 14
One such option is to use a length of seam binding or twill tape. This is not as structured as a true waist stay, but a quick pinking of the raw fabric edges and the addition of the straight of grain binding keeps any cross seams from pulling apart, adds stability, and helps to eliminate cross grain stretch at that seam.
-
 Step 15
A length of narrow grosgrain may also be used in this manner. I would not, however, use this technique with an invisible zipper because of the increased bulk the grosgrain adds in the zipper seamline. You could, however, terminate the stitching lines on the grosgrain an inch or so from the opening and use a hook & eye closure as explained above.
-
 Step 16
Whichever method you choose, a waist stay is an excellent addition to a garment that will help to increase the life span of your garments!