


About
Paper+Headband+Tape=Cool Costume!
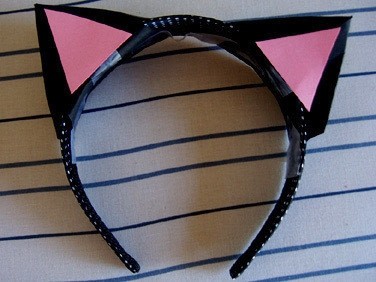
I wanted to make ears, but didn't want flat cheep looking triangles. These were light weight, durable, and most people did not notice they were paper.
Tags
-
 Nicky P. favorited 3d Paper Cat Ears
25 Apr 06:23
Nicky P. favorited 3d Paper Cat Ears
25 Apr 06:23
-
 Leia B. favorited 3d Paper Cat Ears
20 Mar 01:42
Leia B. favorited 3d Paper Cat Ears
20 Mar 01:42
-
 Brittany F. favorited 3d Paper Cat Ears
31 Mar 11:34
Brittany F. favorited 3d Paper Cat Ears
31 Mar 11:34
-
 Haught Tea entered their project 3d Paper Cat Ears to Doxie Flip Contest
19 May 22:18
Haught Tea entered their project 3d Paper Cat Ears to Doxie Flip Contest
19 May 22:18
-
Haught Tea entered their project 3d Paper Cat Ears to Kit-Cat Clock
25 May 05:23
-
 Step 1
Cut your two rectangles. I did the pictures in white to make it easier to see. You pick what ever color cat you want to be. You will be repeating steps 2-8 for each ear.
-
 Step 2
Fold your rectangle long ways (hot dog style) and open it.
-
 Step 3
Fold the corners on one end to the center line.
-
 Step 4
Place a piece of tape on the inside to hold the corners together.
-
 Step 5
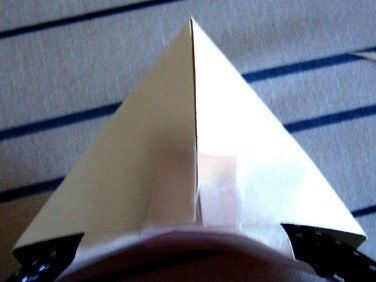
Trim the bottom rectangle from the edges of the folded corners to the center line forming a diamond.
-
 Step 6
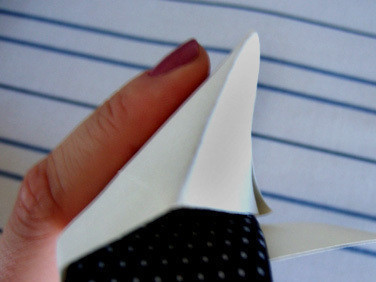
Push in the sides of the folded corners to pop out the back crease. Wrap the bottom flap around the head band about where you plan the final ear to set. Crease a fold where paper wraps around the edge of the band. To prevent gaps you want the front of the ear to be as flush with the front edge of the band as possible.
-
 Step 7
Tuck the loose end inside the ear and tape the edge down. At this point the ear is free floating.
-
 Step 8
So decide where you think it should be positioned (you might want to finish both ears to this point so you can adjust them in relation to each other. Then tape them into place.
Cut your pink inner ear inserts (just eyeball it) and tape them in place with double stick or a tape loop. This helps hide the crease and the tape on the front of the ear while also adding dimension and detail.
-
Step 9
Thats it! You can rock these babies all day and forget they are there. They are light and durable. If you want to up the details with paint, glue on fur or spray flocking you can really dress them up.


awesome greate tute you've made, thank you , i love your ears;-D