


About
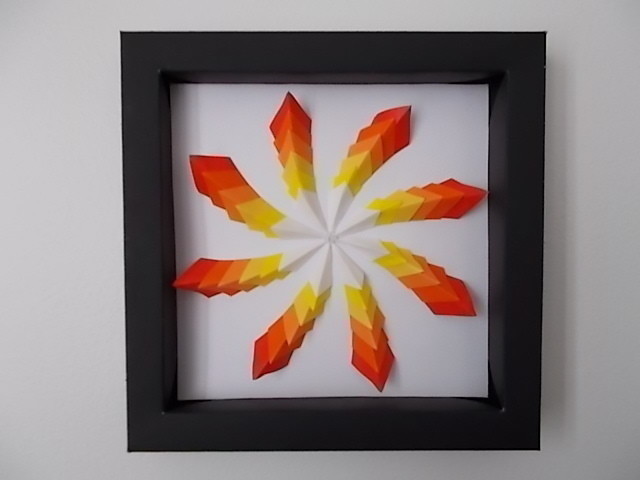
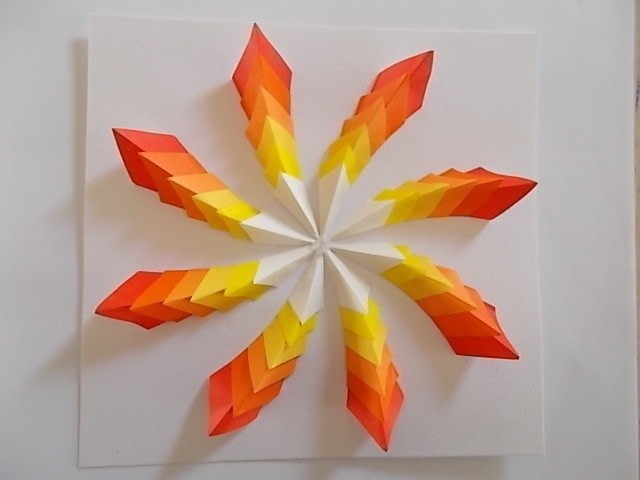
Meet my fire flower.
Inspired by Fibonacci spirals, I came up with some paper art (I'm calling this one Fire Flower for apparent reasons) using minimal origami. I folded some paper and experimented with units before deciding that I liked this design best. It was simple yet beautiful--anyone's favorite combo, I'm sure.
Tags
-
 Ashley Jean favorited 3 D Geometric Art
22 Mar 05:02
Ashley Jean favorited 3 D Geometric Art
22 Mar 05:02
-
 Adrienne S. added 3 D Geometric Art to Paper Flowers And Projects
29 Apr 21:45
Adrienne S. added 3 D Geometric Art to Paper Flowers And Projects
29 Apr 21:45
-
Alyssa D. favorited 3 D Geometric Art
12 Sep 16:45
-
 TheSewingMaven favorited 3 D Geometric Art
29 Apr 02:11
TheSewingMaven favorited 3 D Geometric Art
29 Apr 02:11
-
 Carrie A. added 3 D Geometric Art to Crafty
07 Mar 23:41
Carrie A. added 3 D Geometric Art to Crafty
07 Mar 23:41
-
Carrie A. favorited 3 D Geometric Art
07 Mar 23:41
-
 Pimke added 3 D Geometric Art to Origami
26 Jan 12:56
Pimke added 3 D Geometric Art to Origami
26 Jan 12:56
-
JacaLynn B. favorited 3 D Geometric Art
25 Jan 16:15
-
Alexx M. favorited 3 D Geometric Art
25 Dec 01:21
-
 Jessi D. added 3 D Geometric Art to Neat
23 Dec 00:15
Jessi D. added 3 D Geometric Art to Neat
23 Dec 00:15
You Will Need
-
 Step 1
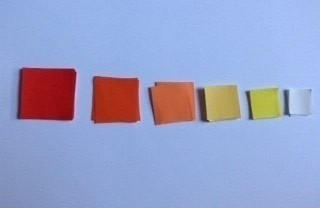
For the Fire Flower, you'll need to cut out squares of different sizes. The side lengths of my sizes were 1.875 cm, 2.175 cm, 2.475 cm, 2.775 cm, 3.075 cm, and 3.375 cm. (The decimal places are because I had a few 1.875 squares already, and I just wanted each unit to be 3 millimeters bigger each size up.) The corresponding colors are progressively darker for larger sizes (so red is the largest size, white is the smallest).
Use your ruler and pencil to draw squares for those sizes (for decimal places, eyeballing your ruler is fine) and you should end up with 8 squares per size, 48 squares total.
-
 Step 2
This project involves folding modular units, but trust me; they're super simple, so no need to worry if origami is far from your forte.
Start with your square of origami paper.
-
 Step 3
Fold along one of the diagonals.
-
 Step 4
Unfold that.
-
 Step 5
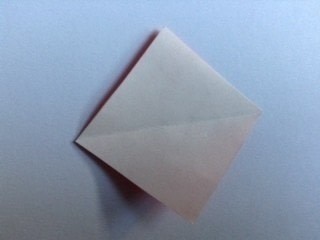
Fold one side to the middle diagonal crease.
-
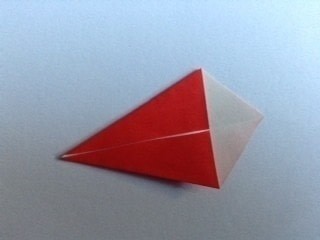
 Step 6
Fold the other side to the middle diagonal crease. That's one finished unit, so repeat these steps with all your squares of origami paper. Again, you should end up with 48 units, 8 per color.
-
 Step 7
On your background paper, draw four long lines that intersect to make eight congruent angles (so now you have something that looks like an asterisk-type of star but with eight points). Line up your units in groups that look like arrows of fire and taking one of the arrow groups, spread it along one of the lines so that the arrow points to the intersection.
-
 Step 8
Then, using a finger, gently push the line of units upward so that they make a slight, graceful curve.
-
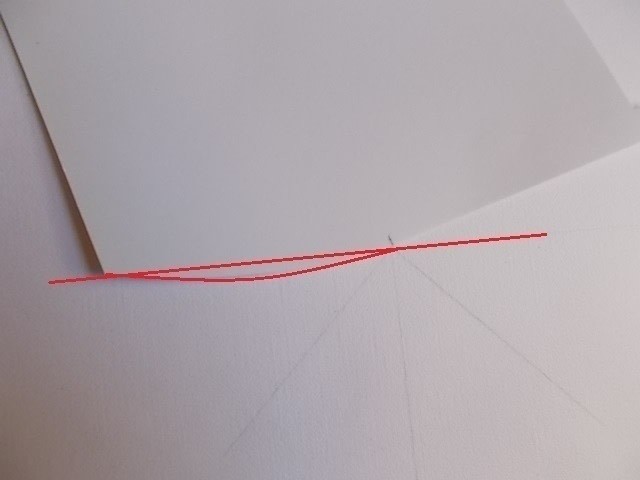
 Step 9
Grab your index card, and mark the distance from one unit to the next. This is your measure for how far apart your units will be as you glue them to the background paper. Cut the index card so that marked measurement sticks out (see step 11 for what I mean).
-
 Step 10
On the other side of the index card, cut something that's approximately like the curve of your units. Just cut something by eye, check it against the real curve, and keep cutting and checking until your index card's curve fits the units' curve.
-
 Step 11
Here's what your index card should look like.
-
 Step 12
Now line up the curve with each of the eight lines coming from the intersection and lightly trace the curve.
-
 Step 13
These will be your guidelines as you glue down the units. Erase the straight lines afterward.
-
 Step 14
To glue down your units, squeeze some glue onto a scrap piece of paper (I just cut off a piece of plastic from something.) and run the edge of a unit along the glue before pressing it down on paper.
-
 Step 15
Start with the smallest unit. Run the two edges along the glue and press the unit down so that one edge lies along the pencil mark of a curve, pointing toward the center intersection of the lines.
-
 Step 16
Take the second smallest unit and run the two edges along the glue too. Insert the point into the smallest unit and line up the edge with the pencil curved line. Use your index card to make sure that the units are correctly spaced.
-
 Step 17
Take the next units and repeat until you're finished with one "petal" of the Fire Flower. Repeat to complete the whole flower.
-
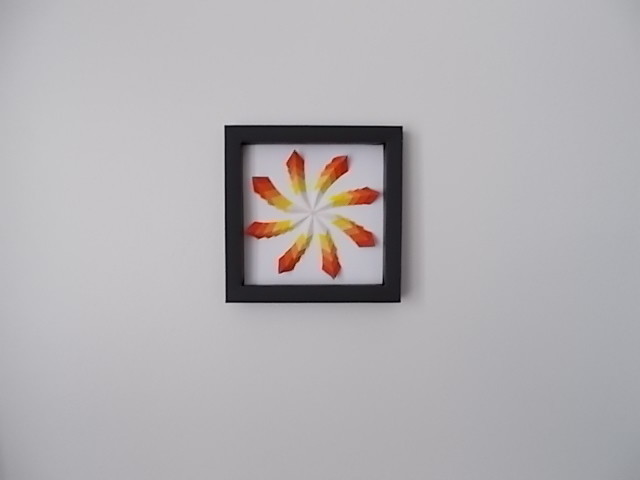
 Step 18
Ta da! Here's your fire flower! (no power up like Mario though..)
The center of my flower looked a bit off due to my clumsy first attempts so I put some glue in the middle, dropped 5 small seed beads in the glue, and then added a final dollop of glue on top to seal the beads.
-
Step 19
Trim the edges of your background paper if the artwork is not properly centered. Grab another piece of paper and draw a square or rectangle or circle (etc) and cut out the shape. Then put that makeshift stencil on top of your artwork, trace the shape lightly in pencil, and then cut out your artwork with the shape you want.
-
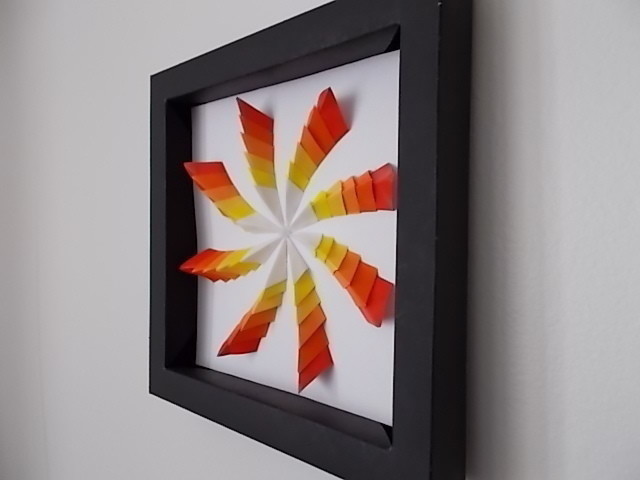
 Step 20
I like to frame my work so I used a poster board (22" by 28"). You don't have to do this though, of course.
Here's the rough MS Paint image, and here's a list of the dimensions:
--white square's dimensions = artwork's dimension = 13.8cm X 13.8cm
--black square's dimensions: 16.8cm X 16.8cm (so frame will provide a 1.5cm border)
--green rectangles' dimensions: 2cm X 16.8cm (The 2cm part determines the height of the frame so my frame will be about -- actually a little less than -- 1cm taller than the artwork.)
--white tabs'/trapezoids' height = green rectangles' height = 2cm
--pink trapezoids' height = less than frame's border = 1.25cm
--so blue square's dimensions = 5.8cm
--yellow tabs' height: 2.5cm (any measurement here is fine as long as the tab ends up big enough for gluing later)
--blue rectangles' dimensions: 8.4cm X 8.4cm (I got 8.4cm from dividing the length of the black square in half -- 16.8cm/2.) -
 Step 21
Draw the pattern on my poster board, using those measurements as guidance, before cutting it out.
HELPFUL TIP: for folding and creasing thick paper, it's easier to lightly score the paper (drag the blade of your scissors or use a knife on the line) before folding along a line.
-
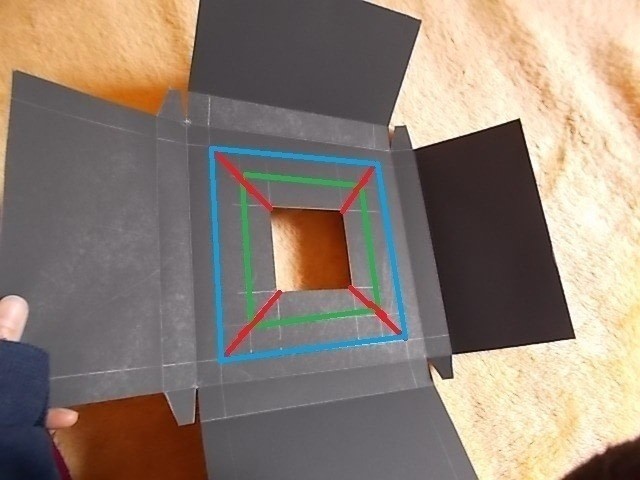
 Step 22
Make valley folds (fold inward) along those blue lines. Then cut out the center-most square (light blue from MS Paint image)
-
 Step 23
Fold again; blue = valley fold, red = cut, green = mountain fold (fold outward).
-
 Step 24
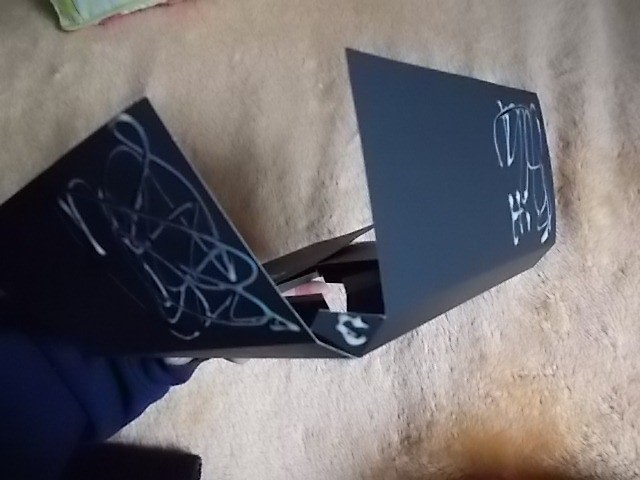
Here's what you should have: back.
-
 Step 25
Here's what you should have: front.
-
 Step 26
Then put glue on the bottom half of one of the blue rectangles of MS Paint image and the adjacent small yellow trapezoid.
-
 Step 27
Here's a tricky part: put glue here... (wait for it) (next part is focused on the bottom right intersection in this picture)
-
 Step 28
... And those places too (always bottom half of the blue rectangles, and all remaining yellow trapezoids).
-
 Step 29
Fold the paper down like so in a pinwheel formation.
-
 Step 30
You should now have this after much fussing ad tugging.
-
 Step 31
If any parts aren't glued securely, take the time to apply glue and/or trim corners that stick out.
-
 Step 32
Insert your artwork in the front. This might take a bit of coaxing, and if the artwork really isn't fitting, trim the edges a bit.
-
 Step 33
Et voilà! New art for decorating a room or presenting as a gift.
Spin-off: be creative and invent new patterns; let your creativity flow into a sketch--and bring that sketch to life.
I hope your enjoyed this tutorial! Feel free to comment below with any questions.


Comments

