
Features


 By
Lori V.
By
Lori V.

Learn how-to sew a basic machine applique with Lori from Girls In The Garden and then use your new skill to make her envelope back pillow.
-
 Step 1
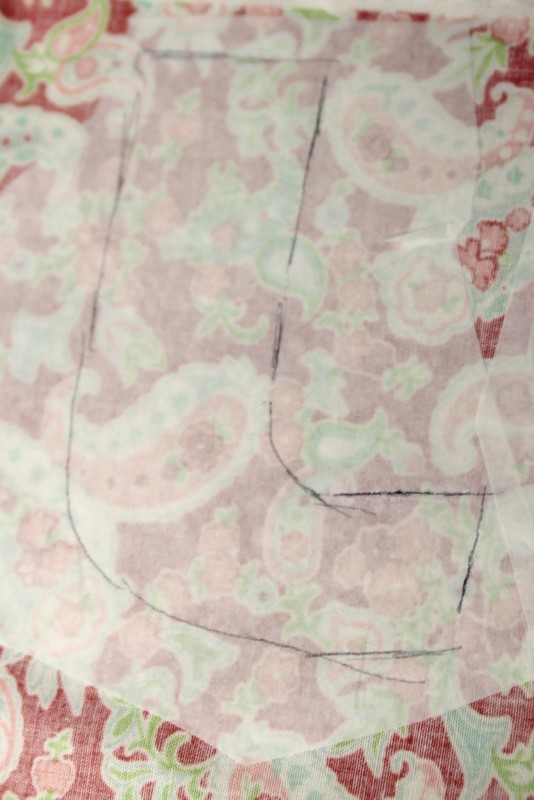
Head to your computer and create letters in your document program. In this example, I am using the word "JOY" but you could use any letters or words. The size of letters depends on what you are using them for (example - smaller for a hand towel or potholder, larger for a pillow) After creating your letters, you will need to flip them or rotate them 180 degrees or mirror them. Whichever term you want to use and if you are not sure how to do this, just search "mirror image" in the software you are using. Print out these letters making sure they are mirrored. I did mirror this "Y", there were just slight differences. In this instance I did not mirror the "O", there just were not any differences
-
 Step 2
Place the printed letter under the paper-backed fusible web, making sure the paper side is up on the fusible web. Trace the letter. Cut out around the letter.
-
 Step 3
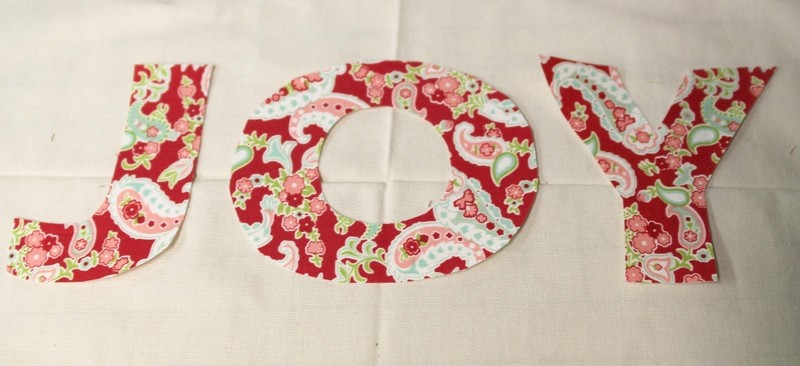
Following the manufacturer's directions fuse the paper-backed fusible web to the wrong side of the fabric. Do this for all your letters, then cut out the letters along the traced line. Also, peel off the paper backing.
-
 Step 4
Cut the background fabric. For pillows, I like to measure the pillow form and add 1/2". This pillow measures 13x24 so I cut the background fabric 13-1/2 x 24-1/2. Fold the background fabric in half each direction and press on the folds. This pressed line helps to line up your letters.
-
 Step 5
Arrange the letters on the background fabric. See why we mirrored the letters? Now it does read JOY!
-
 Step 6
I like to measure all four sides to make sure the design is centered. PIn the letters in place and then press the fusible web to the background fabric. Do this following the paper-backed fusible's directions.
-
 Step 7
There are some scraps of fabric with the paper-backed fusible web (after you cut out the letters). Fuse this to some scraps of background fabric. These scraps are perfect for practice and trying out different decorative stitches and thread colors.
-
 Step 8
Stitch around all the letters, remember to take it slow especially around the corners. A great hint, is to watch the presser foot not the needle. Also, I like to use an open-toe foot for machine applique, it is a great presser foot to see what you are sewing. A clear foot would work nicely, too.
-
 Step 9
Trim threads and press, you have completed beautiful applique.


Got the hang of this technique?
Put your new skill to the test with this tutorial:
Is there a certain technique you'd love to learn or one that you could teach us? Send us a message!
Share
Follow

