


About
PLASTIC BAG YARN CHRISTMAS TREE - RECYCLED HOLIDAY DECORATIONS
This past weekend, I had the opportunity to participate at an eco-holiday craft workshop for San Jose's Our City Forest. I brought along several project ideas for decorating without purchasing anything new, and my plastic bag yarn Christmas tree was a big hit!
Tags
-
 witterings favorited Plastic Bag Yarn Christmas Tree
13 May 10:44
witterings favorited Plastic Bag Yarn Christmas Tree
13 May 10:44
-
 Sue S. favorited Plastic Bag Yarn Christmas Tree
24 Jul 10:13
Sue S. favorited Plastic Bag Yarn Christmas Tree
24 Jul 10:13
-
 rachel.anne.gammon favorited Plastic Bag Yarn Christmas Tree
13 Dec 16:10
rachel.anne.gammon favorited Plastic Bag Yarn Christmas Tree
13 Dec 16:10
-
 Luigi M. favorited Plastic Bag Yarn Christmas Tree
09 Oct 20:02
Luigi M. favorited Plastic Bag Yarn Christmas Tree
09 Oct 20:02
-
 Sheri O. added Plastic Bag Yarn Christmas Tree to To-make list
01 Oct 14:10
Sheri O. added Plastic Bag Yarn Christmas Tree to To-make list
01 Oct 14:10
-
Sheri O. favorited Plastic Bag Yarn Christmas Tree
18 Aug 02:12
-
 Step 1
To begin, find a piece of thin cardboard or cardstock. Cereal boxes work well, old poster board from a past school project is perfect for larger trees, or anything flexible yet firm that you can roll up into a cone shape will work. I'm using a piece of used bristol paper from a scrapped drawing assignment last semester.
Find the center point of your edge, and roll the edges of the paper in on themselves. You'll have to cut the bottom to be flat, so don't worry if it's not evened out.
Once you're happy with the shape of your cone, hot glue the edges of the outside down all the way around. Let the glue cool, then trim the bottom of your cone so it sits flat.
-
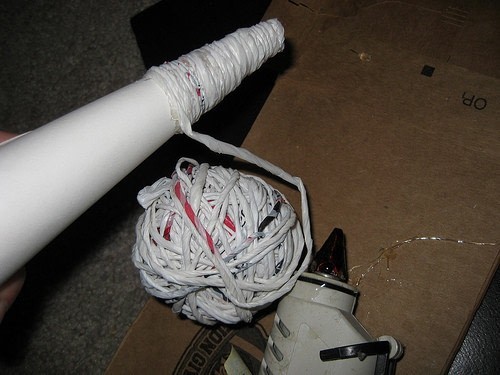
 Step 2
Continue wrapping and gluing plastic bag yarn all the way down the cone. When you get near the bottom and the last layer looks even across, trim excess yarn and cardstock.
-
 Step 3
Starting at the top, glue the end of your plastic yarn into the hole at the tip of the cone. Laying down a line of glue all the way around the cone tip, wrap the plastic yarn carefully into the glue. Once you get all the way around, continue wrapping the yarn down the cone in a spiral fashion, keeping the yarn tight to the round above it. Add more glue as necessary.
-
 Step 4
Now it's time to decorate our tree. Over an area that will collect excess glitter or hot glue, such as a box or a large piece of paper, apply a dot of hot glue on the plastic yarn tree. Low temperature hot glue works best here, but if you just have a high temperature glue gun, be careful that the hot glue doesn't move around on your tree much.
-
 Step 5
Holding the tree over the box or paper, and while the glue dot is still hot, cover the hot glue in glitter. Allow glue to cool completely, then shake off excess glitter. Wait for each hot-glue-and-glitter ornament to be completely cool before applying the next one.
If necessary, dust excess glitter off plastic bag yarn with a soft dry paint brush.
-
 Step 6
Finally, decorate the top of your tree. I used two circles punched from a recycled foil-lined envelope, which I glued back-to-back and finished with a confetti star glued to each side. I cut a tiny slit on both sides of the cone tip, added a little hot glue, and stuck my star medallion to the top.
-
 Step 7
Here's the tree on my craft table at Our City Forest's Eco-Holiday Craft workshop. You can see people making recycled ornaments in the background. Everything was a big hit!
Here's to great decorations, creating less waste, and a happy holiday to you and yours. Cheers! <3


Very cool idea, though! I've been making a ton of plarn lately.