


About
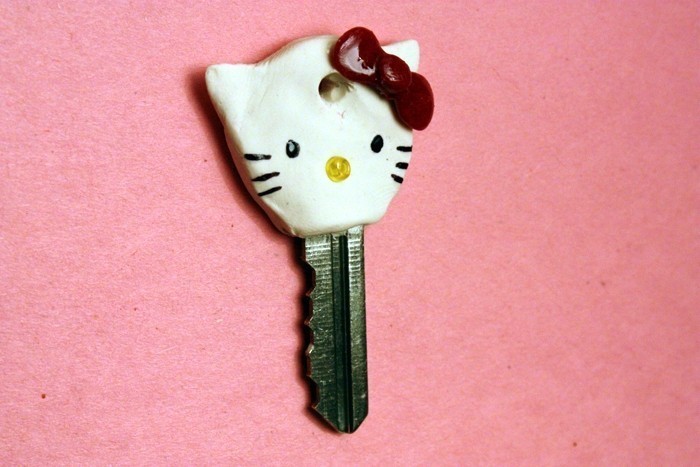
Mine is Hello Kitty, but yours can be anything!
I saw <a href="http://www.cutoutandkeep.net/projects/fimo-covered-key">THIS</a> "Fimo Covered Key" and wanted to make my own, even though I had lots of questions. Being curious, I tried it out on a spare key and wrote a tutorial along the way!
---
NOTE: As far as I know, these are permanent. Don't do this if you aren't going to like it for however long you have your key - or make sure you get copies.
Tags
-
 Cindy L. added Key Cap Tutorial to Music
08 Aug 21:32
Cindy L. added Key Cap Tutorial to Music
08 Aug 21:32
-
Cindy L. favorited Key Cap Tutorial
08 Aug 21:32
-
 Kinhime Dragon added Key Cap Tutorial to alter
24 Jul 14:21
Kinhime Dragon added Key Cap Tutorial to alter
24 Jul 14:21
-
 Prisha K. favorited Key Cap Tutorial
16 Apr 13:02
Prisha K. favorited Key Cap Tutorial
16 Apr 13:02
-
Aurelie L. added Key Cap Tutorial to Idées
14 Mar 20:31
-
 Anna J. favorited Key Cap Tutorial
16 Feb 19:44
Anna J. favorited Key Cap Tutorial
16 Feb 19:44
-
 cherylmjacob favorited Key Cap Tutorial
23 Dec 06:25
cherylmjacob favorited Key Cap Tutorial
23 Dec 06:25
-
602Cyn added Key Cap Tutorial to filmo
11 Nov 13:29
-
Kinhime Dragon added Key Cap Tutorial to things to make
13 Oct 00:23
-
tara P. favorited Key Cap Tutorial
11 Aug 22:49
You Will Need
-
 Step 1
Materials: Polymer clay, metal key, pin, and anything else you want to use to decorate it (such as gloss, markers, glass beads, glitter, etc).
My key was a Hello Kitty one. Yours can be anything you want, from radios to burgers to planets. The possibilities are endless!
-
 Step 2
Start by covering the top part of the key in polymer clay. You can use any color or variety of colors, just make sure you don't go past the big circle part of the key. Otherwise, your key won't fit into the door.
Your fingerprints will probably be all over the clay. To help get rid of them, wet your fingers in fresh water and gently smooth away the wrinkles.
-
 Step 3
Decorate as desired. Note, if using beads make sure they are glass. Plastic beads will melt in the oven and may result in toxic fumes.
Make sure you poke a hole with the pin and wiggle it around until a big enough hole forms. (NOTE: This hole was a bit too small for my keyring and I had trouble getting it on/moving it. I suggest a bigger hole OR putting in a jumpring/metal loop so you can put it on a keychain.)
-
 Step 4
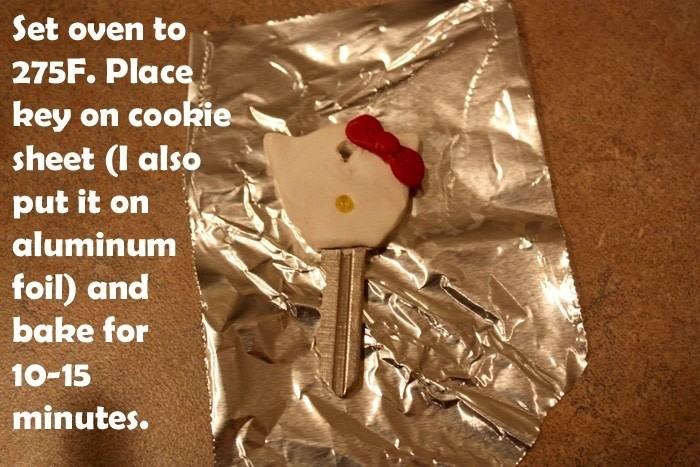
Heat oven to 275 degrees Fahrenheit. Place your key onto a cookie sheet (not shown; I also place mine on aluminum foil) and bake for 10-15 minutes. Take out and let cool completely before continuing.
-
 Step 5
Finish decorating your key. I drew on the eyes and whiskers with a permanent marker and then glossed various parts with Sculpey varnish.
Then, you're done! Enjoy your new key cap!


Thanks for the tutorial <33