


About
Sew a Babushka plushie.
Although this little Babushka is shown on her own, she's one of a traditional family of Russian nesting dolls. When you've made her, you can try scaling the pattern up or down on a photocopier to give her a family of sisters. Vary the decoration, too, if you like - but don't overdo it, or you will spoil her naive fold-art air.
Tags
-
 Elena B. added Babushka Plushie to doll plushies
30 Mar 23:43
Elena B. added Babushka Plushie to doll plushies
30 Mar 23:43
-
Elena B. added Babushka Plushie to handstiching
30 Mar 23:43
-
Elena B. favorited Babushka Plushie
30 Mar 23:42
-
 Sarah Sylvia S. favorited Babushka Plushie
26 Jul 00:35
Sarah Sylvia S. favorited Babushka Plushie
26 Jul 00:35
-
 Jen S. added Babushka Plushie to stuff for me
18 Jul 19:32
Jen S. added Babushka Plushie to stuff for me
18 Jul 19:32
-
 Alvin Y. favorited Babushka Plushie
23 Aug 11:18
Alvin Y. favorited Babushka Plushie
23 Aug 11:18
-
 Harjot S. favorited Babushka Plushie
18 Aug 11:16
Harjot S. favorited Babushka Plushie
18 Aug 11:16
-
 Jerry M. favorited Babushka Plushie
17 Aug 10:26
Jerry M. favorited Babushka Plushie
17 Aug 10:26
-
 Carlsi M. favorited Babushka Plushie
29 Jul 05:23
Carlsi M. favorited Babushka Plushie
29 Jul 05:23
-
 Neko-San K. favorited Babushka Plushie
31 May 21:38
Neko-San K. favorited Babushka Plushie
31 May 21:38
-
 Step 1
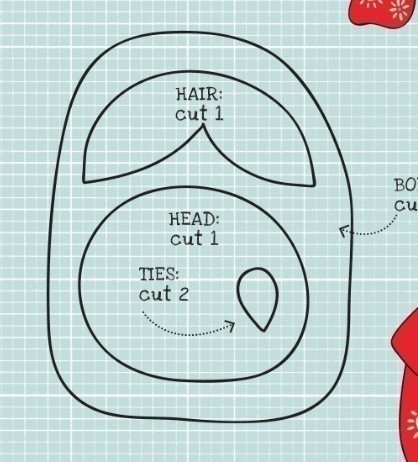
Trace off the pattern pieces onto tracing paper, and cut out to make templates. Cut out 2 pieces each for the body and for the tiny headscarf ties from the fuchsia felt, 1 piece for the face from the white felt, and 1 for the hair from the brown felt. Carefully position the hair at the top of the face piece and attach in place with a small amount of craft glue.
-
 Step 2
Thread an embroidery needle with two strands of black embroidery floss and carefully hand-stitch the eyes and nose, using single straight stitches and checking against the photograph to get the positioning just right.
-
 Step 3
Now thread an embroidery needle with two strands of red embroidery floss, and make Babushka's mouth. Hand-stitch tiny straight stitches horizontally and vertically, to make a rosebud shaped mouth. Check the photograph to get the expression right.
-
 Step 4
Glue the head and hair into position on one of the body pieces, using a sparing amount of craft glue. Overstitch around the edges of the hair using an embroidery needle threaded with a single strand of brown embroidery floss, and around the edges of face with a needle threaded with a single strand of white floss. Fasten off the threads on the wrong side of the body piece.
-
 Step 5
Use a tiny dot of craft glue to attach the two little scarf ties in position. Thread an embroidery needle with two strands of fuchsia embroidery floss, and backstitch a line across the body to give the headscarf an "edge", looking at the photograph to position in correctly.
-
 Step 6
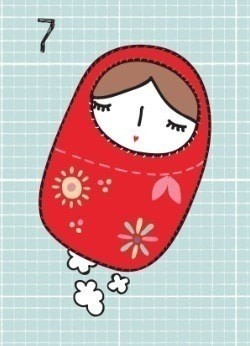
Thread a beading needle with one strand of fuchsia embroidery floss, and sew on the sequins and beads for decoration. Follow the arrangement shown in the photograph or make your own design, but remember if you do that little groups usually look better than single scatter beads. Attach the sequins with a central bead/ Fasten the thread on the wrong side of the felt.
-
 Step 7
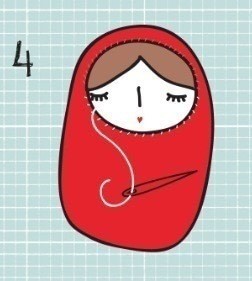
Align the second felt body piece with the first. Thread an embroidery needle with one strand of fuchsia embroidery floss, and use a small overstitch to sew the pieces together. Leave a gap at the base of the doll (don't fasten off the thread), and fill her with a tiny amount of toy stuffing, using a toothpick or matchstick to help you get the padding even. Don't use too much filling: she should be lightly padded, not stuffed. When the padding is distributed, stitch the gap closed.
-
 Step 8
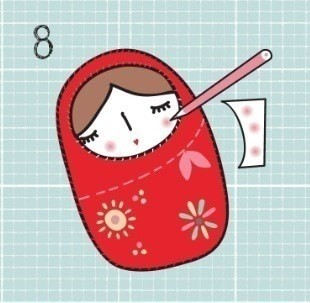
Finally, give Babushka a light flush on the cheeks with a tiny touch of red pencil. Practice on an offcut of felt first to ensure that you give her just the right amount of color.


Versions
See all 10 »


Comments


